7Service
70 Keysight 85024A User’s and Service Guide
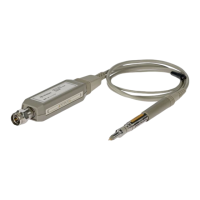
Cable/Probe wand replacement
Tools required:
– 10 mm open-end wrench
– 9/16 inch open-end wrench
– 1/8 inch-wide flatblade screwdriver
– Phillips No. 0 or positive screwdriver
–Long-nose pliers
Special tool:
– Spanner/wrench (part number 85024-20041)?
This special tool is pictured in Figure 7-10, “Special spanner/wrench tool and
area of use” on page 72.
Refer to Figure 7-6.
1 Remove the nut with a 10 mm open-end wrench.
2 Remove the nose assembly and set aside.
Refer to Figure 7-7.
3 Remove the amplifier microcircuit. Remove the spring clip and elastic
conductive strip. Place the microcircuit in a static-safe place. It will be needed
later in this procedure.
4 Remove the regulator housing covers by performing the procedure in
“Removing the plastic regulator housing covers” on page 67.
Refer to Figure 7-9.
5 Remove the connector body with the 9/16 inch wrench.
The amplifier microcircuit is very sensitive to static electricity. Exercise full
anti-static precautions and use great care when performing the procedure.