LAUNCH
X-431 PRO5 User Manual
60
Step 1: Connect the printer:
Tap
Scan
to start scanning and select the desired printer hotspot named with X-431PRINTER-XXXX (XXXX
stands for 4 characters), and then tap
Connect
to enter Step 2.
Step 2: Join the Wi-Fi printer into LAN:
Tap
Scan
to select the desired local Wi-Fi network from the list, and type in the security password (If it is an
open network, password is not required), and then tap
Confirm
.
3. Once the Wi-Fi network of the printer is connected and the printer is found, tap
Printing test
to test the printing.
Now the Wi-Fi printer is ready for printing.
If the printer is not found, please reset the printer to default factory settings (refer to Step 2 for details) and check
whether the current device and the printer are on the same LAN.
B. If you have configured the Wi-Fi printer to the LAN:
2. Tap
Connect to Printer
:
a). If the local network remains as it is, tap
Test Print
directly to test the printing.
b). If the local network changes, you have to reset the Wi-Fi printer.
For other Wi-Fi printers
,
Before printing, make sure the following conditions are met:
• The Wi-Fi printer is powered on and working normally.
• The print service plug-in associated with the printer is already installed on the tablet (Go to Google Play or use
the Browser to download and install it).
Follow the steps below to proceed:
1. Set the default printer as
System
.
2. Go to
Settings -> Network & Internet -> WLAN
, set the WLAN switch to Off.
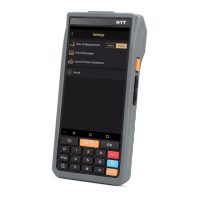
3. On the report details page, tap .
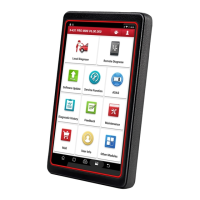
4. Touch next to
Select a printer
on the upper left corner of the screen.