Page 62
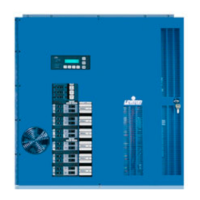
To select a dimming circuit to modify:
1 Press the UP button until the LCD display shows Menu Setup.
2 Press the Select/Save button.
The LCD display shows
Enter Setup Code = 999
.
3 Press the UP and DOWN buttons to change the 999 to the
actual setup code.
4 Press the Select/Save button.
The LCD display shows
Setup Menu Setup Modules?
.
5 Press the Select/Save button.
The LCD display shows
Setup Mod 01A
.
6 Press the UP and DOWN buttons to change the dimming circuit
to be modified (01A, 01B, 02A, etc.).
7 Press the Select/Save button to select the dimming circuit.
The flashing moves from the upper number to the lower
description.
To modify the channel:
1 Press the UP button twice to display the Luma-Net address,
or press the UP button three times to display the DMX 512 address.
2 Press the Select/Save button.
The flashing in the lower part of the display moves from the
description to the number.
3 Press the UP and DOWN buttons to change the flashing number
to the desired new address.
4 Press the Select/Save button to store the new address.
The flashing returns to the description.
5 Push the Cancel/Clear button five times to return to the top level menu.
Verifying Assignment of Mark VII Analog Output Signal
1 Enter Set-up
2 Enter Set-up Modules
3 Select Modules and Circuits
4 Page once to Analog Out = X
Where X (1 - 8) is the analog out (auto) assigned. It can now be changed if
desired.
Step 13G: Daylight Harvesting/Photocells
Background-Daylighting:
In a daylight harvesting application, the goal is to maintain a consistent lighting
level within the space, regardless of the source of light which could be either
LUMANET ADD=0001
DMX 512 ADD=001