Rad-57 Signal Extraction Pulse CO-Oximeter Operator’s Manual 2-5
2
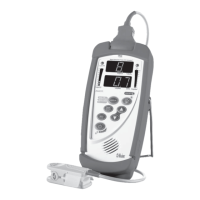
system description
CONTROL / INDICATOR DESCRIPTION
6
Display Button
Pressing this button will display the numeric SpMet value
in place of the pulse rate numeric value until the SpMet
button is pressed again.
7
Mode / Enter Button
Used to enter the setup menus and to select/activate
certain entries within the menu/setup system.
8
Next Button
Used within the menu/setup system to move through setup
options. Not active during normal patient monitoring.
9
Power On / Off
Press to turn the device on.
Press-and-hold for 2 seconds to turn the device off.
10
Battery Level Indicator
Four LED’s indicate the status of the battery. When the
final indicator begins flashing, replace the batteries.
11
Visual Alarm Indicator
Illuminates when any alarm condition exists. This indicator
may not be turned-off or otherwise over-ridden.
12
%SpO
2
Indicator
Indicator above label will illuminate to provide an additional
visual indication of the value currently being displayed.
13
PI
Perfusion Index, or PI, is a relative assessment of the
perfusion at the monitoring site. PI is displayed on a
10 segment LED bar, ranging from < .1% (very weak
perfusion) to >5% (strong perfusion). The highest LED will
remain lit continuously to allow a PI level to be viewed. The
Perfusion Index is the ratio of the AC (pulsatile) to DC (non-
pulsatile) components of the IR (Infrared) signal where the
AC and DC components correspond to the pulsatile and
non-pulsatile amounts of blood, respectively.
14
Low SIQ
Flashes to indicate low SpO
2
Signal IQ. Refer to Section
4, Low Signal IQ.
15
Alarm Silenced Indicator
Flashes to indicate the alarm is temporarily silenced.
A solid illuminated light indicates that the alarms are
permanently silenced until the power is cycled or the
alarms are enabled per Setup Menu 1 in Section 4.
16
Alarm Silence Button
Push once to temporarily silence the alarm for 120
seconds. Push a second time to return the device to
standard alarm monitoring.
17
Up button
Down button
During saturation monitoring, use these buttons to adjust
the volume of the pulse beep tone.
Within the menu/setup system, these buttons are used to
select values within each menu option.
18
Speaker
Provides audible indication of alarm conditions, pulse tone
and feedback for key-presses. Ensure the speaker is not
covered or the device is placed face-down on bedding or
other sound absorbing surface.