Do you have a question about the McHale Issue 5 and is the answer not in the manual?
Specifies the intended agricultural applications for the baler/wrapper machine.
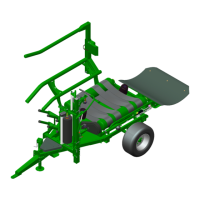
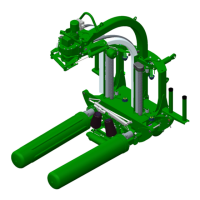
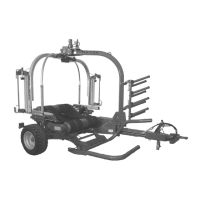
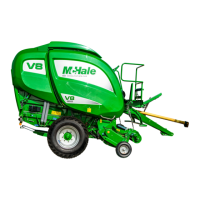
Identifies key components of the baler/wrapper from the front.
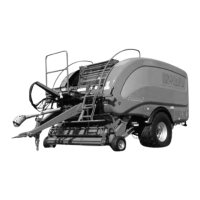
Identifies key components of the baler/wrapper from the rear.
Provides overall dimensions, weight, and speed limits of the machine.
Lists required tractor horsepower, hitch type, PTO, and hydraulic specs.
Details bale chamber size, pick-up width, net wrap, and film specs.
Lists tyre details, field and road pressures, and part numbers.
Describes optional features like drawbar hitch, brakes, and side-tip.
Explains the importance of understanding warning, caution, and note symbols used in the manual.
Emphasizes reading manual, understanding decals, and proper training for safe operation.
Advises secure storage of attachments to prevent falling and keeping areas clear.
Lists essential PPE like safety glasses, ear muffs, boots, gloves, and tight clothing.
Stresses the need for readily available first aid, fire extinguisher, and emergency numbers.
Warns about entanglement risks with PTO shafts and moving parts; advises stopping engine.
Outlines age-related and general requirements for machine operators.
Provides critical warnings about clearing blockages and standing clear during operation.
Offers a guideline procedure for responding to a fire situation.
Highlights common causes of accidents and importance of following manual and safety rules.
Covers compliance with EMC directive and checks for electronic component wear.
Details maximum pressure, safe handling of pressurized oil, hose checks, and qualified personnel.
Mentions European directive on noise control and factors affecting noise levels.
Advises awareness of crop flammability, keeping machine clean, and having a fire extinguisher.
Explains safety precautions for maintenance, opening covers, and handling knives.
Shows diagrams indicating the placement of safety decals on the machine.
Explains the meaning and purpose of various safety decals found on the machine.
Details the functions and operation of the hydraulic control valve levers.
Explains the information provided on the machine's serial number identification plate.
Provides instructions and warnings for safely lifting the machine using chains or straps.
Outlines procedures and safety precautions for safely jacking up the machine.
Specifies minimum tractor kW, hydraulic system type, and required PTO shaft.
Details how to connect the electronic control box to the tractor's power supply.
Describes the procedure for attaching the machine's drawbar to the tractor hitch.
Explains how to use provided padlock and locking device to secure the machine.
Details the function and attachment of the break-away brake rope for safety.
Provides instructions for correctly assembling and securing the PTO shaft.
Discusses tractor hydraulic systems and ideal configurations for machine operation.
Guides the user in identifying the correct hydraulic system type for tractor connection.
Explains how to select and configure the open/closed-centre valve settings.
Lists the required hydraulic and electrical connections between machine and tractor.
Details placement and connection of the electronic control box inside the tractor cab.
Instructs on connecting the 7-pin lighting plug for road travel.
Specifies recommended quality, density, elongation, strength, and width of net rolls.
Advises on protecting net rolls from damage and moisture for optimal performance.
Details cleaning procedures for rollers and applying talcum powder for netter operation.
Explains how to monitor net passage, handle alarms, and the procedure for changing net rolls.
Describes how to adjust the number of net layers applied per bale for optimal shape.
Provides instructions and warnings for correctly removing and installing chopper unit knives.
Details the methods for retaining knives and blanks in the holster.
Explains the correct method for sharpening chopper unit knives without overheating.
Describes the machine's automatic greasing and oiling system for bearings and chains.
Details daily greasing of specific points not served by the central system.
Provides instructions for draining and filling the gearbox oil, including recommended types and intervals.
Lists recommended tyre pressures for field and road use.
Explains the purpose and location of wheel chocks for securing the machine.
Details the usage of different types of drawbar and PTO shaft stands for machine support.
Guides on adjusting the drawbar to ensure the machine is level and horizontal.
Provides instructions for correctly measuring, cutting, and maintaining the PTO shaft length.
Lists and explains the functions of various buttons and displays on the control box.
Describes the working display and the two operating screen modes (Manual/Automatic).
Explains various indicators and icons displayed on the control screen for machine status.
Details how to raise/lower knives and manage knife pressure in manual and automatic modes.
Explains how the indicator helps achieve uniform bale shape by guiding tractor steering.
Describes the process of automatic baling, netting, transfer, and wrapping cycles.
Outlines how to navigate the control box menu using buttons or touchscreen.
Explains settings for Auto-tip, Wrapper, Wrapper rotations, Film sensor, and Bale shape.
Describes how to view and manage bale counts, subtotals, and lube counts.
Covers adjustments for bale diameter, density, core size, net layers, delay, and stretch.
Explains how to adjust screen backlight, volume, clock/date, and camera mode.
Describes the optional crop moisture sensor and its displayed readings.
Mentions a restricted menu for McHale engineers, requiring a PIN code.
Lists and explains various warning messages displayed on the control box and their solutions.
Provides step-by-step instructions and safety warnings for loading plastic film rolls into dispensers.
Specifies the minimum number of film layers and quality required for effective bale wrapping.
Guides on calculating the correct number of rotations based on bale size and forage conditions.
Details the automatic wrapping cycle, including bale transfer, film cutting, and tip-off procedures.
Lists available dispenser gear kits for different film stretch percentages and their part codes.
Explains the operation of the cut and hold system for plastic film, including safety warnings.
Lists essential pre-travel checks including tyres, doors, PTO, lighting, and brakes.
Provides specific instructions and warnings for transporting the machine with a side-tip attachment.
Explains the function and attachment of the break-away brake system for safety when detached.
Advises on the initial period of operation for machine bedding-in and chain tension checks.
Emphasizes the importance of proper swath width (1.5m) for optimal bale formation and crop flow.
Guides on adjusting the pick-up reel height for optimal ground contour following and tine protection.
Explains the function and adjustment of the crop roller for smooth material flow into the pick-up unit.
Details the procedure for clearing blockages using the unblock system and safety warnings.
Describes the 15/25 knife chopping system, knife removal, and recommended settings for dry material.
Explains how to select different knife configurations on machines equipped with this option.
Describes the gauge indicating pressure applied to belt tension rams for bale density.
Guides on setting bale density pressure based on crop conditions and desired firmness.
Explains the gauge indicating net tension and its relation to bale shape and net quality.
Details the use of the chamber door lock for safety during maintenance operations.
Explains the function of the tension arm lock for releasing pressure for blockages or maintenance.
Describes film roll storage and safety precautions when opening machine doors.
Provides a general overview of the machine's hydraulic and air brake systems.
Explains the operation and adjustment of the manual parking brake.
Details the connection and function of the dual-line air brake system.
Describes the connection and operation of optional hydraulic drum brakes.
Guides on checking and adjusting the machine's brake systems for optimal performance.
Covers draining air reservoir condensation and general brake system maintenance.
Provides instructions for adjusting pick-up float springs to ensure proper ground contour following.
Offers a general guide to adjusting drive chains for proper tension.
Details the procedure for adjusting the main drive chain tension.
Explains how to adjust the lower drive chain tension.
Guides on adjusting the pick-up reel tine chain.
Details the procedure for adjusting the reel drive chain.
Explains how to adjust the rotor duplex chain.
Provides instructions for aligning machine belts to ensure smooth running and tracking.
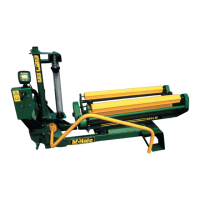
Describes the function and operation of the side-tip attachment for bale placement.
Describes the external control for raising/lowering the side-tip without entering the tractor cab.
Lists recommended daily, weekly, monthly, and yearly maintenance tasks for the machine.
Provides tables of recommended torque values for various fasteners in Nm.
Explains how to check and top up oil in the net tension pump if pressure drops.
Details procedures for cleaning, lubricating, and preparing the machine for storage.
Outlines checks and preparations required before starting the machine at the beginning of a season.
Introduces the troubleshooting section and provides contact information for further assistance.
Identifies blunt knives or high bale density as causes for increased power usage.
Suggests checking pick-up height or chain tension for issues with the slip clutch.
Lists potential causes like loose rotor chain, poor swath, or blunt knives for PTO slip clutch engagement.
Indicates blunt knives or broken roll pins in the activator arms as reasons for knife issues.
Points to hydraulic hose leaks or valve leakage as causes for low knife pressure.
Suggests raised knives or faulty hydraulic valves as causes for excessive knife pressure.
Identifies oil leaks or loose relief valves as potential causes for loss of chamber pressure.
Suggests resetting the drop floor to the working position if bale rotation is problematic.
Advises adjusting density, cleaning crop build-up, or reducing ground speed for bale quality issues.
Points to worn bill hooks, free play, or insufficient spring pressure as causes for net cutting issues.
Suggests checking for faulty hydraulic valves or low power supply to the control box.
Recommends fitting new knives, cleaning grease, or adjusting knife spring pressure for net cutting problems.
Suggests checking for faulty hydraulic valves or low power supply to the control box for drop floor issues.
Identifies air locks or system blockages as potential reasons for the greaser not working.
Certifies machine compliance with EC Machinery Directive and national laws, including description and function.
Explains the Pre-Delivery Inspection form, completed by dealers, covering machine checks and owner instructions.
Advises using the PDI form for pre-sale checks, focusing on safety and familiarizing the new owner.
Outlines the terms and conditions of the limited warranty, including coverage and exclusions.
Provides illustrated instructions for adjusting the PTO shaft length for tractor compatibility.
Offers tables for converting units of length, area, volume, mass, flow rate, pressure, speed, and torque.
| Category | Farm Equipment |
|---|---|
| Model | Issue 5 |
| Manufacturer | McHale |
| Type | Bale Wrapper |
| Power Requirement | 50 hp |
| Film Layers | 4 or 6 |
| Film Roll Capacity | 2 |