−23−
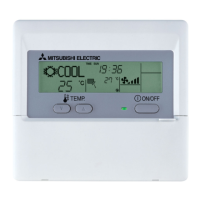
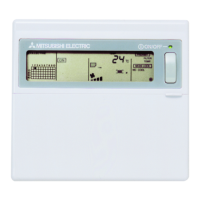
①
Run/Stop
switch
One push on the button starts
operation and another push stops
operation.
②
F1
switch ③
F2
switch
This switch starts operation that is set
in F1/F2 function setting.
④ Operation lamp
This lamp lights in green (yellow-
green) during operation. It changes to
red (orange) if any error occurs.
Operation lamp luminance can be
changed.
⑤ LCD (With backlight)
A tap on the LCD lights the backlight.
The backlight turns off automatically if
there is no operation for certain period
of time.
Lighting period of the backlight lighting
can be changed.
If the backlight is ON setting, when
the screen is tapped while the
backlight is turned off, the backlight
only is turned on. (Operations with
switches ①, ② and ③ are
excluded.)
⑥ USB port
USB connector (mini-B) allows
connecting to a personal computer.
For operating methods, refer to the
instruction manual attached to the
software for personal computer (eco-
touch remote control utility software).
Note
・ When connecting to a personal computer, do not connect simultaneously with other USB devices.
Please be sure to connect to the computer directly, without going through a hub, etc.
Touch panel system, which is operated by tapping the LCD screen with
a finger, is employed for any operations other than the ① Run/Stop,
② F1 ③ F2 switches.
⑤ LCD
(With backlight)
③ F2
switch
④ Operation lamp
⑥ USB port (mini-B)
① Run/Stop
switch② F1 switch
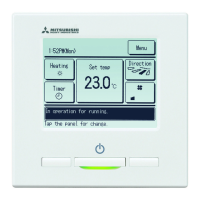
Menu
Direction
Cooling
16:14
(Mon)
Timer
Now stopping.
Set temp
F2: Energy-savingF1: High power
Names and functions of sections on the R/C (Operating section)
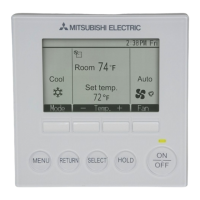
2. Functions and menu items of the remote control
① Clock, Room name display
Displays the current time and the room name.
② Icon display
Each icon is displayed when one of following settings is going on.
When the demand control is
effective.
When setting is made from the
sub R/C.
When the central control
(Optional) is running.
When the periodical inspection
is necessary.
During the ventilation
operation.
When ”lter sign” is up.
When the Permission/Prohibition
setting is made.
When the peak-cut timer is
set.
When the weekly timer is set.
③ Menu button
When setting or changing other than the following ④-⑧, tap the menu button.
Then menu items are displayed, select one and set.
④
Change operation mode button
Displays the operation mode which is selected currently. Tap this button to
change the operation mode.
⑤ Change set temp button
Displays the temperature which is set currently. Tap this button to change the
set temperature.
⑥ Change flap direction button
Displays the flap direction which is selected currently. When the 3D auto flow
operation is enabled, 3D auto display will appear. Tap this button to change the
flap direction.
⑦ Change the fan speed button
Displays the fan speed which is selected currently. Tap this button to change the fan
speed.
⑧ Timer button
Displays simplified contents of the timer which is set currently.
(When two or more timers are set, contents of the timer which will be operated
immediately after is displayed.)
Tap this button to set the timer.
⑨ Message display
Status of air conditioner operation and messages of the R/C operations etc. are
displayed.
⑩
F1
,
F2
switch function Display
Displays the function that is set for each
F1
,
F2
switch.
The function for these switches can be changed in F1/F2 function setting.
Menu
Direction
Auto
14:00 (Mon)
F1: High power F2: Energy-saving
Timer
In operation for running.
Set temp
MEETING1
*All icons are shown for the sake of explanation.
⑩
F1 , F2 switch
function display
① Clock, Room name display
④ Change operation
mode button
TOP screen
⑧ Timer button
② Icon display
③ Menu button
⑤ Change set temp
button
⑥ Change flap
direction button
⑦ Change the fan
speed button
⑨ Message display
Names and functions of sections on the R/C (Display)
 Loading...