−26−
■For allowable temperature setting ranges, refer to the range setting of set temp.
■Reference set temp
Cooling … 26 to 28°C Dry … 24 to 26°C Heating … 20 to 24°C Fan … Setting temp is not required.
■If the
Auto
is selected for the set temp, the set temp display shows “0”. Temperature can be adjusted higher or lower with using
▲
▼
buttons. Note that
Auto
is not displayed and
cannot be set when SC-SL2, SC-SL3, or SC-SL4 is connected.
■If the
Back
button is tapped without tapping the
Set
button, the selected set temp is invalidated and the display returns to the TOP screen.
Change flap direction
Menu
Direction
Cooling
16:14
(Mon)
F1: High power
Timer
Now stopping.
Set temp
F2: Energy-saving
Change flap direction
Ind. flap
Control
Back
4
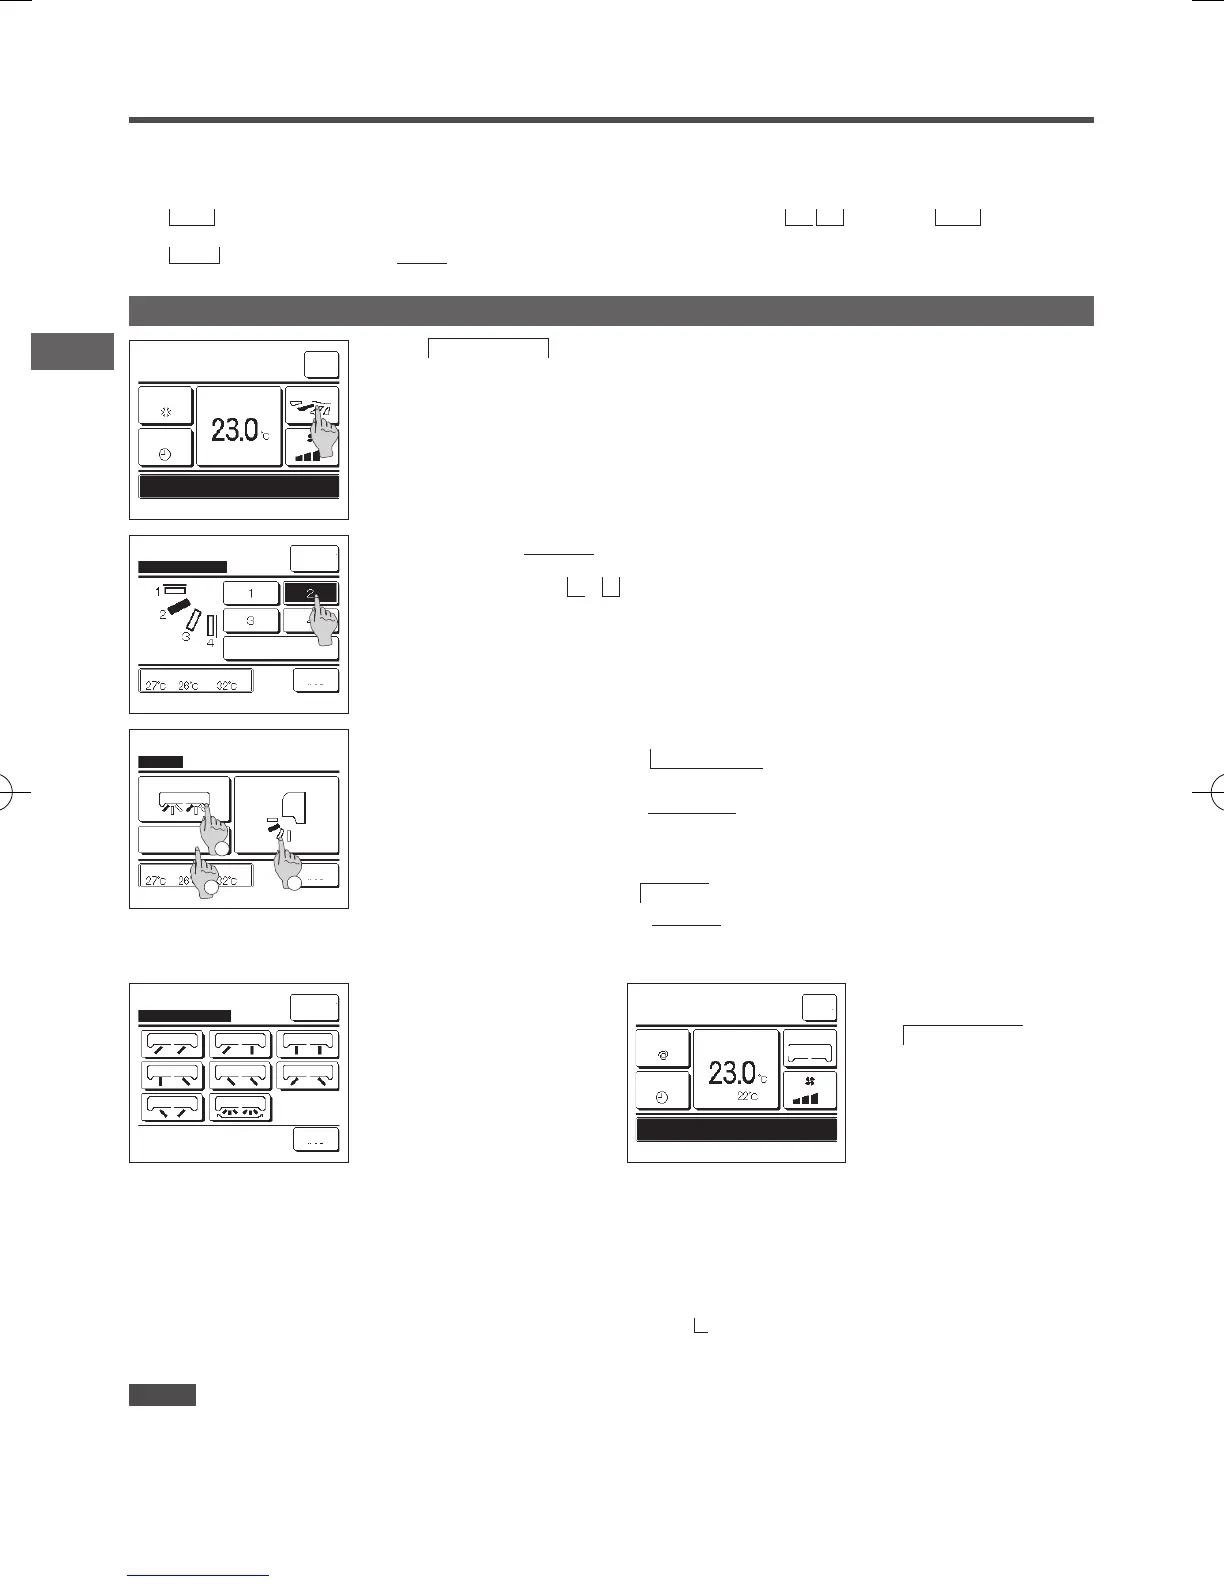
Tap the desired ap direction. After
selecting the ap direction, the display
returns to the Select ap screen. (
☞
1 )
5
When the 3D auto ow operation is
enabled, “3D AUTO” is displayed on
the
Change flap direction
button, as
shown on the left.
Menu
Direction
Auto
16:14
(Mon)
F1: High power
Timer
Now stopping.
Set temp
MEETING1
Room
3D AUTO
F2: Energy-saving
Select flap
Upper/lower flap
Back
Select the flap to change.
Left/right flap
3D AUTO
2
1
R/C Room
Outdoor
3
■When multiple IUs are connected to the remote control for a mixed environment consisting of FDKs with a left/right flap and IUs without a left/right flap, enabling the 3D auto flow operation will set the
models without a left/right flap to a flap position set before the 3D auto flow operation was started.
■Since the flap is controlled automatically in the following operation, it may differ from the display on the R/C.
∙
When the room temperature is higher than the set temp (In case of the heating operation)
∙
When the “In operation for heating standby. ” or “In operation for defrosting.” is displayed (In case of the heating operation).
Cool air is blown horizontally not to blow directly to human body.
∙
In a high humidity environment (during cooling operation)
■When you select Auto swing while the Anti draft setting is enabled, the flap will not swing and be set at flap position
1
.
■Changing the left/right flap direction and 3D auto flow operation cannot be performed from the SC-SL2, SC-SL3, or SC-SL4. Also note that 3D auto flow operation will not be disabled when you
change the flap direction from the SC-SL2, SC-SL3, or SC-SL4 during a 3D auto flow operation.
1
Tap the
Change flap direction
button on the TOP screen.
When an FDK with a left/right ap is not connected:
☞
2
When one or more FDKs with a left/right ap are connected:
☞
3
Change flap direction
Ind. flap
Control
Auto swing
Back
OutdoorRoomR/C
Select the flap direction.
2
When the Change ap direction screen is displayed, tap the button of desired ap direction.
To swing the ap, tap the
Auto swing
button.
To x the ap position, tap one of
1
to
4
buttons.
After selecting the ap direction,
When an FDK with a left/ right ap is not connected, the display returns to the TOP screen. (
☞
1 )
When an FDK with a left/right ap is connected, the display returns to the Select ap screen. (
☞
3 )
3
When one or more FDKs with a left/right ap are connected, the Select ap screen is displayed. Select the desired ap direction.
①
To change the up/down ap direction, tap the
Upper/lower flap
button. The Change ap direction screen for the up/down
ap is displayed. (
☞
2 )
②
To change the left/right ap direction, tap the
Left/right flap
button. The Change ap direction screen for the left/right ap is
displayed. (
☞
4 )
③
The 3D auto ow operation automatically controls the fan speed and ap direction to efciently condition the air of the entire
room.
To switch to the 3D auto ow operation, tap
3D AUTO
to enable the operation.
To disable the 3D auto ow operation, tap the
3D AUTO
again. The ap direction returns to the direction that was set before
the 3D auto ow operation was enabled. The 3D auto ow operation will also be disabled when you change the up/down or left/
right ap direction during the 3D auto ow operation.
Note
・ Do not manually move the flaps or panel with anti draft by force. It could damage these flaps and panels.
・ Do not blow air downward for a long period of time during the cooling operation. Condensation may be generated and water may drip from the side panel. (In case of Ceiling suspended type)
・ For FDKs with a left/right flap, it is recommended that the flap should be set toward the right side when there is a wall on the left, or set toward the left side when there is a wall on the right. For more
information, refer to the Notes in the Individual flap control section.
 Loading...