81 / 174
Service Manual Mitsubishi SQ-Series diesel engines
Version 08/2004
PISTONS, CONNECTING RODS,
CRANKSHAFT AND CRANKCASE
ENGLISH
ENGINE MAIN PARTS
13. Installing piston assembly
1) Apply engine oil to the piston rings.
2) Make sure the piston ring end gaps are
arranged on the piston, as shown in the
illustration.
3) Turn the crankshaft to bring the No.1 (or No.
4) crankpin to the top center.
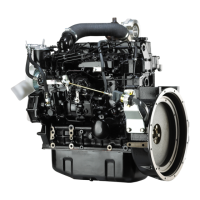
4) Put piston installer (30691–58100) on the top
of the crankcase in alignment with the bore
center. Hold the installer in position by one
hand.
5) Put the piston assembly in the crankcase
through the installer. Make sure the “front”
mark on the top of the piston is toward the
front of the engine.
6) Lightly tap the top of the piston with the handle
of a hammer to put the big-end of the
connecting rod on the crankpin.
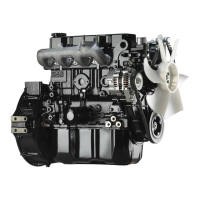
Figure 150 Installing piston assembly (1)
Camshaft side
Thrust direction
End gap of
No. 2 ring
Combustion
chamber side
End gap of
No.1 ring
Piston pin
End gap of
oil ring
Anti-thrust
direction
Figure 151 Installing piston assembly (2)
“Front” mark
Piston installer
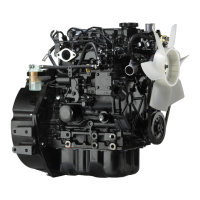
Figure 152 Installing piston assembly (3)
Front of engine
“Front” mark
NOTE
Make sure the big-end of the connecting rod fits on
the crankpin properly.
CAUTION
Be careful not to cause damage to the crankpin when
putting the connecting rod on the crankpin.

 Loading...