CRANKSHAFT
Clean crankshaft thoroughly and inspect journals for
scoring,
chipping,
cracking,
or
signs
of
overheating.
If
crankshaft
has
overheated, is scored, or excessively
worn, reconditioning or replacement will be required.
Examine bearing journals for cracks
if
overheating
has
occurred.
Measure crankshaft main bearing and connecting rod
journals at several places on their diameter to check for
roundness and taper.
The only recommended method
of
reconditioning the
crankshaft is regrinding, as required
to
accommodate
undersize bearings. Metalizing
of
bearing journals
is
not
recommended.
If
regrinding of crankshaft journals is necessary, the
work should be done by a reputable machine shop that
available.
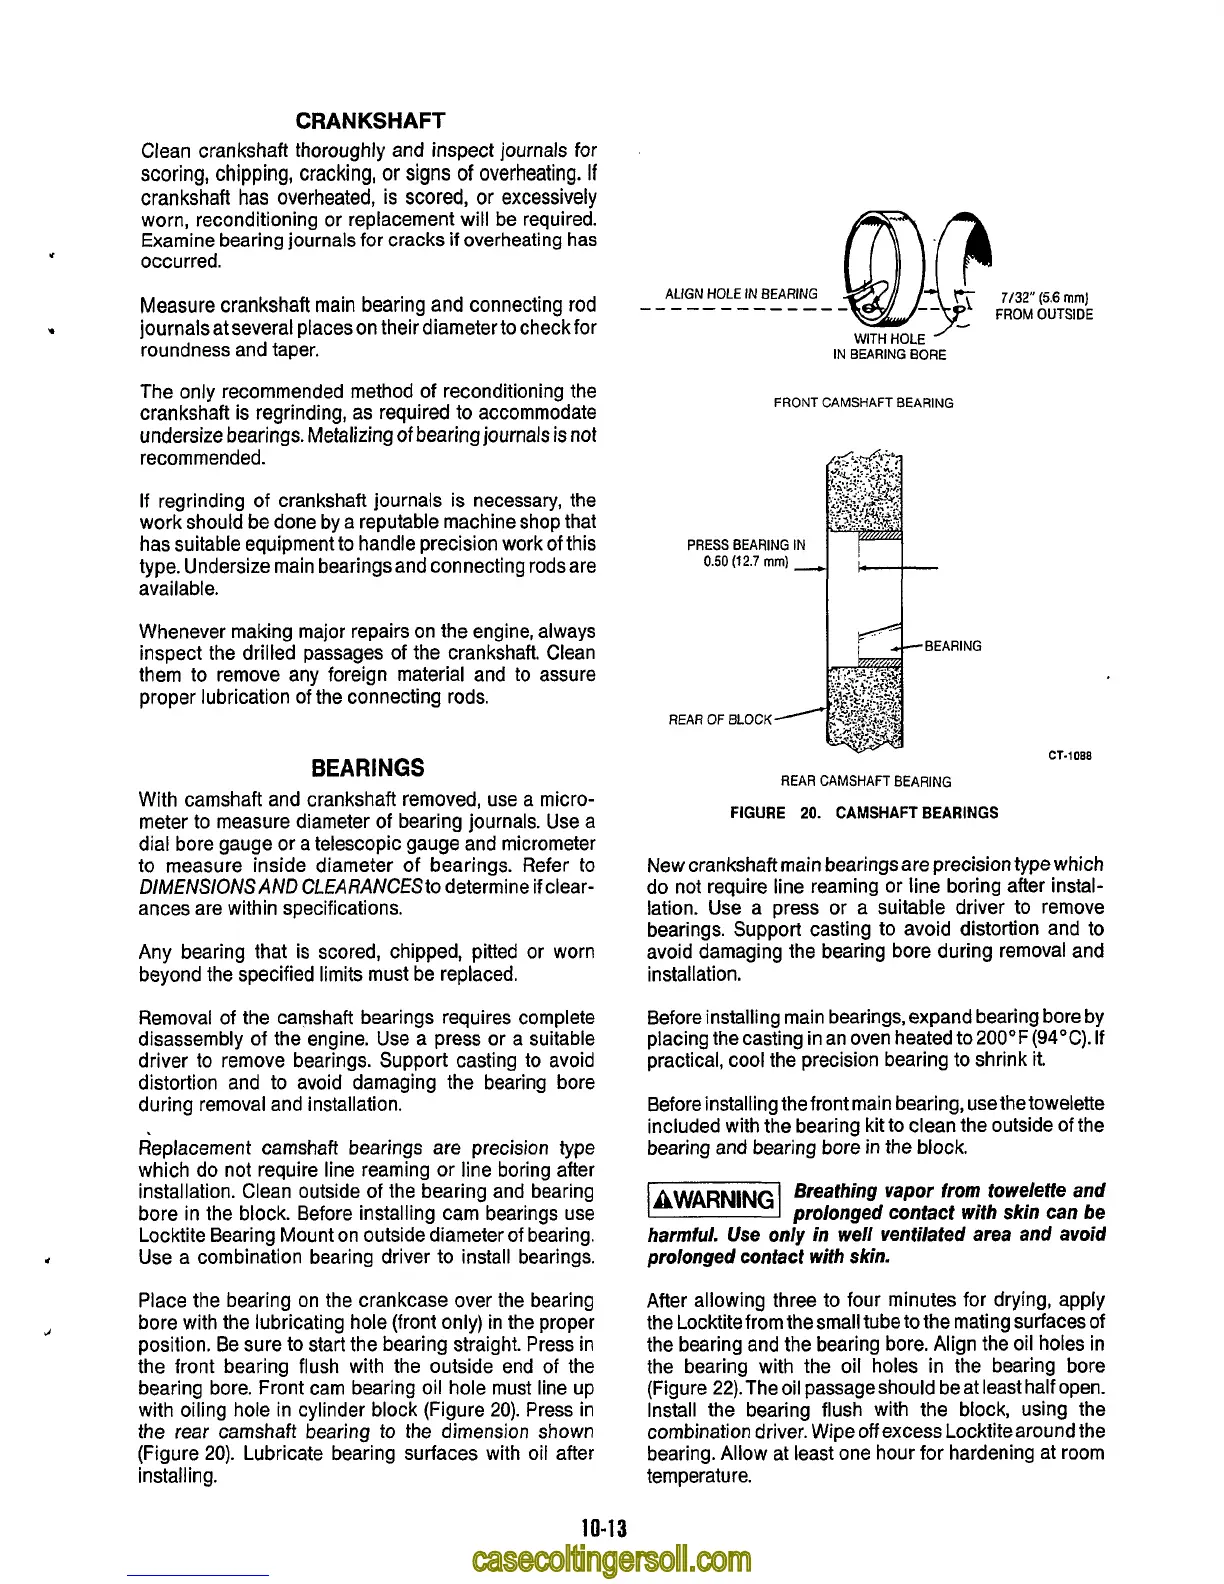
ALIGN HOLE IN BEARING
7/32"
(5.6
mm]
FROM
OUTSIDE
-
-
-
--
-
-
-
-
-
-
-
-
IN
BEARING BORE
FRONT CAMSHAFT
BEARING
has suitable equipment to handle precision work of this
type.
Undersize main bearings and connecting rods are
PRESS BEARING IN
0.50
(12.7
mm)
-
Whenever making major repairs on the engine, always
inspect the drilled passages
of
the crankshaft. Clean
them
to
remove any foreign material and
to
assure
proper lubrication
of
the connecting rods.
BEARINGS
With camshaft and crankshaft removed, use a micro-
meter
to
measure diameter of bearing journals. Use a
dial bore gauge or a telescopic gauge and micrometer
to
measure inside diameter
of
bearings. Refer
to
DlMENSlONSAND
ClfARANCfSto
determine if clear-
ances are within specifications.
Any bearing that is scored, chipped, pitted or worn
beyond the specified limits must be replaced.
Removal of the camshaft bearings requires complete
disassembly
of
the engine. Use a press or a suitable
driver
to
remove bearings. Support casting
to
avoid
distortion and
to
avoid damaging the bearing bore
during removal and installation.
Replacement camshaft bearings are precision type
which do not require line reaming or line boring after
installation. Clean outside of the bearing and bearing
bore in the block. Before installing cam bearings use
Locktite Bearing Mount on outside diameter of bearing.
Use a combination bearing driver
to
install bearings.
Place the bearing on the crankcase over the bearing
bore with the lubricating hole (front only) in the proper
position. Be sure
to
start the bearing straight. Press in
the front bearing flush with the outside end of the
bearing bore. Front cam bearing oil hole must line up
with oiling hole in cylinder block (Figure
20).
Press in
the rear camshaft bearing
to
the dimension shown
(Figure
20).
Lubricate bearing surfaces with oil after
installing.
REAR CAMSHAFT BEARING
FIGURE
20.
CAMSHAFT
BEARINGS
New crankshaft main bearings are precision type which
do not require line reaming or line boring after instal-
lation. Use a press or a suitable driver
to
remove
bearings. Support casting
to
avoid distortion and
to
avoid damaging the bearing bore during removal and
installation.
Before installing main bearings, expand bearing bore by
placing the casting in an oven heated
to
2OOOF
(94°C).
If
practical, cool the precision bearing to shrink
it.
Before installing the front main bearing, usethe towelette
included with the bearing kit
to
clean the outside of the
bearing and bearing bore in the block.
-1
Breathing vapor from towelette and
prolonged contact with skin can be
harmful. Use only
in
well ventilated area and avoid
prolonged contact with skin.
After allowing three
to
four minutes for drying, apply
the Locktitefrom thesmall tube
to
the mating surfaces
of
the bearing and the bearing bore. Align the oil holes in
the bearing with the oil holes in the bearing bore
(Figure 22).The oil passageshould beat least half open.
Install the bearing flush with the block, using the
combination driver. Wipe
off
excess Locktite around the
bearing. Allow at least one hour for hardening at room
temperature.
10-1
3