FRANÇAIS
38
8. '
'
Pièces nécessaires :
6 x Vis (#C)
Installation :
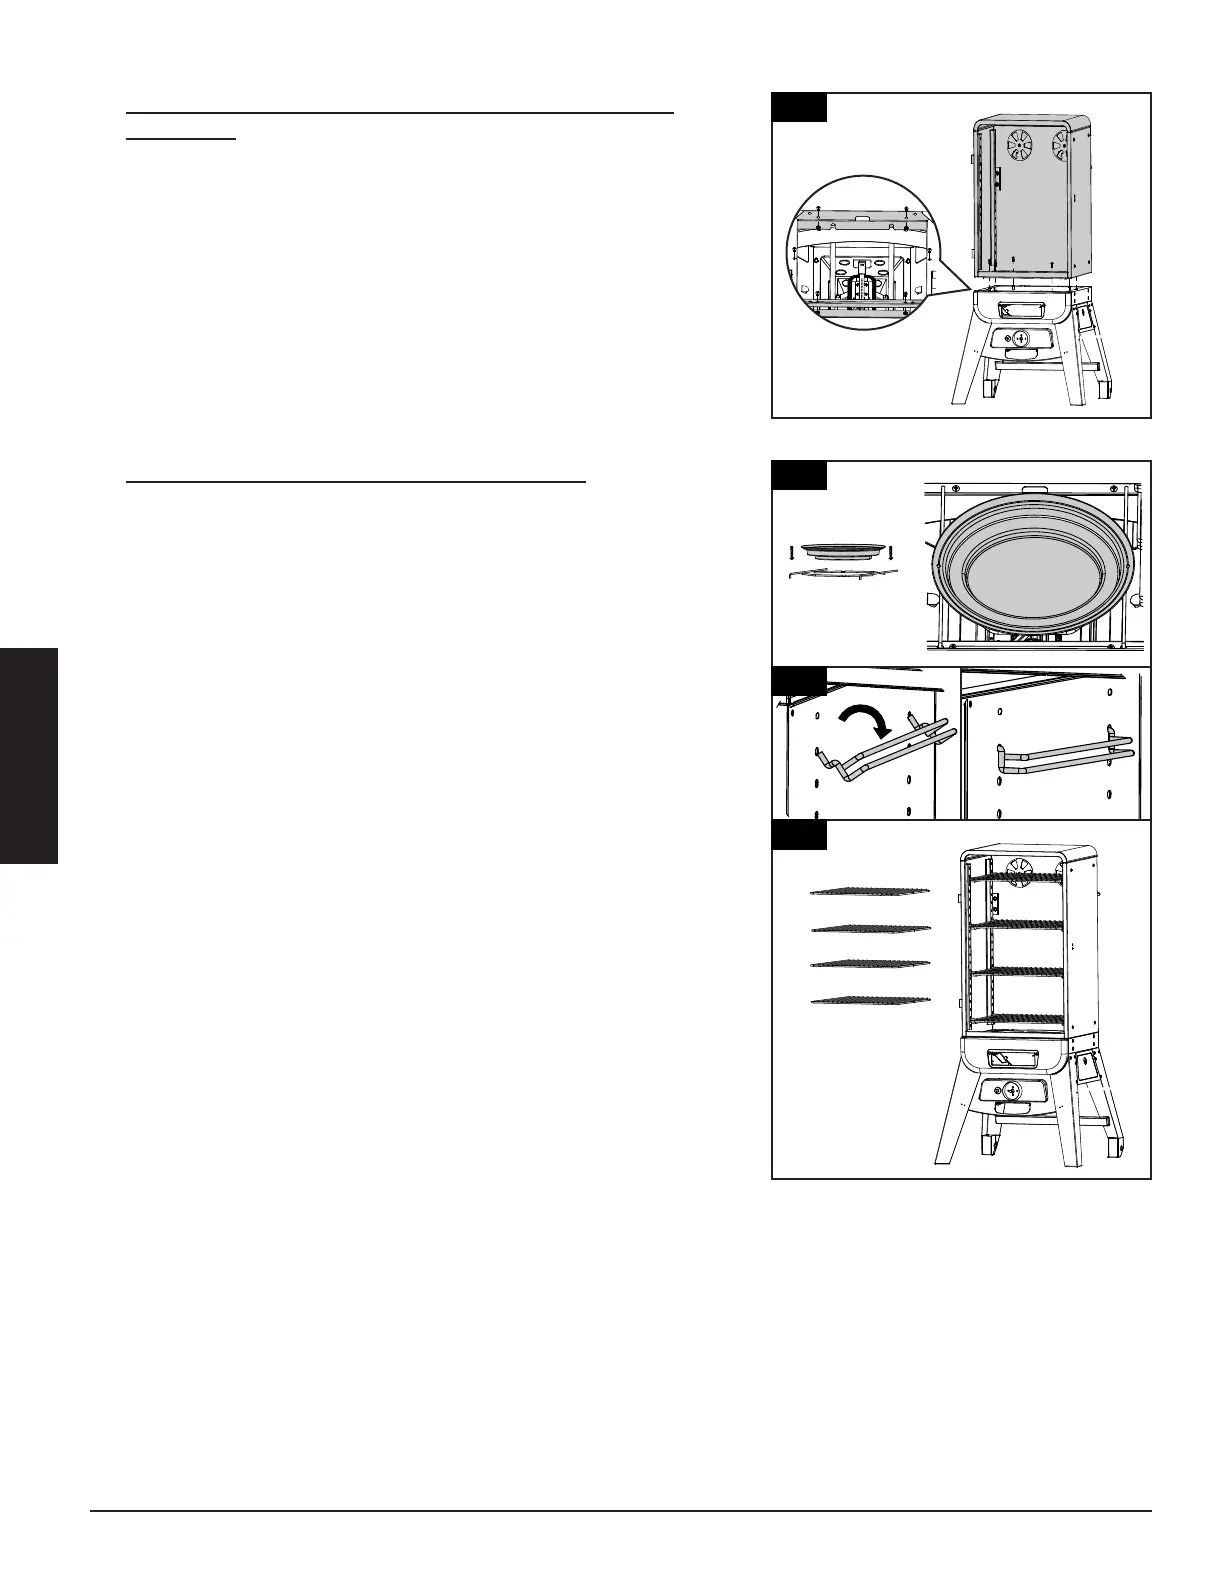
• ssemblage de l'armoire principale à la base de l'armoire Placez la base
de l'armoire à côté de l'armoire principale, les deux orientés dans la
même direction. Soulevez prudemment l'armoire principale et placez-
la sur la base. Fixez l'armoire principale à la base à l'aide de six vis.
9.
Pièces nécessaires :
8 x Supports de la grille de cuisson (#2)
4 x Grilles de cuisson (#1)
1 x Réservoir d'eau (#16)
1 x Support du réservoir d'eau (#17)
Installation :
• Insérez le support du réservoir d'eau en bas de l'armoire intérieure
principale, puis placez le réservoir dans le support. Illustration 9.
REMARQUE: Assurez-vous qu'il y ait toujours de l'eau dans le
réservoir pendant la cuisson. Il va récupérer la graisse et les gouttes
de vos aliments et permettre un nettoyage plus facile. Si vous fumez
des aliments pendant une période prolongée, mettez le réservoir
d'eau plus haut pour que l'eau dure plus longtemps.
• Ensuite, insérez six supports de grille de cuisson dans les trous situés le
long des parois intérieures de l'armoire intérieure principale. Une fois
les supports dans les trous, inclinez-les vers le bas pour qu'ils soient
fixés dans la bonne position. Répétez le même processus, en faisant
correspondre les hauteurs pour la paroi du côté droit. Illustration 9.
• Enfin, placez les grilles de cuisson sur les supports à l'intérieur de
l'armoire principale. Illustration 9.
ATTENTION: Ne modifiez la hauteur entre chaque grille de cuisson que
lorsque le fumoir est complètement refroidi pour éviter les blessures.
10
.
ASSEMBLING COOKING GRID
SUPPORT TO THE UPPER SMOKER
CABINET ASSEMBLY
Parts Required:
Installation:
10.
PLACING WATER PAN AND WATER
PAN SUPPORT ONTO THE BOTTOM
AREA OF CABINET AND PLACING
COOKING GRIDS INTO THE
COOKING GRID SUPPORT
Parts Required:
x Cooking Grid (#4)
1 X Water pan Support (#16)
1 x Water Pan (#15)
Installation:
•Place Water Pan Support (#16) and
Water Pan (#15) onto the bottom area of
Cabinet and place
Cooking Grids
(#4) into the Cooking Grid Support as
Fig.10.1 & Fig.10.2 shown.
1 .
ATTACHING DOOR ASSEMBLY INTO
THE UPPER SMOKER CABINET
ASSEMBLY
Parts Required:
Installation:
1
9
9
9
16
17
2
1
1
1
1
10
.
ASSEMBLING COOKING GRID
SUPPORT TO THE UPPER SMOKER
CABINET ASSEMBLY
Parts Required:
Installation:
10.
PLACING WATER PAN AND WATER
PAN SUPPORT ONTO THE BOTTOM
AREA OF CABINET AND PLACING
COOKING GRIDS INTO THE
COOKING GRID SUPPORT
Parts Required:
x Cooking Grid (#4)
1 X Water pan Support (#16)
1 x Water Pan (#15)
Installation:
•Place Water Pan Support (#16) and
Water Pan (#15) onto the bottom area of
Cabinet and place
Cooking Grids
(#4) into the Cooking Grid Support as
Fig.10.1 & Fig.10.2 shown.
1 .
ATTACHING DOOR ASSEMBLY INTO
THE UPPER SMOKER CABINET
ASSEMBLY
Parts Required:
Installation:
1
2
8
.
SMOKER CABINET ASSEMBLY
Parts Required:
1 x Upper Smoker Cabinet Assembly (#2)
2 x #10-24*1/2”Screw (#C)
Installation:
• the Assembly (#10) and set
aside. Mount
(#1) to the
Upper Smoker Cabinet Assembly (#2)
using 2 x #10-24*1/2”Screws (#C), 2 x
2 x #10-24
Lock Nut
.
UPPER SMOKER CABINET ASSEMBLY
Parts Required:
1 x Upper Smoker Cabinet Assembly (#2)
Installation:
• to the Upper
Smoker Cabinet Assembly (#2) using 4 x
. UPPER SMOKER
CABINET ASSEMBLY TO THE
LOWER SMOKER CABINET
ASSEMBLY
Parts Required:
1 x Upper Smoker Cabinet Assembly (#2)
1 x Lower Smoker Cabinet Assembly (#14)
6 x #10-24*1/2”(#C)
Installation:
• Mount Upper Smoker Cabinet Assembly
(#2)to the Lower Smoker Cabinet Assembly
(#14) using 6 x #10-24*1/2”(#C) as Fig.8.1 &
Fig.8.2 shown.
.
SMOKER CABINET ASSEMBLY
Parts Required:
1 x Upper Smoker Cabinet Assembly (#2)
2 x #10-24*1/2”Screw (#C)
Installation:
• the Assembly (#10) and set
aside. Mount
(#1) to the
Upper Smoker Cabinet Assembly (#2)
using 2 x #10-24*1/2”Screws (#C), 2 x
2 x #10-24
Lock Nut
.
UPPER SMOKER CABINET ASSEMBLY
Parts Required:
1 x Upper Smoker Cabinet Assembly (#2)
Installation:
•
to the Upper
Smoker Cabinet Assembly (#2) using 4 x
. UPPER SMOKER
CABINET ASSEMBLY TO THE
LOWER SMOKER CABINET
ASSEMBLY
Parts Required:
1 x Upper Smoker Cabinet Assembly (#2)
1 x Lower Smoker Cabinet Assembly (#14)
6 x #10-24*1/2”(#C)
Installation:
• Mount Upper Smoker Cabinet Assembly
(#2)to the Lower Smoker Cabinet Assembly
(#14) using 6 x #10-24*1/2”(#C) as Fig.8.1 &
Fig.8.2 shown.