Home
Precor
Exercise Bike
SPINNER CHRONO POWER
Precor SPINNER CHRONO POWER User Manual
5
of 1
of 1 rating
197 pages
Give review
Manual
Specs
To Next Page
To Next Page
To Previous Page
To Previous Page
Loading...
6.
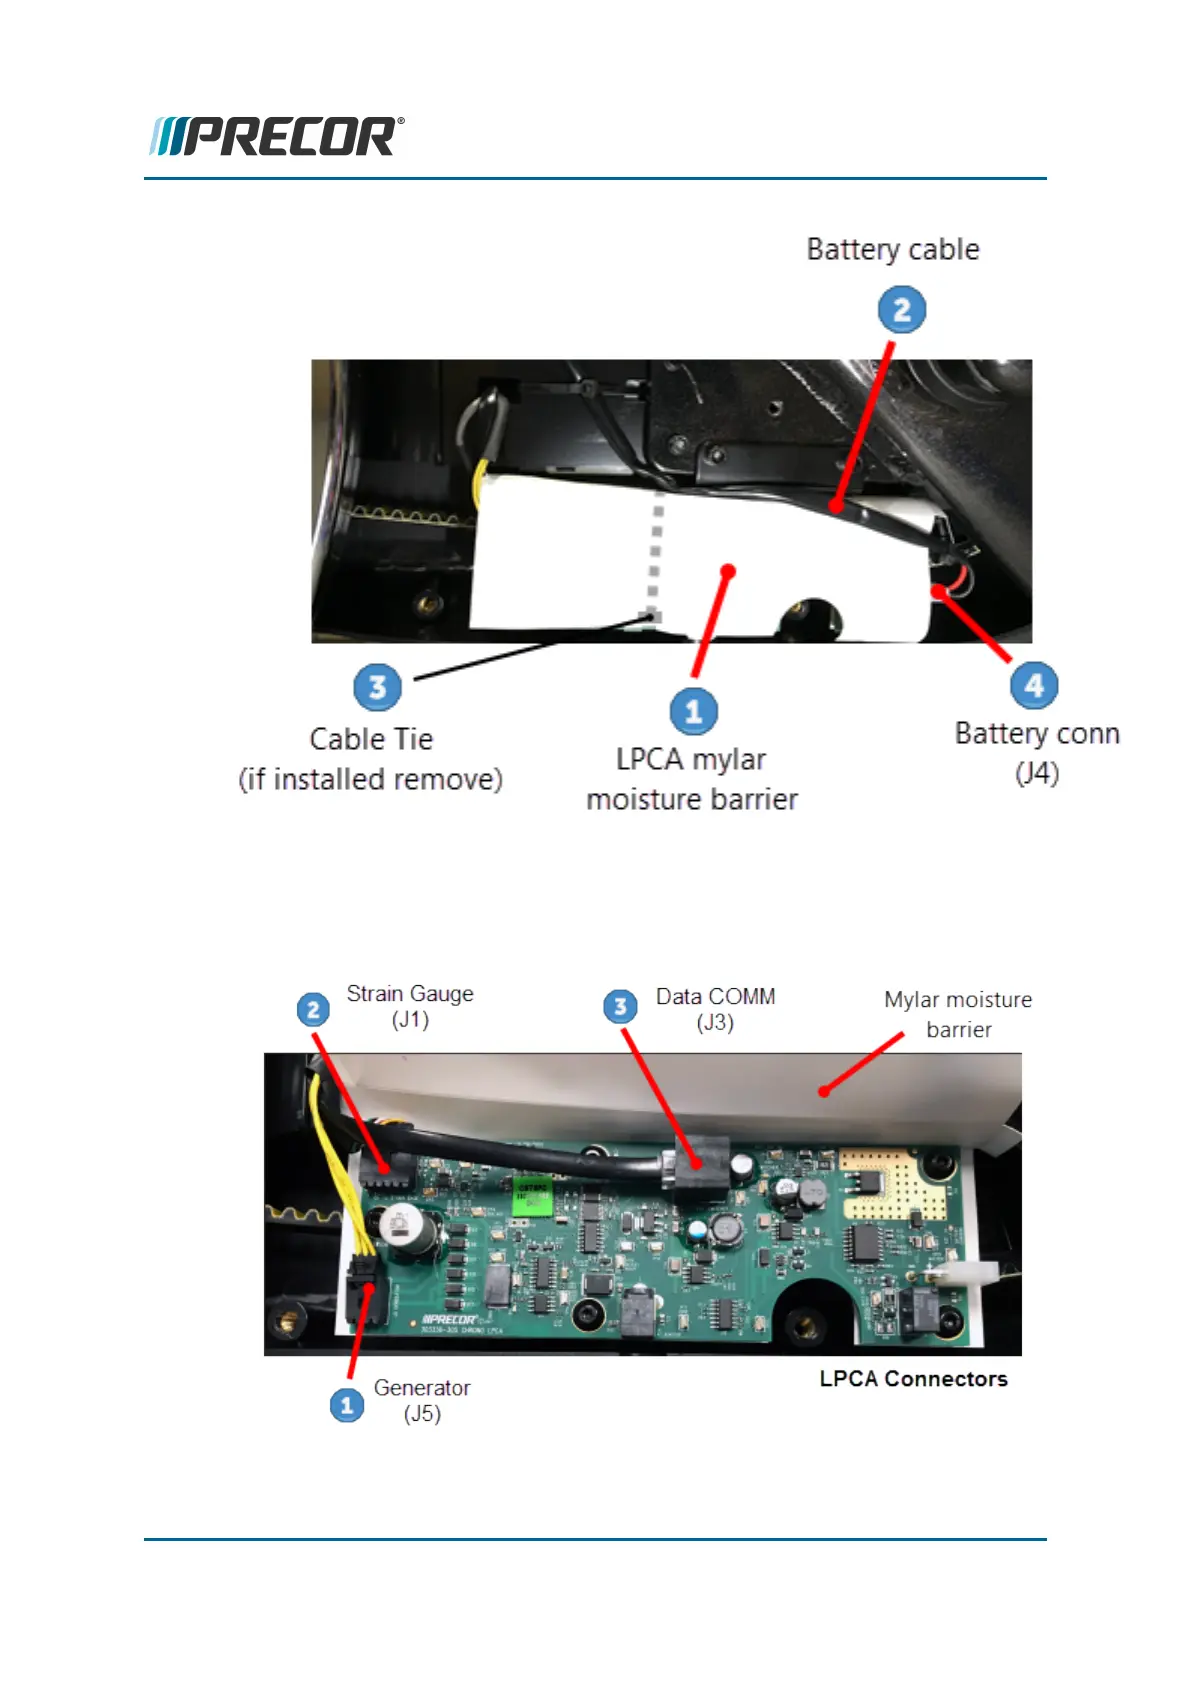
Lift
the
Mylar
moisture
barrier
and
disconnect
the
Generator
(J5)
cable
connector,
then
t
he
Dat
a
COMM
(J3)
cable
connector
and
last
the
Strain
Gauge
(J1)
cable
con-
nector.
Contact
Precor
Cust
omer
Support
at
support@precor.com
or
800.786.8404
with
any
quest
ions.
Page
87
5
Replacement
Procedures
Drive
Belt,
Generator
Belt,
and
Flywheel
Replacement
94
96
Table of Contents
Table of Contents
2
Introduction
9
About this Document
9
Service Manual Contents
10
Additional Service Documentation and Videos
10
Product Literature & Videos
11
Service & Maintenance Documentation
11
Precor Websites
11
Service Videos
12
Safety Guidelines
14
Safety Guideline You Need to Know and Follow
14
General Information
15
Orientation Convention
15
Tools
15
Specification Summary
16
Bolt Grade Identification
16
Bolt Grade Markings Chart
17
Parts
17
Optional AC Power Adapter
18
Lubrication
19
Cleaning
20
Approved Cleaning Products
20
Cleaning Procedure
20
Equipment Spacing Requirements
21
Operation Verification
22
About
22
Operation Verification Checklist
22
Adjustment Procedures
25
About
25
Available Adjustment Procedures
25
Autocal
26
Autocal Release 1 (Autocal R1)
27
Autocal Release 2 (Autocal R2)
28
Brake Pad Adjustment
31
Procedure
31
Drive Belt Tension and Tracking Adjustment
35
About
35
Procedure
35
Generator Belt Tension Adjustment
43
About
43
Specifications
43
Procedure
43
Bike Leveling Adjustment
47
Replacement Procedures
49
Battery Replacement
51
About
51
Specifications
51
Determining the Battery Condition
51
Battery Fuse
52
Procedure
52
Belt Guard Cover Replacement
55
About
55
Procedure
55
Brake Pad Replacement
60
About
60
Specialized Tools
61
Procedure
62
Brake Caliper Assembly Replacement
65
About
65
Strain Gauge Cable Routing
65
Specialized Tools
66
Parts
67
Procedure
67
Replacement Procedures
67
Replacement Procedure - (Spinner® Chrono™ Power Models Only)
67
Replacement Procedure - (Spinner® Climb™ Models Only)
77
Data COMM Cable Replacement
80
About
80
Specialized Tools
81
Parts
81
Procedure
81
Drive Belt, Generator Belt, and Flywheel Replacement
93
About
93
Specifications
93
Procedure
94
Generator Assembly Replacement
106
About
106
Procedure
106
Handlebar Assembly Replacement
108
About
108
Procedure
108
Handlebar Adjustment Knob Replacement
112
About
112
Procedure
112
Handlebar Post Removal
114
About
114
Procedure - (Spinner® Chrono™ Power Models Only)
114
Procedure - (Spinner® Climb™ Models Only)
117
LPCA Board Replacement
120
About
120
LPCA Interface Cable Connections
121
LPCA Status Leds
122
Procedure
122
Pedal Replacement
129
About
129
Specifications
129
Specialized Tools
129
Procedure
129
Crank Arm Replacement
134
About
134
Specialized Tools
134
Procedure
134
Resistance Knob Replacement
137
About
137
Procedure
137
Seat Assembly Replacement
142
About
142
Procedure
142
Stabilizer Replacement
144
About
144
Front Stabilizer Replacement
145
Rear Stabilizer Replacement
148
About
151
Introduction to Troubleshooting
151
Basic Steps
151
Service and Diagnostic Menus
154
About
154
Service/Setup Mode Access
154
Menu Navigation
155
Service and Settings Menus
156
Error Log
159
Active Status Light (ASL)
160
About
160
ASL Overview
160
ASL States
161
ASL Setup and Test
161
Resetting the ASL State and Maintenance Counter
162
Clearing a Pulsing Yellow And/Or Steady Yellow ASL State
162
Error Log
164
About
164
Accessing the Error Log
164
Clearing the Error Log
164
Exporting the Error Log
165
System Troubleshooting Procedures
166
About
166
Available Procedures
166
Belt Drive Issues
167
Resistance Issues
168
Erratic Power (WATTS) Measurements
170
Bike Missing from Group Leader Board
172
Bottom Bracket Inspection
174
Troubleshooting
151
Preventive Maintenance (PM)
176
About
176
PM Guides and Videos
176
Product PM Guides
176
PM Service Videos
178
Parts
180
About
180
Exploded View Diagram
181
Parts List
182
Consoles
184
About
184
Spinner® Chrono™ Console
185
About
185
Console Power
186
Installation and Removal
187
Service/Setup Menu Access
187
Menu Navigation
187
Menus and Settings
188
Error Log Information
190
Spinning® Studio Console
193
About
193
Cadence (RPM) Sensor Installation
194
Heart Rate Belt Bluetooth Pairing
194
Service and Maintenance
194
Appendix A : Edition Information
195
Edition
195
Additional Documentation
195
Copyright
195
Appendix B : Notices and Safety
196
Trademarks
196
Other manuals for Precor SPINNER CHRONO POWER
Maintenance Guide
2 pages
5
Based on 1 rating
Ask a question
Give review
Questions and Answers:
Need help?
Do you have a question about the Precor SPINNER CHRONO POWER and is the answer not in the manual?
Ask a question
Precor SPINNER CHRONO POWER Specifications
General
Brand
Precor
Model
SPINNER CHRONO POWER
Category
Exercise Bike
Language
English
Related product manuals
Precor SPINNER CLIMB
197 pages
Precor SPINNER RALLY
82 pages
Precor SPINNER SHIFT
82 pages
Precor SBK823
82 pages
Precor SBK867
197 pages
Precor RBK 615
104 pages
Precor UBK 615
104 pages
Precor C842
87 pages
Precor RBK 815
88 pages
Precor Experience 600 Series
280 pages
Precor RBK 61
104 pages