24 © 2015 Proceq SA
5.4.3 Work with a Default Value
Method 3
The purpose of this approach is to work with a default value with known error tolerances.
From the menu item “Bar diameter” select the default value 16 mm or #5 for the diameter.
Use the chart in section 3.4.3 of the tutorial to understand the errors that can be expect-
ed in the cover readings when the actual rebar diameters differ from the reference value.
You may correct the measured cover with the error value.
5.4.4 Drill an Inspection Hole
Method 4
The purpose of this approach is to accurately determine the rebar diameter through destructive
means.
If neither of the methods 1, 2 and 3 are feasible for whatever reason and you are still in doubt (this
could be the case when rebars are bunched too close together or are too small in diameter), then
drill an inspection hole wide enough to allow the use of a caliper to measure the rebar diameter. Set
this value into the Profoscope and proceed.
5.4.5 Diameter Measurements on Welded Reinforcement Meshes
In most cases a diameter can be measured but the displayed value is far too high and cannot be used.
The only way to determine the diameter is by an inspection hole as described under 5.4.4 above.
6. Settings
6.1 Navigating through the Settings Menu
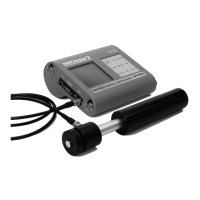
UP
Navigation (2)
LEFT
RIGHT
DOWN
Select Button (10)
The settings menu can be entered by pressing the
Select Button (10). Use the Navigation (2) to select
the desired menu icon and press the Select Button
(10) again.
Fig 30: Navigation with the keys (2) and (10)
Scroll within the menus to the setting you wish to make and press the Select Button (10) to imple-
ment it. To go back to the main menu press the Select Button (10) In case all settings are done or
to exit from the main menu press either the Reset Key (3) or Function Key (6). In either case the
measuring field appears on the display. You are ready for the measurements.
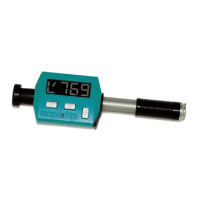
Each menu item is described in detail below.
*
*Icon only in Profoscope
+
Fig 31: Main menu icons