En-7
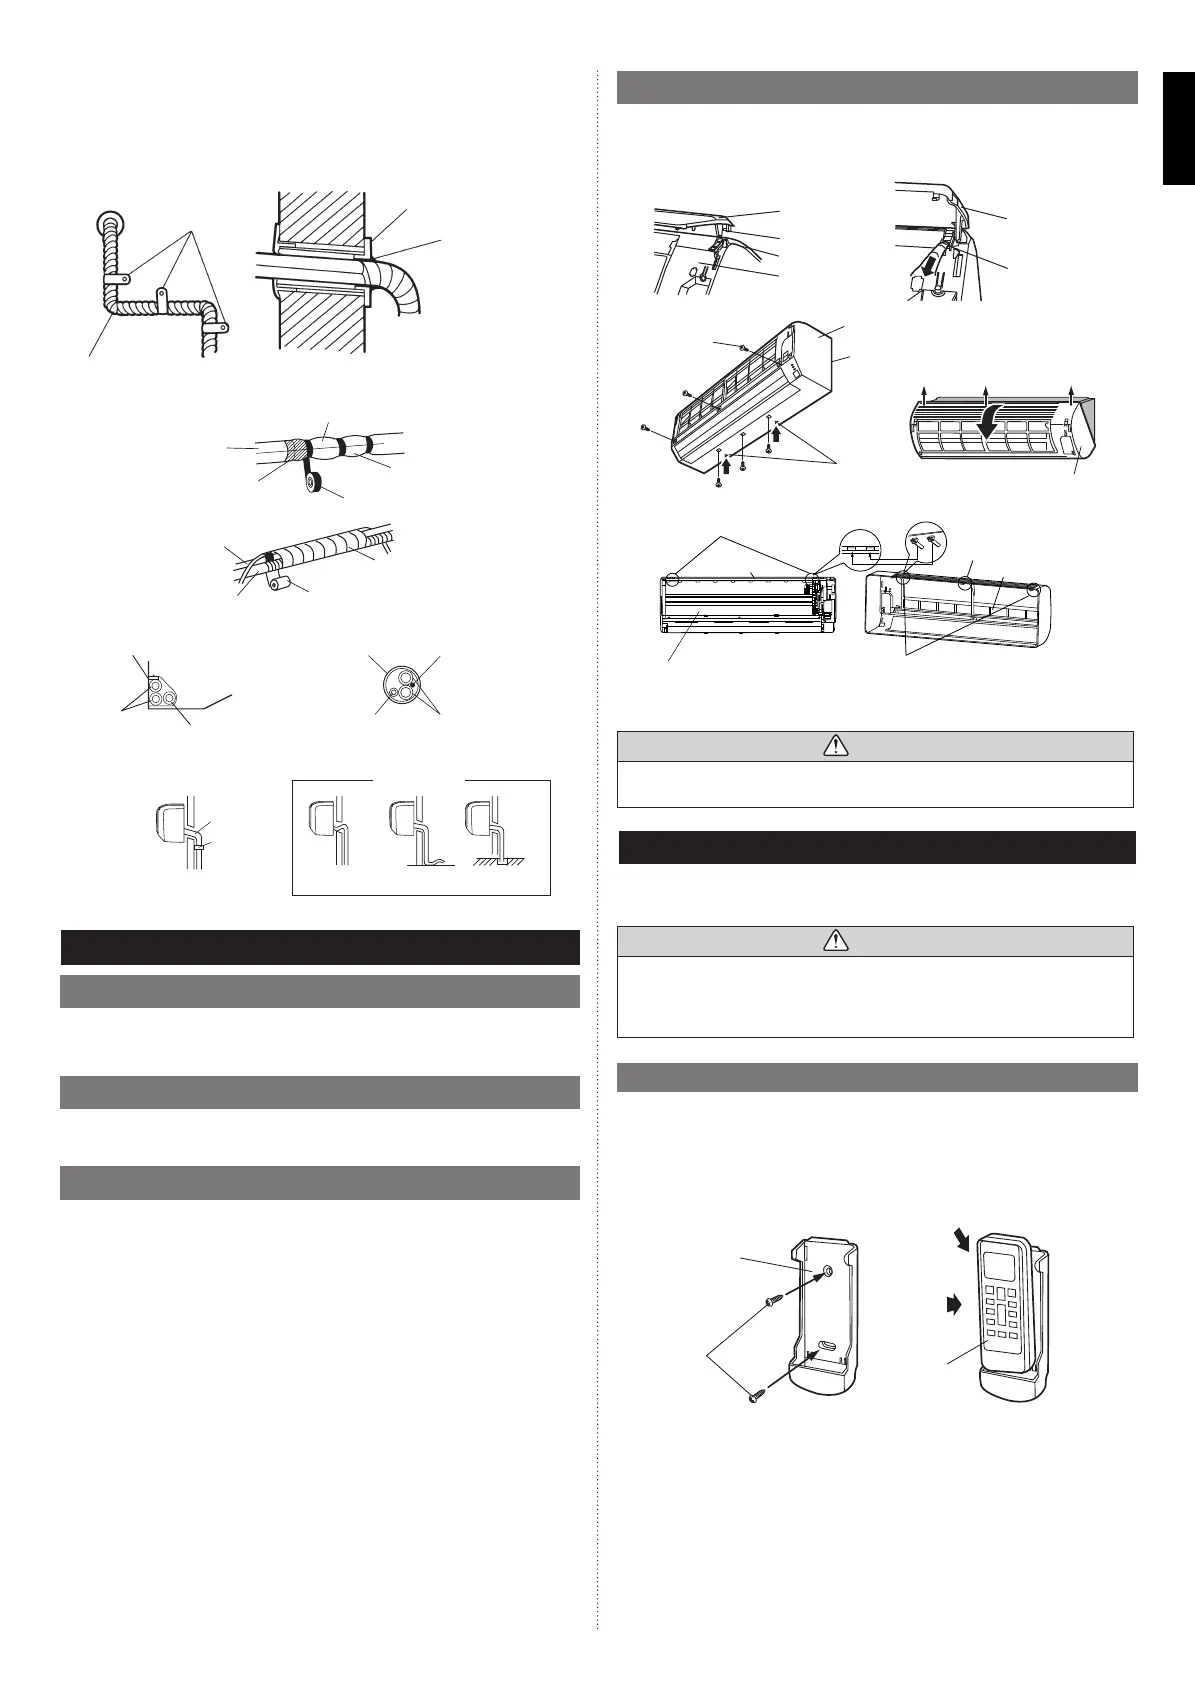
8.4. Front panel installation
(1) First, fi t the lower part of the front panel, and insert top and bottom hooks. (3 top
sides)
(2) Attach the 6 screws.
(3) Attach the intake grille.
Wall hook bracket
Front panel
Push
[▲] mark
Screws
(6 places)
Push
Front panel
Top holes (two sides)
Top hole
(center)
Top hook (center)
Front panel
Indoor unit
Top hooks
(2 sides)
Front panel
Bearing
Mounting shaft
Intake grille
Intake grille
Knob
CAUTION
Install the front panel and intake grille securely. If installation is imperfect, the front
panel or intake grille may fall off and cause injury.
9. REMOTE CONTROLLER INSTALLATION
• Check that the indoor unit correctly receives the signal from the remote controller, then
install the remote controller holder.
CAUTION
Select the remote controller holder selection site by paying careful attention to the
following:
- Avoid places in direct sunlight.
- Select a place that will not be affected by the heat from a stove, etc.
9.1. Remote controller holder installation
• Install the remote controller a maximum distance of 22 ft. (7 m) from the remote control
receiver. However, when installing the remote controller, check that it operates correctly.
• Install the remote controller holder to a wall, pillar, etc. with the tapping screw.
Remote controller holder fi xing
Remote controller
holder
(1) Set
(2) Push
Remote
controller
Tapping
screw
(small)
Remote controller mounting
(2) Temporarily fasten the connection cable along the connection pipe with vinyl tape.
(Wrap to about 1/3 the width of the tape from the bottom of the pipe so that water
does not enter.)
(3) Fasten the connection pipe to the outside wall with a saddle, etc.
(4) Fill the gap between the outside wall pipe hole and the pipe with sealer so that rain
water and wind cannot blow in.
(5) Fasten the drain hose to the outside wall, etc.
*Locally purchased
Pipe
Saddle*
Outside wall cap*
Sealer putty*
(Outdoors)
Wall
Overlap the insulation
Vinyl tape
Wrap with cloth tape
Cloth tape
Drain hose
Connection cable
Pipe
Drain hose
Check the following:
GOOD
Drain hose
Saddle
Lifted up
Wave
End in water
Drain hose
Connection pipe
Wall pipe Connection cable
Left piping For connection from the left rear
Pipe
Connection pipe
(heat insulation)
Indoor unit pipe
(heat insulation)
PROHIBITED
Bind the pipes together
so that there is no gap.
8. FRONT PANEL REMOVAL AND INSTALLATION
8.1. Intake grille removal
(1) Open the intake grille.
(2) Pull down the knob.
(3) Lift the intake grille upward, until the axle at the top of the intake grille is removed.
8.2. Intake grille installation
(1) The fi xing axle of the intake grille is installed on the Panel.
(2) Lay down the intake grille.
8.3. Front panel removal
(1) Remove intake grille (Reference the intake grille removal.)
(2) Remove 6 screws.
(3)
The thumb is hung on the lower part as shown in the fi gure, and it pulls to the front,
pushing [▲] mark , and bottom hooks (2 places) is removed from wall hook bracket.
(4) The front panel is pulled to the front, raising the upper surface, and a front panel is
removed.
9318739237_IM.indb 79318739237_IM.indb 7 11/30/2016 9:59:21 AM11/30/2016 9:59:21 AM
 Loading...