13
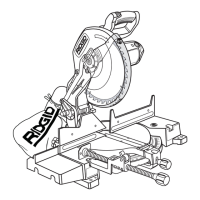
9. Be sure the arbor lock is released so
the blade turns freely.
NOTE: The arbor lock can be damaged
by improper use.
WARNING: Make sure the col-
lars are clean and properly
arranged. After installing a new
blade, make sure the blade
clears the table slot at the 0° and
45° bevel positions. Lower the
blade into the lower table and
check for any contact with the
base or turn table structure.
10. After changing the blade place the 1/4”
hex wrench in the handle/storage
area.
Assembling Extensions and Stop
Block
Find the following parts:
Item
No. Description Qty.
A Extension Arm...................................2
B Clamp Bracket...................................2
C Dust Bag ...........................................1
D Thumb Screw 1/4 x 20 x 1/2 .............1
E Adjustable Stop Block .......................1
F Phillips Screw 5/16-18x1-1/4.............2
G Washer 21/64 x 5/8 x 1/16 ................2
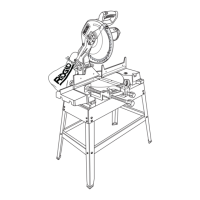
1. Place saw in the 0° miter position.
2. Lock the miter saw power head in the
lowered position.
3. Tilt saw back on its rear legs to
expose underneath of base. Secure
saw so it does not tip or fall off bench.
4. Slide adjustable stop block over the
back of side extension arm. Thread
the 1/4-20 thumb screw into the back
of stop block.
5. Find the second pair of grooves
underneath miter saw base. Place
clamp bracket over extension arm.
NOTE: Each extension arm must pass
completely through both grooves in the
saw base before the clamp bracket is
secured.
Blade
Arbor Screw
Left Hand Thread
Blade Collars
Blade
Collar
Recesses
A
B
C
F
D
E
G
Stop
Block
1/4-20
Thumb Screw
Extension
Arm
Clamp Bracket
 Loading...