Selecting Harmony Tones
(harmony SEL)
The setting “ARPEGGIO/harmony SEL” (Arpeggio/
Harmony select) for each patch determines whether
the first tone, the second tone, or an external sound
generator becomes the harmony. Try making actual
changes to this setting for the preset patches, and lis-
ten to the results.
<Verifying How harmony SEL Works>
1. Choose patch F53 (combined distortion guitar and
tenor sax tones).
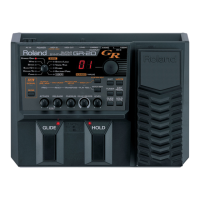
2. Press [EDIT/PLAY] to enter the Edit mode, then
set the EDIT TARGET dial to “ARPEGGIO/har-
mony” and the PARAMETER SELECT dial to “A”
(ARPEGGIO/harmony SEL).
3. Press pedal 4 to turn on Harmonist for patch F53
that you’ve called up.
4. The display shows the current setting, “h.-1” (first
tone is harmony). Play the guitar and make sure
that the play a melody in G major and check the
harmony.
5. Press [+] once to make the display change to show
“h.-2” (second tone is harmony). Play the guitar
— notice how the melody and harmony tones in
step 4 have been exchanged.
6. Press [+] once again to make the display change to
show “h.-b” (both: both tones are harmony). Set
the GK-2A switch to “MIX” and play along with
the guitar sound, and hear how the sounds from
the GR-30 become the harmony for the guitar
sound (melody).
Other values for Harmonist that can be chosen with
[+] and [-] are as follows.
hAr
All tones (from the internal sound generator and
the external MIDI sound generator) become the
harmony.
h.-1
The first tone of the internal sound generator
becomes the harmony.
h.-2
The second tone of the internal sound generator
becomes the harmony.
h.-b
This “b” stands for “both,” and means that the first
and second tones both become the harmony. (The
external sound generator does not become the har-
mony.)
h.-E
This “E” stands for “External,” and means that
only the external MIDI sound generator becomes
the harmony.
h.1E
The first tone and the external MIDI sound genera-
tor become the harmony.
h.2E
The second tone and the external MIDI sound gen-
erator become the harmony.
✽
Settings can also be made for the values that precede
these (ArP, A.-1, A.-2,..., A.2E), but choosing one of
these causes Harmonist to stop and selects Arpeggiator
(p. 51). Please note that if Arpeggiator is chosen here, it
becomes impossible to select the setting items “h-style,”
“h-key,” or “h-remote.”
●●●●●●●●●●●●●●●●●●●●●●●●●●●●●●●●●●●●●●●●●●●●●●●●●●●●●●●●●●●●●●●●●●●●●●●●●●●●●●●●●●●●●●●●●●●●●●●●●●●●
<Overwriting the Settings for a Desired Patch>
Call up the patch you wish to change, and while still
in the Edit mode, set the PARAMETER SELECT dial
to “WRITE PATCH?”, and press [+] and [-] simulta-
neously to write the patch.
If the patch you’re changing is a preset patch from
E11 to H84, or if you wish to leave the original
unchanged, first set the PARAMETER SELECT dial to
“WRITE TO...”, then use [+] and [-] to specify the des-
tination patch number for the write operation.
●●●●●●●●●●●●●●●●●●●●●●●●●●●●●●●●●●●●●●●●●●●●●●●●●●●●●●●●●●●●●●●●●●●●●●●●●●●●●●●●●●●●●●●●●●●●●●●●●●●●
Setting Harmonic Intervals
(h-style)
The interval between the melody and harmony that
Harmonist uses (a third, a fifth, or the like) is set with
the ARPEGGIO/harmony item “h-style” (harmony
style).
<An Example of How to Change h-style>
1. Use “ARPEGGIO/harmony SEL” to call up a
patch for which Harmonist is selected, and press
[EDIT/PLAY] to go into the Edit mode.
2. Set the EDIT TARGET dial to “ARPEGGIO/har-
mony” and the PARAMETER SELECT dial to “B”
(h-style).
3. The display shows the currently selected interval
(-7, -6, -5, -4, -3, -2, 2, 3, 4, 5, 6, 7, or diM).
66

 Loading...
