13
Selecting a Sound
(Kit)
The TAIKO-1 assigns separate sounds to the head and rim of the two
pads. These four sounds are collectively called a “ k it.”
There are 50 preset kits. By switching kits, you can perform using a
variety of dierent sounds.
1. Press “BACK” (F1 button) several times to access the top
screen.
2. Use the [+] [–] buttons to select the kit.
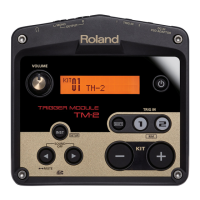
About the top screen
This is the basic screen of the TAIKO-1, which appears when you turn
on the power.
Trigger indicator
The strength at which you strike the head or rim is shown in six levels.
Kit number
Kit name
If a Japanese (kanji) name is specied for
the kit, the kanji name is also shown.
Function
Displays if functions are assigned to
the F1 and F2 buttons.
MEMO
You can edit the sounds of the kit.
For details, refer to “Editing Sounds and Other Settings for Kits (Kit
Edit)” (p. 16).
Playing Along with a Song
Using the MIX IN Jack
You can perform along with a song that’s playing back on the external
device, if the output from that device is input via the MIX IN jack.
* To adjust the playback volume, adjust the volume on your mobile device.
Using a Bluetooth Device
If an external device is connected via Bluetooth, you can play along
with a song playing back on the external device.
&
“Using the Bluetooth® Functionality” (p. 31)
Using the Lesson Function
(Lesson)
You can sound a “ji-uchi” (base beat) or metronome, and practice along
with this to improve your rhythmic accuracy, or record and play back
your performance.
Sounding the Ji-uchi (Ji-uchi)
The TAIKO-1 can sound a ji-uchi, which is like a metronome. By
performing along with the ji-uchi, you can practice the basics and
improve your performance skill.
What is ji-uchi?
Ji-uchi is the basic rhythm of the song.
The ji-uchi is struck like a metronome, and the song is played in
time with it.
Since the ji-uchi also plays a role in determining the expression
or tempo of the song (corresponding to the conductor of an
orchestra), it is an extremely important part.
1. Press “MENU” (F2 button).
2. Use the [
H
] [
I
] buttons to select “Lesson,” and then
press “SELECT” (F2 button).
3. Use the [
H
] [
I
] buttons to select “Ji-uchi,” and then
press “SELECT” (F2 button).
The setting screen appears.
Parameter
[
H
] [
I
] buttons
Value
[+] [-] buttons
Explanation
Ji-uchi Volume 0–31, MAX Sets the volume of the ji-uchi.
Track
&
“Ji-uchi List”
(p. 52)
Selects the ji-uchi pattern.
Tempo 20–260 Sets the tempo.
Velocity 1–32 Sets the strength of the sound.
* The tempo and velocity can be set for each track.
4. Press “PLAY p” (F2 button).
You can also switch to another screen while the ji-uchi plays.
5. Press “STOP q” (F2 button).
If a screen other than the ji-uchi setting screen is shown, access the
ji-uchi setting screen and then press “STOP q” (F2 button).
6. Press “BACK” (F1 button) several times to return to the
top screen.
MEMO
You can use MIDI to make the instrument play that sounds the ji-
uchi. For details, refer to “Ji-uchi Instrument List” (p. 52).
Playing
 Loading...