Assembly
6
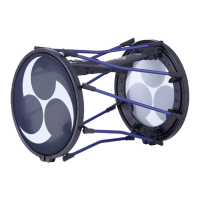
Setting up the Floor Stands
What you’ll need besides the TAIKO-1 and stand
5 String (0.5 m) × 4
5 Thick cloth/fabric (used for cushioning) × 3
1. Remove the pads and sound module of the TAIKO-1.
&
“Disassembly” (p. 5)
* The rods and rings are not used here.
2. Wrap the cloths or fabric around the stand (three
places).
3. Turn the pad over and thread the strings through
the holes where the rods are usually mounted (four
places).
* Make sure to thread the string
through the holes at the
specied places. If you thread
the strings through other places,
this could damage the sensor.
4. Flip the stand upside down that you wrapped with
cloths or fabric in step 1, and place it on the pad that
you turned over.
Position the pad so that the protrusion faces towards you.
5. Tie the strings into knots (four places).
Where to knot the
strings (four places)
Protrusions on the pad
6. Turn the assembled unit over.
7. Connect the pad and sound module with the included
trigger cable (1.0 m).
Pad: TRIG OUT jack
TAIKO-1: TRIG IN 1 jack (or TRIG IN 2 jack)
Set all Xtalk Cancel parameters to “0.”
&
“Conguring the Other Pad Not to Sound (Xtalk Cancel)”
(p. 29)
Depending on the stand and how you strike the TAIKO-1, you may
get a better drumming feel by adjusting the parameters.
&
“Conguring the Trigger Settings” (p. 28)
MEMO
You can line up two sets of
pads that you have respectively
attached to the oor stands, for
two people to play. In this case,
connect the TRIG OUT jack of the
second pad to the TRIG IN 2 jack (or
the TRIG IN 1 jack) of the TAIKO-1.
Place the sound module on the
oor for use.
Disassembly
To disassemble the units, use the reverse process you used when
assembling them.
Setting up on a Three-Pillar Stand
What you’ll need besides the TAIKO-1 and stand
5 String (1 m) × 3
1. Disconnect all connection cables such as the AC
adaptor and trigger cables.
2. Remove the sound module of the TAIKO-1.
Leave the rubber rings on the sound module.
 Loading...