4
Checking the Parts
1 2
5
7
6
4
3
8 9 10
r
Part name Quantity
1
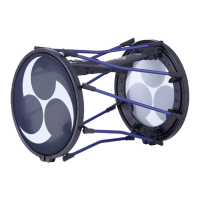
Rods (with pad attachment screws) 8
2
Pads 2
3
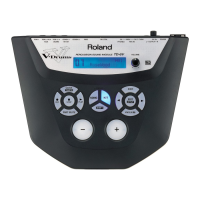
Sound module 1
4
Rubber ring (for securing the sound module) 4
5
Trigger cables (0.2 m) 2
6
Trigger cables (1.0 m) (*1) 2
7
AC adaptor + power cord 1
8
Drum key 1
9
Hex wrench (*2) 1
10
Cable clamps 3
*1 Use the trigger cable (1.0 m) when playing the taiko while not on your shoulder.
&
“Setting up the Floor Stands” (p. 6)
*2 The hex wrench is used to adjust the tension of the heads.
&
“Adjusting the Head Tension” (p. 42)
Assembly
If necessary, spread out a blanket or similar material to prevent the
TAIKO-1 or oor from being scratched during assembly.
1. Attach the rods to the pad
r
2
1
1
1-1. Place the pad (
2
) so that the surface with holes in it faces upward.
1-2. One at a time, insert the rods (
1
eight locations) into the holes of the
pad.
MEMO
The rods should be facing diagonally when correctly inserted.
1-3. Use the drum key
8
to tighten the bolts of the rods (
1
eight locations)
until they no longer turn.
The appropriate tightness is approximately when the bolt head is no
longer visible.
2
Protrusions on
the pad
1-4. Place the other pad (
2
) so that the surface with holes in it is facing
upward.
1-5. Turn over the pad to which the rods are attached, position the pads so
that the projections of the two pads are aligned, and then consecutively
insert the rods into the holes of the other pad one by one.
1-6. While making sure that the rods are inserted in the holes of the pad, use
the drum key
8
to tighten the bolts of the rods (
1
eight locations) until
they no longer turn.
Assembly
Watch a video that explains TAIKO-1 assembly.
Access the following URL on your
computer or smartphone.
http://roland.cm/taiko_qs
 Loading...