MX-M260/M310/M260N/M310N ADJUSTMENTS 5 - 2
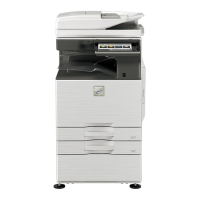
(2) MG roller main pole position adjustment
1) Put the developing unit on a flat surface.
2) Tie a needle or pin on a string.
3) Hold the string and bring the needle close to the MG roller horizon-
tally. (Do not use paper clip, which is too heavy to make a correct
adjustment.) (Put the developing unit horizontally for this adjust-
ment.)
4) Do not bring the needle into contact with the MG roller, but bring it
to a position 2 or 3mm apart from the MG roller. Mark the point on
the MG roller which is on the extension line from the needle tip.
5) Measure the distance from the marking position to the top of the
doctor plate of the developing unit to insure that it is 9.1mm.
If the distance is not within the specified range, loosen the fixing
screw A of the main pole adjustment plate, and move the adjust-
ment plate in the arrow direction to adjust.
(3) Developing bias voltage adjustment (SIM 8-1)
1) Execute SIM 8-1.
2) Touch the exposure mode to be changed.
The current set value is displayed.
3) Enter the set value with the 10-key.
4) Press the [START] key.
Output is made with the entered value, and the display returns to
the original state.
<Adjustment specification>
Min. unit: –10V increment
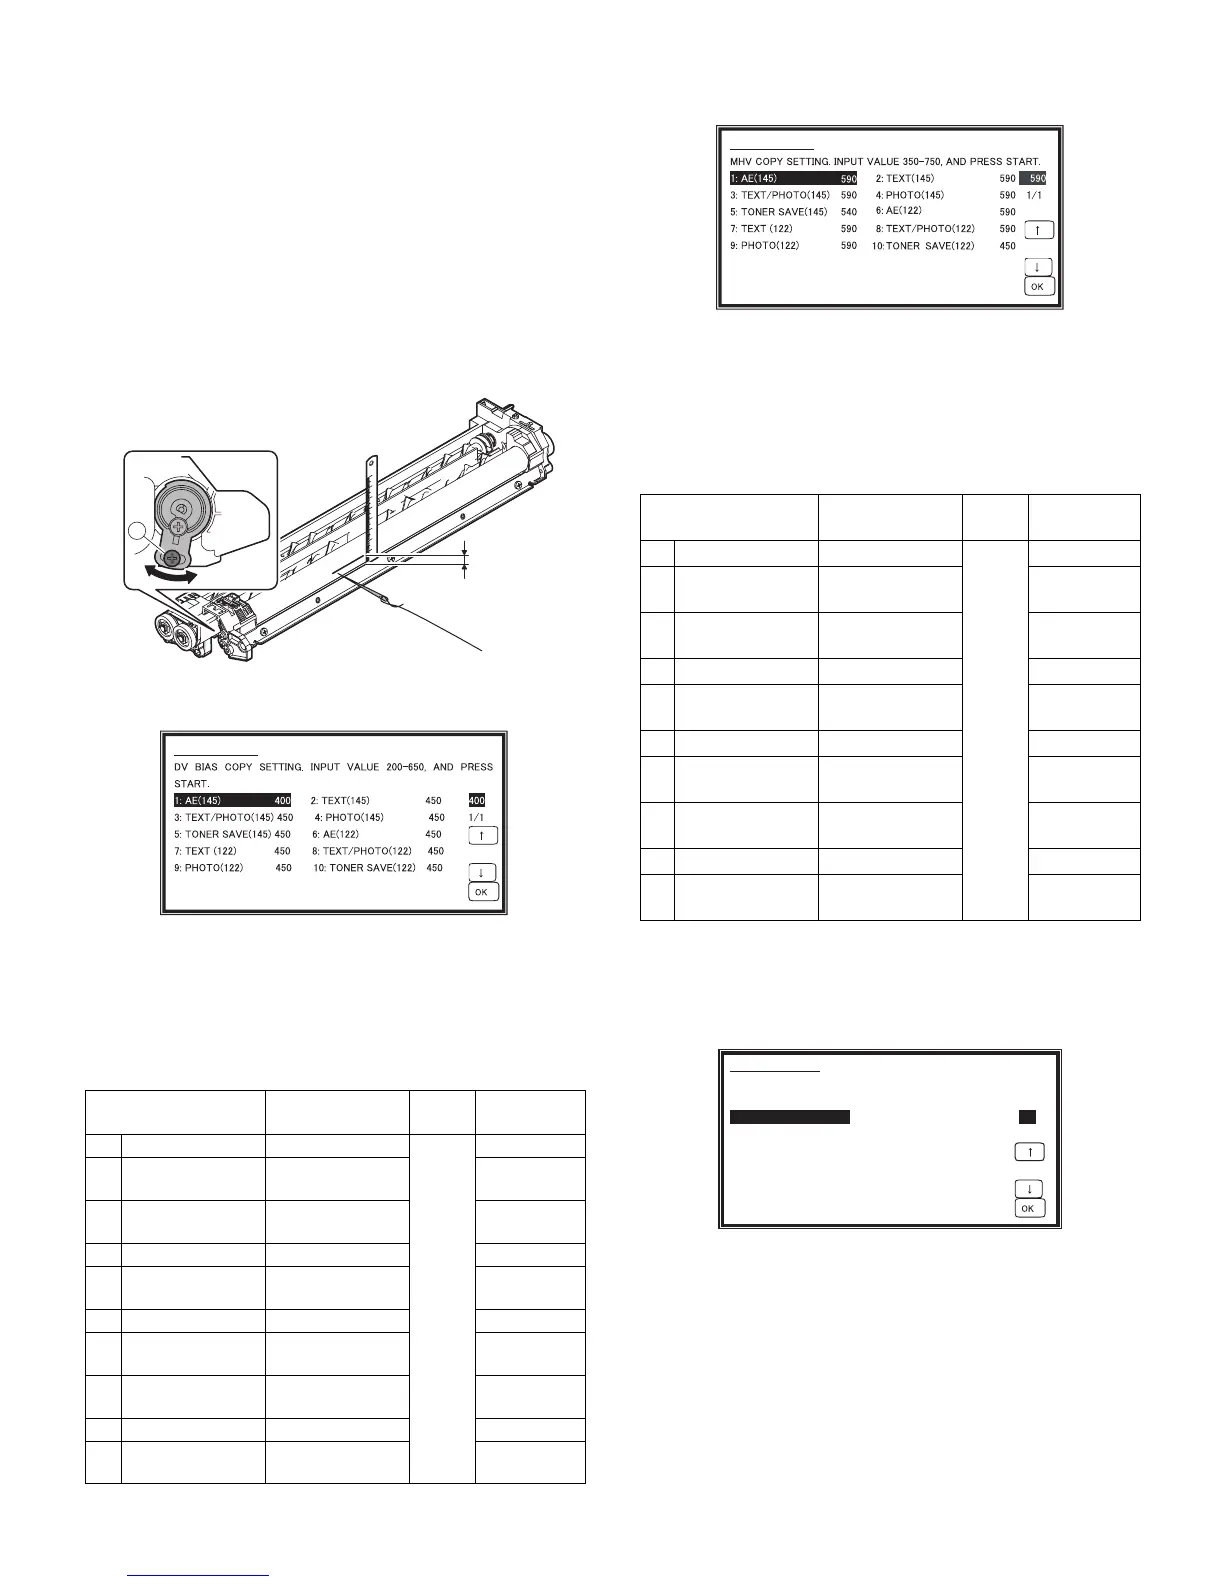
(4) Grid bias voltage adjustment (SIM 8-2)
1) Execute SIM 8-2.
2) Touch the exposure mode to be changed.
The current set value is displayed.
3) Enter the set value with the 10-key.
4) Press the [START] key.
Output is made with the entered value for 30sec, and the display
returns to the original state.
<Adjustment specification>
Min. unit: –10V increment
B. Mechanism section
(1) Print start position adjustment
1) Execute SIM 50-5.
2) Touch the item to be adjusted.
The item and the currently set value are highlighted.
3) Press the [P] key.
The display is shifted to the copy menu.
4) Select the paper feed tray, the print density, and the duplex mode.
Enter the adjustment value with the 10-key.
5) Press the [START] key.
Copying is started.
Item Content
Setting
range
Default
1 AE (145) AE (145mm/s)
200-
650
450
2 TEXT (145)
Character
(145mm/s)
450
3
TEXT/PHOTO
(145)
Character/Photo
(145mm/s)
450
4 PHOTO (145) Photo (145mm/s) 450
5
TONER SAVE
(145)
Toner save
(145mm/s)
400
6 AE (122) AE (122mm/s) 450
7 TEXT (122)
Character
(122mm/s)
450
8
TEXT/PHOTO
(122)
Character/Photo
(122mm/s)
450
9 PHOTO (122) Photo (122mm/s) 450
10
TONER SAVE
(122)
Toner save
(122mm/s)
400
9.1mm
A
SIMULATION 8-1
426
1/1
DV BIAS COPY SETTING. INPUT VALUE 200-550, AND PRESS
START.
1: AE 426
2: TEXT 450
3: TEXT/PHOTO 450
4: PHOTO 450
5: SUPER/PHOTO 400
6: TONER SAVE 376
SIMULATION 8-1
Item Content
Setting
range
Default
1 AE (145) AE (145mm/s)
350-
750
590
2 TEXT (145)
Character
(145mm/s)
590
3
TEXT/PHOTO
(145)
Character/Photo
(145mm/s)
590
4 PHOTO (145) Photo (145mm/s) 590
5
TONER SAVE
(145)
Toner save
(145mm/s)
540
6 AE (122) AE (122mm/s) 590
7 TEXT (122)
Character
(122mm/s)
590
8
TEXT/PHOTO
(122)
Character/Photo
(122mm/s)
590
9 PHOTO (122) Photo (122mm/s) 590
10
TONER SAVE
(122)
Toner save
(122mm/s)
540
SIMULATION 8-2
SIMULATION 50-5
53
1/1
LEAD EDGE ADJUSTMENT(PRINT). INPUT VALUE 0-99, AND PRESS
START.
1: TRAY1 53
2: OPTION 53
3: MANUAL 53
4: DUPLEX 53