OPERATING INSTRUCTIONS | CFP CUBIC 8021989 / 2017-10-20 | SICK AG
Subject to change without notice
14
5 MOUNTING
5 Mounting
5.1 Installation conditions
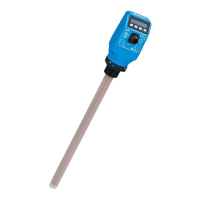
The CFP Cubic level sensor is mounted vertically from above into the container.
The sensor features a G 3/4 A, 3/4" NPT threaded connection or Easy Clamp bracket
(clamping bracket for innite adjustment of the required length).
A minimum connecting piece diameter in accordance with the following graphic must
be observed. The CFP Cubic is to be installed in such a way that, after it has been
mounted, there is a sufcient distance between it and other tank components (e.g.,
supply pipes, other measuring devices) as well as the sides and bottom of the con-
tainer.
These minimum distances are also specied in the following graphic. Observe a min-
imum distance of 30 mm to the container sides and to the tank components.
When operating the sensor, ensure that the ambient temperature is not above or below
the limits. Insulating the sensor housing is not permitted for tanks with hot media.
When positioning the device, ensure that the sensor is not directly exposed to the lling
ow and that at least 10 mm of the probe is covered by the medium to be measured on
all sides.
The sensor housing can be rotated 360°, allowing for the cable outlet to be positioned
freely. If the process temperature drops below 0 °C during operation, the probe must
not be subjected to transverse loads.
5.2 Installation in a container
G 3/4" A
3/4" NPT
1
4
2
X
3
Fig. 2: CFP Cubic in the container
1 100 ... 1,000 mm measuring range
2 min. 30 mm
3 10 mm inactive area at probe end
4 min. 10 mm