Installing, exchanging and connecting
7
210 | 248
Mounting steps
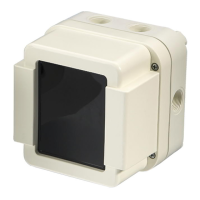
1. Mount the RT interface (4) to the mounting plate (2) or the rear panel (observe
correct installation position) as shown using the five fixing screws (3). The five
spacer bolts (1) must be used when installing on the mounting plate.
2. Wire up the RT interface according to the pin assignment.
3. Fix the cables with the enclosed, self-adhesive Panduit bases and the cable
ties. One means of fixation may be e.g. for the mounting plate and the other for
the rear panel of the station.
7.26.2 Pin assignments
7.26.2.1 X1 switching contacts relays 1…5
Pin Designation Description
10 REL1_OUT+ Relay 1 switching contact (configurable as NO or NC)
9 REL1_OUT- Relay 1 switching contact
8 REL2_OUT+ Relay 2 switching contact (configurable as NO or NC)
7 REL2_OUT- Relay 2 switching contact
6 REL3_OUT+ Relay 3 switching contact (configurable as NO or NC)
5 REL3_OUT- Relay 3 switching contact
4 REL4_OUT+ Relay 4 switching contact (configurable as NO or NC)
3 REL4_OUT- Relay 4 switching contact
2 REL5_OUT+ Relay 5 switching contact (configurable as NO or NC)
1 REL5_OUT- Relay 5 switching contact
NO = Normally open
NC = Normally closed
Admissible cable cross-section: 0.14…1.5 mm²
REL3_OUT-
 Loading...