Installation UM353-1
March 2003
8-14
Common Ground Bus
Earth
Ground
20
+
_
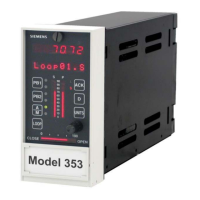
Model 353
Rear Terminals
18
Controller Circuitry
Analog Signal,
4-Wire Transmitter,
4-20 mA Output
External Devices
1-5 Vdc
22
+
_
23
+
_
24
X03107S3
External
Power
Source
AIN1
AIN2
AIN3
Note: Range resistors are 250 Ohms.
Analog Signal,
4-Wire Transmitter,
4-20 mA Output
Analog Signal,
4-Wire Transmitter,
4-20 mA Output
1-5 Vdc
1-5 Vdc
6
21
FIGURE 8-10 Analog Inputs AIN1, 2, and 3; 4-Wire Transmitters
45
46
47
48
Controller Circuitry
4-20 mA
Source
+
_
Ground
Isolated
Ground
Isolated
Power
Note: See Table 8.1 for AINU2 terminals.
MG000611
Universal
Converter,
Isolated
Inputs
Model 353
Rear Terminals
3.75
45
46
47
48
Controller Circuitry
Millivolt
Source
+
_
Ground
Isolated
Ground
Isolated
Power
Note: See Table 8.1 for AINU2 terminals.
X03117S1
Universal
Converter,
Isolated
Inputs
Model 353
Rear Terminals
A. 4-20 mA Input
B. Millivolt Input
FIGURE 8-11 Universal Analog Input AINU1
2. 4-20 mA Input Only - Select a 250Ω (for AIN#) or 3.75Ω (for AINU#)
resistor from the installation kit and insulate the bent resistor lead with a piece
of sleeving. At the lead end, approximately 1/4" (6 mm) to 5/16" (8 mm) of
bare resistor lead should be exposed.
If a crimp-on connector is to be used, go to step 3. Otherwise, go to step 4.
0.5"
(12.7mm)
0.8"
(20.3mm)
Place sleeving
on this lead.

 Loading...