Mobility, Intelligent Traffic Systems
Sopers Lane, Poole, Dorset, BH17 7ER
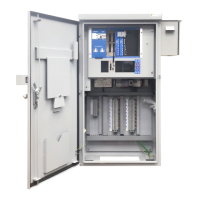
7.3 Cabinet Installation
Prior to any installation works, firstly make sure that the cabinet has been delivered
to site without external physical damage.
The electronics should be removed from the controller and stored separately if:
• The controller cabinet cannot be made waterproof
• The cabinet will be un-powered and may suffer from condensation, moisture
ingress and/or animal/insect infestation
• There is a risk of the cabinet being damaged on-site
• The cabinet will be left in an un-powered state for a prolonged period.
7.3.1 Order of Installation
• Remove the electronics from the controller
• Remove the stool from the case, if not already separate
• Remove the CET bars from the stool
• Install the stool into the ground
• Run cables to the controller.
• Re-fit the CET bars to the stool
• Terminate the cable armouring to the CET bars
• Test the cables
• Re-fit the controller case to the stool
• In-fill the stool
• Seal the base
• Refit the electronics
7.3.2 Removal of Controller Electronics
Ensure the Master Switch is in the OFF position
Remove all PCBs and the Mains Distribution Unit from the rack. Swing the rack
forward and unscrew the retaining bolts for the back plate of the rack. Tie this plate
to a convenient point on the rear face of the cabinet. Lift off the complete rack
assembly from the hinge pins.