New Messages
The New Message menu option can be used to create, edit and send short text
messages.
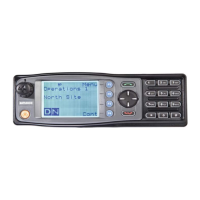
Figure 40: New Message Screen
Each message can be up to 23 characters in length. The number of remaining
characters that can be entered is displayed above the message.
Text characters are entered using the keypad. Each keypad button is labelled with up
to 4 text characters (e.g. 7 = PQRS). The text characters are entered by pressing the
keypad once for the first character, twice for the second, and three times for the third,
and so on.
After a short delay, the cursor will advance to the next character entry. Entered
characters are inserted immediately to the right of the cursor. Punctuation characters
(full stop, comma, question mark, etc.) are entered using the # key. A space is entered
with the * key.
Each line displays up to 15 characters. Up to two lines can be displayed at once. The
text used in the message is lowercase, left justified. The ▴ and ▾ keys are used to scroll
the cursor left or right.
Pressing the # key twice in quick succession will erase the character to the left of the
cursor. Pressing the * key twice in quick succession will erase the complete message.
Press the Back key to return to the previous screen.
Press the Select key to display the Send screen, which allows you to select a Contact
from the Contacts menu.
Sending Status, Template and Text Messages
To send Status, Template and Text Messages carry out the following:
1. When the message has been selected/created and is ready to be sent, press the
Select key to display the Send screen (see Figure 41).
2. On the Send screen, use the ▴ and ▾ keys to select the ‘CONTACT’ option. Press
the Select key. An individual Contact Details screen from the Contact List will be
displayed.
3. To select a different contact than the one displayed, use the ▴ and ▾ keys.
4. With the correct Contact displayed, press the Select key to send the message.
Document Number: TNM-U-E-0145 Issue: 1.0 Page 32