Scan Menu
The Scan menu allows the User to manually start and stop the channel scanning
process on the current channel, if the channel is programmed as a “scan” channel in
the FPP.
This Scan function can be programmed to a toggle key.
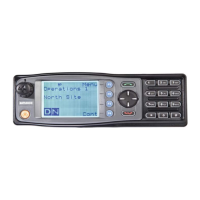
Figure 44: Scan Menu
Use the ▴ and ▾ keys to select either the Start or Stop function. Press the Select key
initiate the action.
Scan Functions
The display shows the name of the current Scan-Group (e.g. “ScanChGrp”), which may
be changed using the ▴ and ▾ keys .
The Scan-Group number is shown on the display, i.e. 1…4 if it is a User Scan-Group, or
blank for Fixed Scan-Groups. While the Scan screen is displayed the radio is scanning
the displayed group.
The Scan Screen does not timeout. Normal exit is via the OK button.
The RSSI indicator shows the received signal strength as the radio is scanning. All
other buttons have the same assignments as in the Main Channel Screen.
When stopped on a channel, the name of the selected site is displayed, and the
“rotating arrow” symbol is no longer displayed.
While listening on the channel, the User can PTT on that channel. After the signal
disappears (or the microphone is placed back in the cradle) the radio will remain
listening on the channel for a short time before resuming scanning.
The microphone may need to be in cradle for the radio to scan. If the microphone is
left off-cradle for too long then the radio may sound a continuous alert tone until it is
replaced.
DTMF (if enabled) is only active when the microphone is out of the cradle.
The keypad may NOT be used for quick channel change (e.g. 4*#) in this Screen.
Document Number: TNM-U-E-0145 Issue: 1.0 Page 34