Tracking MARPA targets
1. Position the cursor on the target on the radar image
2. Select Acquire targets from the menu
3. Repeat the process if you want to track more targets
After your targets are identified, it may take up to 10 radar sweeps to acquire and then track
the target.
Cancelling MARPA target tracking
When targets are being tracked, the radar menu expands to include options for cancelling
individual targets or to stop the tracking function.
Cancel tracking individual targets by selecting the target icon before activating the menu.
Viewing MARPA target information
If the pop-up is activated, you can select a MARPA target to display basic target information.
Information for the 3 MARPA targets closest to the vessel is also displayed in the data bar.
When a target is selected, detailed information for the target can be displayed from the
menu.
You can display information about all MARPA targets by using the Vessels option on the
Home page.
MARPA alarm settings
You can define the following MARPA alarms:
• MARPA target lost
Controls whether an alarm is activated when a MARPA target is lost.
• MARPA unavailable
Controls whether an alarm is activated if you do not have the required inputs for MARPA
to work (valid GPS position and heading sensor connected to the radar server).
Recording radar data
You can record radar data and save the file internally in the NSO evo2 unit, or save it onto an
SD card inserted into the unit’s card reader.
A recorded radar file can be used for documenting an event or an operational error. A logged
radar file can also be used by the simulator.
If more than one radar is available, you can select which source you want to record.
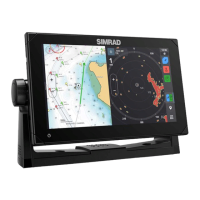
Radar settings
Radar symbology
You can select which optional radar items that should be turned on/off collectively from the
menu. Refer to the Radar panel illustration.
Radar | NSO evo2 Operator Manual
75