1-4
18
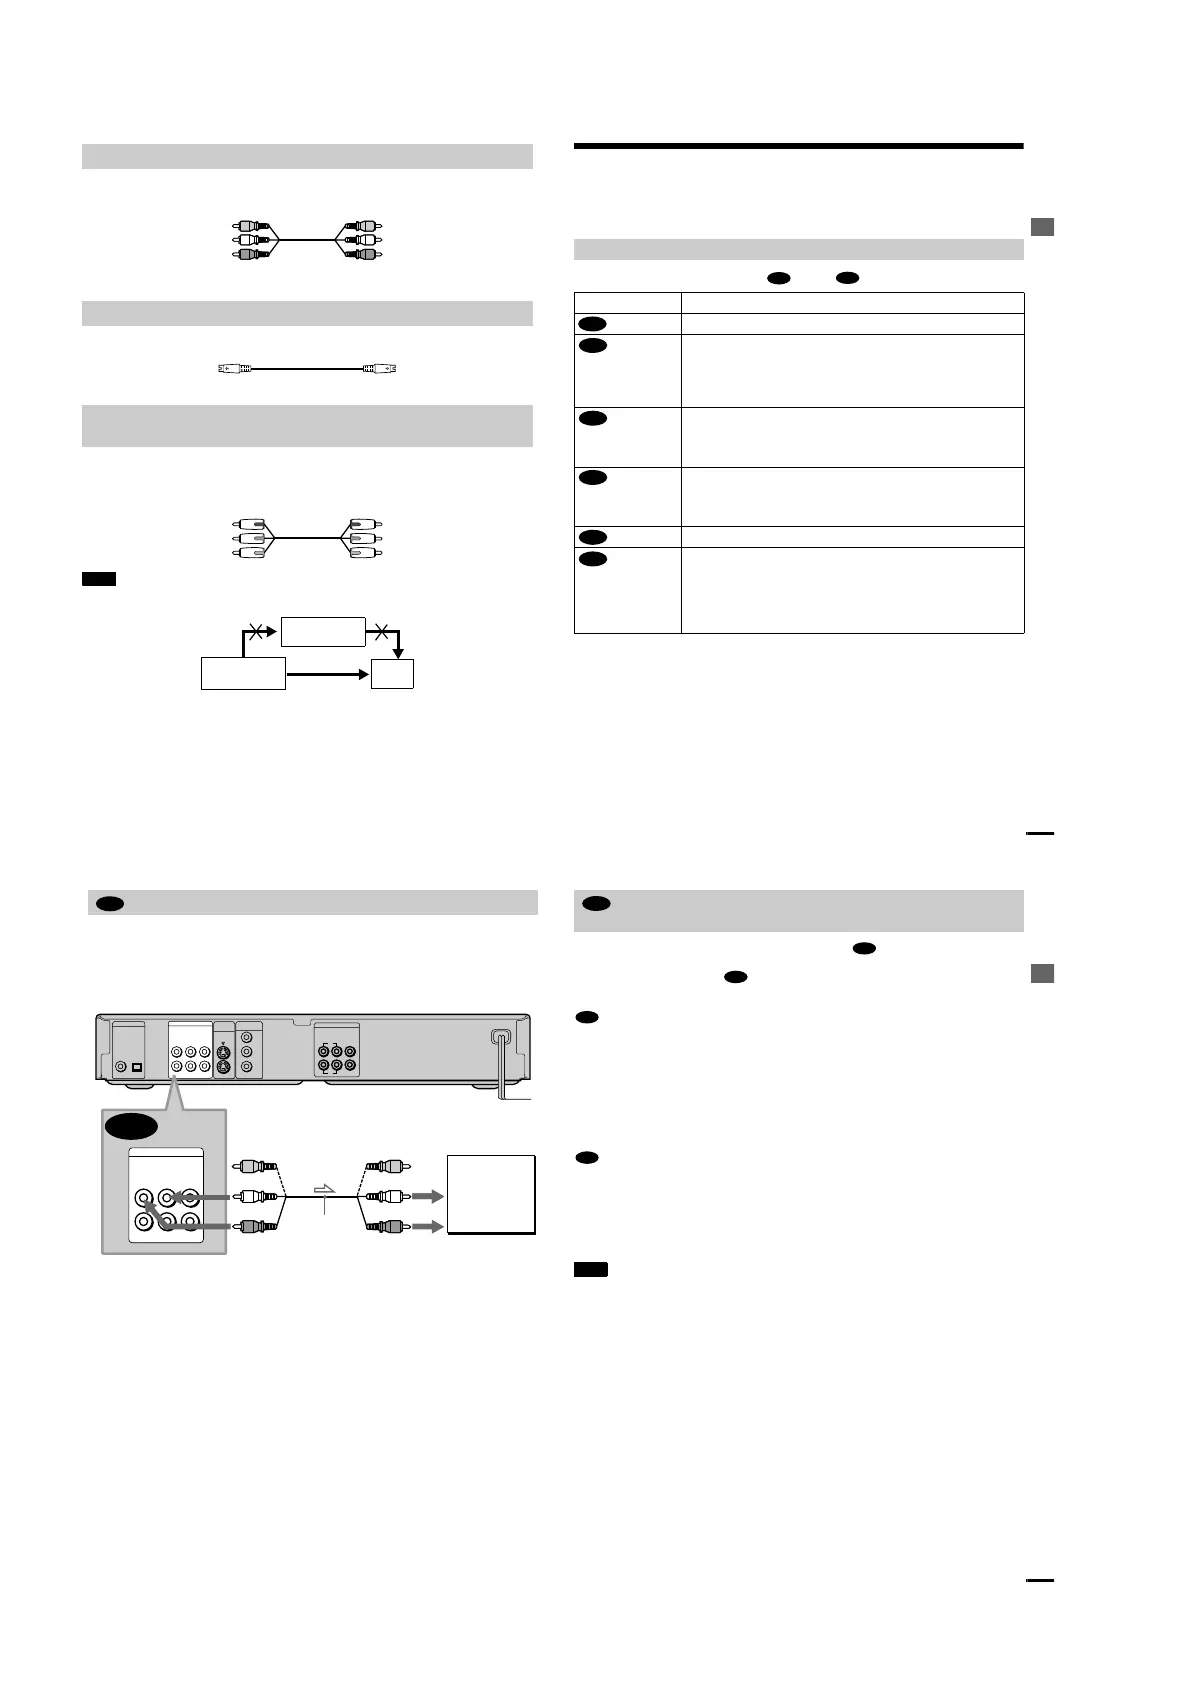
Connect the yellow plug of the audio/video cord (supplied) to the yellow (video) jacks. You will
enjoy standard quality images.
Use the red and white plugs to connect to the audio input jacks (page 20).
Connect the S VIDEO cord (not supplied). You will enjoy standard quality images.
Connect the component via the COMPONENT VIDEO OUT jacks using a component video cord
(not supplied) or three video cords (not supplied) of the same kind and length. You will enjoy
accurate color reproduction and high quality images.
Note
Do not connect the player to a VCR so that the signals of the player are passed to the TV via the VCR. If you do so, you may
not receive a clear image on the TV screen.
A
If you are connecting to a video input jack
B
If you are connecting to an S VIDEO input jack
C
If you are connecting to a monitor, projector or, AV amplifier (receiver) having
component video input jacks (Y, P
B
, P
R
)
Yellow (Video)
White (L)
Red (R)
Yellow (Video)
White (L)
Red (R)
VCR
CD/DVD player
TV
Connect directl
y
Hookups
19
Step 2: Connecting the Audio Cords
Refer to the chart below to select the connection that best suits your system. The surround effects
you will enjoy depend on the connections and components you use.
Select one of the following connections, through .
* Manufactured under license from Dolby Laboratories. “Dolby,” “Pro Logic,” and the double-D symbol are
trademarks of Dolby Laboratories. Confidential unpublished works. © 1992-1997 Dolby Laboratories. All rights
reserved.
** “DTS” is a registered trademark of Digital Theater Systems, Inc.
Select a connection
Connection Components to be connected
(page 20)
•
TV (stereo)
(page 21)
•
AV amplifier (receiver) having 5.1ch input jacks
•
4 speakers
(front L and R, rear L and R)
•
6 speakers
(front L and R, center, rear L and R, subwoofer)
(page 21)
•
AV amplifier (receiver) having a Dolby
*
Digital or DTS
**
decoder and a digital
input jack
•
6 speakers
(front L and R, center, rear L and R, subwoofer)
(page 23)
•
Stereo amplifier (receiver)
(having L and R audio input jacks only, or having a digital input jack)
•
2 speakers
(front L and R)
(page 23)
•
MD deck/DAT deck
(page 24)
•
AV amplifier (receiver) with a Dolby Surround (Pro Logic) decoder
(having L and R audio input jacks only, or having a digital input jack)
•
3 speakers
(front L and R, and rear (monaural))
•
6 speakers
(front L and R, center, rear L and R, subwoofe
r)
A
D
A
B
B
C
C
D
continued
20
This connection will use your TV speakers for sound.
xRecommended surround sound effects for this connection.
•TVS DYNAMIC (page 50)
•TVS WIDE (page 50)
The yellow plug is used for video signals (page 17).
Connecting to your TV
A
PCM/DTS/
DOLBY DIGITAL
S VIDEO
OUT
COMPONENT
VIDEO OUT
COAXIAL
OPTICAL
R-AUDIO 1-L VIDEO 1
Y
P
B
P
R
R-AUDIO 2-L VIDEO 2
DIGITAL OUT
LINE OUT
R-AUDIO 1-L VIDEO 1
R-AUDIO 2-L VIDEO 2
LINE OUT
5.1CH OUTPUT
WOOFER
L
R
FRONT REAR CENTER
1
2
A
TV
l : Signal flow
(white)
Audio/video cord
(supplied)
to
audio input
(yellow)
(white)
(red)
(yellow)
(red)
CD/DVD player
Hookups
21
If your AV amplifier (receiver) has 5.1 channel inputs, use .
If you want to use the Dolby Digital or DTS decorder function on your AV amplifier (receiver),
connect to its digital jack using . With the following connections, you can enjoy a more
realistic audio presence in the comfort of your own home.
: Connecting to the 5.1ch input jacks
You can enjoy 5.1ch surround sound using the internal Dolby Digital decoder of this player. You
can also enjoy Dolby Surround (Pro Logic) sounds, or surround sounds using various
SURROUND modes (page 50).
xRecommended surround sound effects for this connection.
When 6 speakers are connected.
•Dolby Digital (5.1ch) (page 79)
(Set “SURROUND” to “OFF.”)
: Connecting to the digital input jack
This connection will allow you to use the Dolby Digital or DTS decoder function of your AV
amplifier (receiver). You are not able to enjoy the SURROUND sound effects of the player.
xRecommended surround sound effects using this connection with your amplifier (receiver).
•Dolby Digital (5.1ch) (page 79)
•DTS (5.1ch) (page 79)
Note
After you have completed the connection, be sure to set “DOLBY DIGITAL” to “DOLBY DIGITAL” (page 27). If
your AV amplifier (receiver) has a DTS decoder, set “DTS” to “ON” (page 27). Otherwise, no sound or a loud noise
will come from the speakers.
Connecting to an AV amplifier (having 5.1ch input jacks or a digital input
jack) and 4 to 6 speak
ers
B
B-1
B-2
B-1
B-2
continued
 Loading...