1-18
74
Notes
• If each or the front or rear speakers are not placed at
an equal distance from your listening position, set
the distance according to the closest speaker.
• Do not place the rear speakers farther away from
your listening position than the front speakers.
xBALANCE
You can vary the balance of the left and right
speakers as follows. Be sure to set “TEST
TONE” to “ON” for easy adjustment.
The default adjustments are in parentheses.
xLEVEL
You can vary the level of each speaker as
follows. Be sure to set “TEST TONE” to
“ON” for easy adjustment.
The default adjustments are in parentheses.
To adjust the volume of all the
speakers at one time
Use the amplifier’s (receiver’s) volume control.
xTEST TONE
The speakers will emit a test tone. Use this
when you use the 5.1CH OUTPUT jacks and
adjust the “BALANCE” and “LEVEL”.
1 After you stop playback, select
“SPEAKER SETUP” in the Setup Display.
2 Select “TEST TONE” and set “TEST
TONE” to “ON.”
You will hear the test tone from each
speaker in sequence.
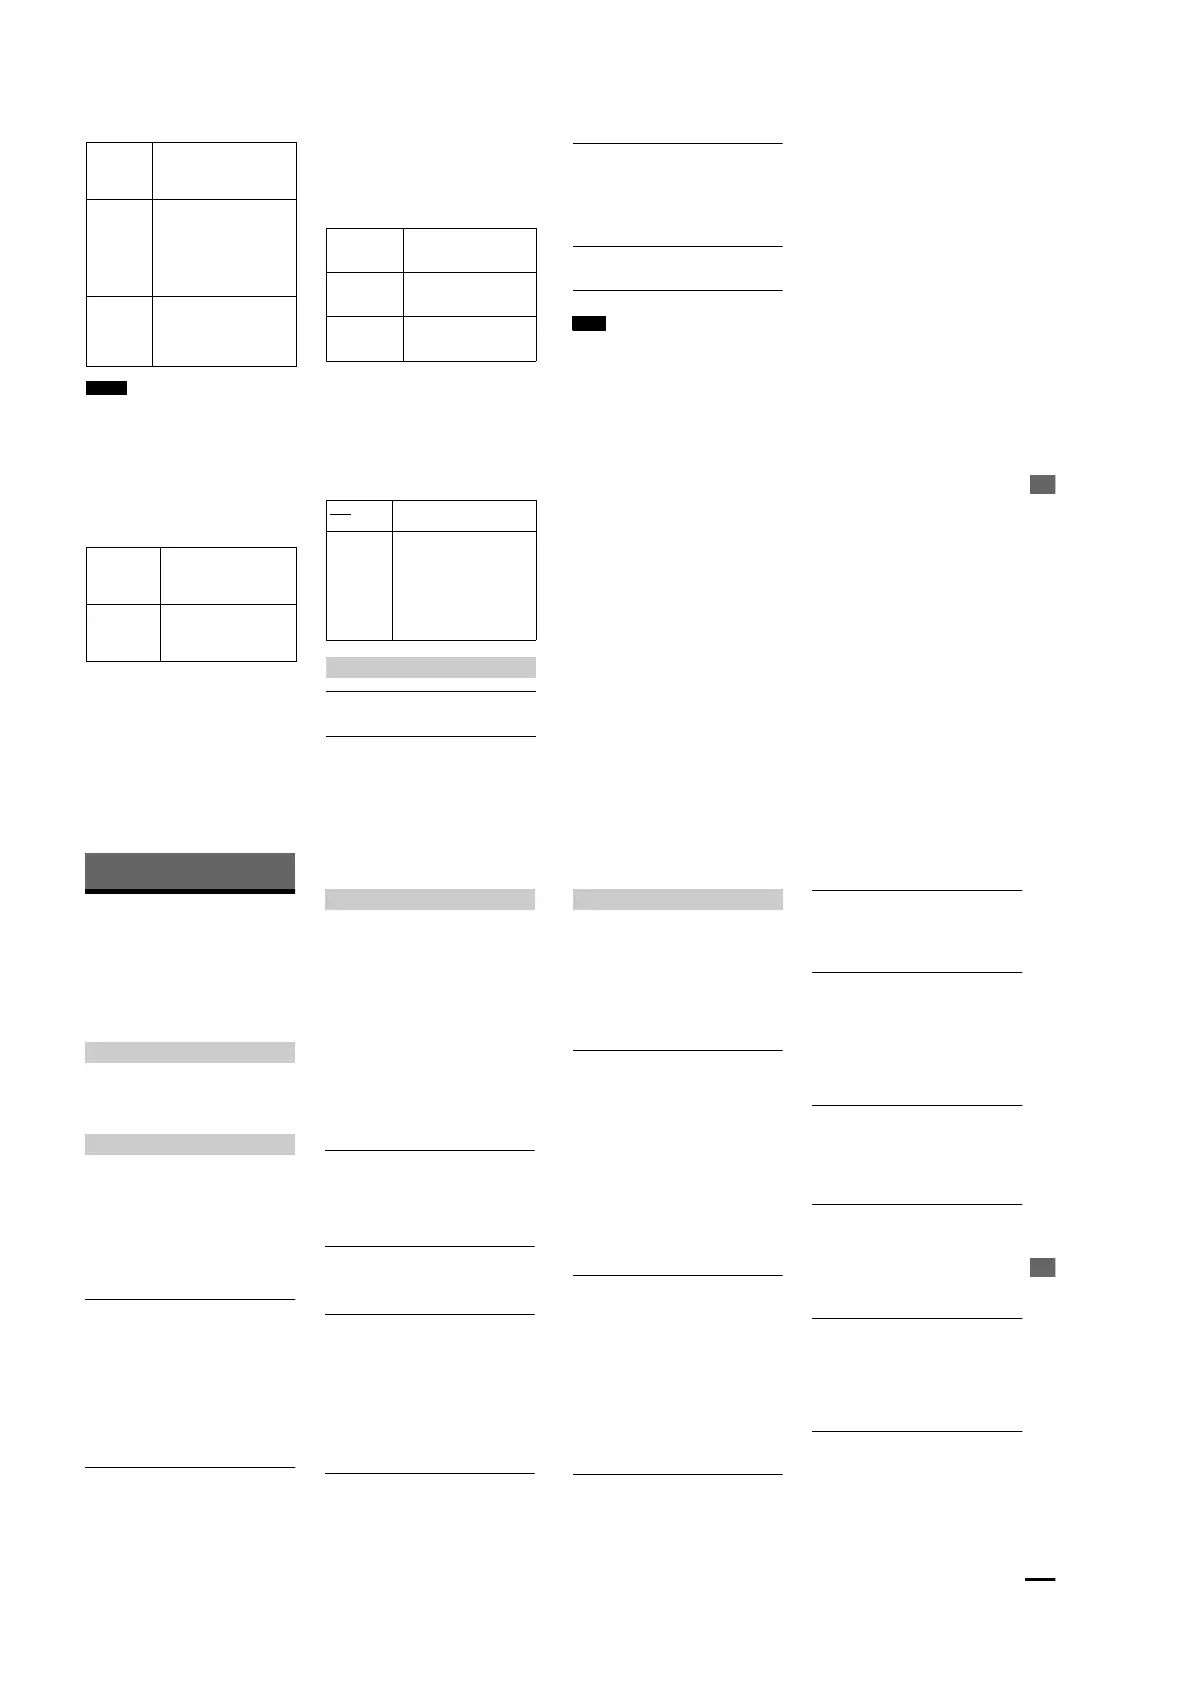
FRONT
(12ft/3.6m)
Front speaker distance from the
listening position can be set in 1
foot (0.3 meter) increments from
4 to 50 feet (1.2 to 15.2 meters).
CENTER
(12ft/3.6m)
Center speaker distance can be
moved up to 2 feet (0.6 meters)
backward from the front
speakers or 5 feet (1.5 meters)
forward closer to the listening
position, in 1 foot (0.3 meter)
increments.
REAR
(10ft/3m)
Rear speaker distance can be
moved up to 16 feet (4.8 meters)
closer to your listening position
from the front speaker position,
in 1 foot (0.3 meter) increments.
FRONT (0dB) Adjust the balance between the
front left and right speakers (–
6dB [L] to +6dB [R], 0.5dB
incr
ements).
REAR (0dB) Adjust the balance between the
rear left and right speakers (–
6dB [L] to +6dB [R], 0.5dB
increments).
CENTER
(0dB)
Adjust the level of the center
speaker (–6dB to +6dB, 0.5dB
increments).
REAR (0dB) Adjust the level of the rear
speakers (–6dB to +6dB,
0.5dB increments).
SUBWOOFER
(0dB)
Adjust the level of the
subwoofer (–10dB to +10dB,
0.5dB increments).
OFF The test tone is not emitted from
the speakers.
ON The test tone is emitted from
each speaker in sequence while
adjusting balance or level.
When you select one of the
“SPEAKER SETUP” items, the
test
tone is emitted from both left
and right speakers
simultaneously.
Adjusting the speaker volume and leve
l
Settings and Adjustments
75
3
From your listening position, select
“BALANCE” or “LEVEL” and adjust the
value of “BALANCE” using C/c and
“LEVEL” using X/x.
The test tone is emitted from both left and
right speakers simultaneously.
4
Select “TEST TONE” and set “TEST
TONE” to “OFF” to turn off the test tone.
Note
When you adjust the speaker settings, the sound cuts
off for a mome
nt.
76
Additional Information
Troubleshooting
If you experience any of the following
difficulties while using the player, use this
troubleshooting guide to help remedy the
problem before requesting repairs. Should
any problem persist, consult your nearest
Sony dealer.
The power is not turned on.
, Check that the AC power cord is connected
securely.
There is no picture.
, The connecting cords are not connected
securely.
, The connecting cords are damaged.
, The player is not connected to the correct TV
input jack (page 17).
, The video input on the TV is not set so that you
can view pictures from the player.
Picture noise appears.
, The disc is dirty or flawed.
, If the picture output from your player goes
through your VCR to get to your TV, the copy-
protection signal applied to some DVD
programs could affect picture quality. If you
still experience problems even when you
connect your player directly to your TV,
plea
se try connecting your player to your TV
’s
S video input (page 17).
Even though you set the aspect ratio
in “TV TYPE” of “SCREEN SETUP,”
the picture does not fill the screen.
, The aspect ratio of the disc is fixed on your
DVD.
There is no sound.
, The connecting cord is not connected securely.
, The connecting cord is damaged.
, The player is connected to the wrong input
jack on the amplifier (receiver) (page 21, 23,
24).
, The amplifier (receiver) input was not
changed so that you can listen to the player.
, The player is in pause mode or in Slow-motion
play mode.
, The player is in fast forward or fast reverse
mode.
, If the audio signal does not come through the
DIGITAL OUT (OPTICAL or COAXIAL)
jack, check the audio settings (page 71).
Sound is noisy.
, The disc is dirty or flawed.
, When playing a CD with DTS sound tracks,
noise will come from the LINE OUT L/R
(AUDIO) 1/2 jacks (page 31).
Sound distortion occurs.
, Set “AUDIO ATT” in “AUDIO SETUP” to
“ON” (pag
e 70).
The surround effect is difficult to hear
when you are playing a Dolby Digital
sound track.
, Check the speaker connections and setting
(page 21, 27, 71)
, Depending on the DVD, the output signal may
not be the entire 5.1 channels. It may be
monaural or stereo even if the sound track is
recorded in Dolby Digital format.
The sound comes from the center
speaker only.
, Depending on the disc, the sound may come
from the center speaker only.
, Set “SURROUND”to “OFF” in the Control
Menu display (page
50).
Power
Picture
Sound
Additional Information
77
The remote does not function.
, There are obstacles between the remote and
the player.
, The distance between the remote and the
player is too far.
, The remote is not pointed at the remote sensor
on the player.
, The batteries in the remote are weak.
The disc does not play.
, There is no disc inside.
, The disc is turned over.
Insert the disc with the playback side facing
down on the disc tray.
, The disc is skewed.
, The player cannot play CD-ROMs, etc. (page
6).
, The region code on the DVD does not match
the player.
, Moisture has condensed inside the player.
Remove the disc and leave the player turned
on for about half an hour. Turn on the power
again before playing the disc (page 3).
The disc does not start playing from
the beginning.
, Program Play, Shuffle Play, Repeat Play, or
A-B Repeat Play has been selected (page 35).
Press CLEAR to cancel these functions before
playing a disc.
, Resume Play has been selected.
During stop, press x on the player or the
remote and then start playback DVD (page
32).
, The title, DVD or PBC menu automatically
appears on the TV screen.
The player starts playing the disc
automatically.
, The DVD features an auto playback function.
, “AUTO PLAY ” in “CUSTOM SETUP” is set
to “TIMER” (page 68).
Playback stops automatically.
, Some discs may contain an auto pause signal.
While playing such a disc, the player stops
playback at the auto pause signal.
You cannot perform some functions
such as stop, Search, Slow-motion
play, Repeat Play, Shuffle Play, or
Program Play.
, Depending on the disc, you may not be able to
do some of the operations above. See the
operating manual that comes with the disc.
Messages do not appear on the
screen in the language you want.
, In the Setup Display, select the desired
language for the on-screen display in “OSD”
under “LANGUAGE SETUP” (page 66).
The language for the sound track
cannot be changed.
, Multilingual tracks are not recorded on the
DVD being played.
, The DVD prohibits the changing of the
language for the sound track.
The subtitle language cannot be
changed.
, Multilingual subtitles are not recorded on the
DVD being played.
,
The DVD
prohibits
the changing of the
su
btitles.
The subtitle cannot be turned off.
, The DVD prohibits the subtitles being turned
off.
Operation
continued
 Loading...