PXS-710D Section 3
54
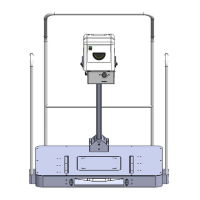
3.3 OPERATING PROCEDURES: (GENERATOR/CONTROL ASSEMBLY)
CAUTION
Do not attempt to connect or disconnect any interconnect
cables without disconnecting the mains supply first.
3.3.1 MANUAL OPERATION (OPTIONAL SR-115-RC)
1) Operate the “Power On” switch (1) to turn the primary power on.
2) Activate the “Collimator Lamp” (G) by depressing one of the
push-buttons located on the left or right side of the collimator. The
collimator lamp will automatically extinguish after a period of
approximately 15-30 seconds to extend bulb life.
3) Collimate the light field to the area of interest by means of the
shutter adjust knobs.
4) Manually select the desired kVp by means of the kVp adjust
switches on the optional Remote Control SR-115-RC (9).
5) Adjust the “mAs” to the desired interval by means of the mAs
selectors (10). The resultant mAs is displayed on the mAs meter
(8). Reference Table 3.2 for standard techniques.
6) After the required warm up period, the “Ready” Indicator will
illuminate. It will not be possible to operate the unit until this has
occurred. If the unit has not been operated for a long period of
time an additional 2-minute waiting period is recommended.
7) While holding the “Remote Exposure Control”, step at least 6
feet to side of side of the x-ray control/generator assembly.
8) Depress the “X-Ray Switch” to the first position (prep). The
“Ready Light” will go off and come back on when the unit is fully
prepped.