S - 56 | English English | S - 57
Thru Axles
Thru axles are mounted in almost all fields when STEVENS bicycles are
exposed to high loads, i.e. when riding cross-country, all mountain, enduro as
well as in the field of road racing, cyclocross, e-bikes and allround. They provide
suspension forks with a suitable stiffness.
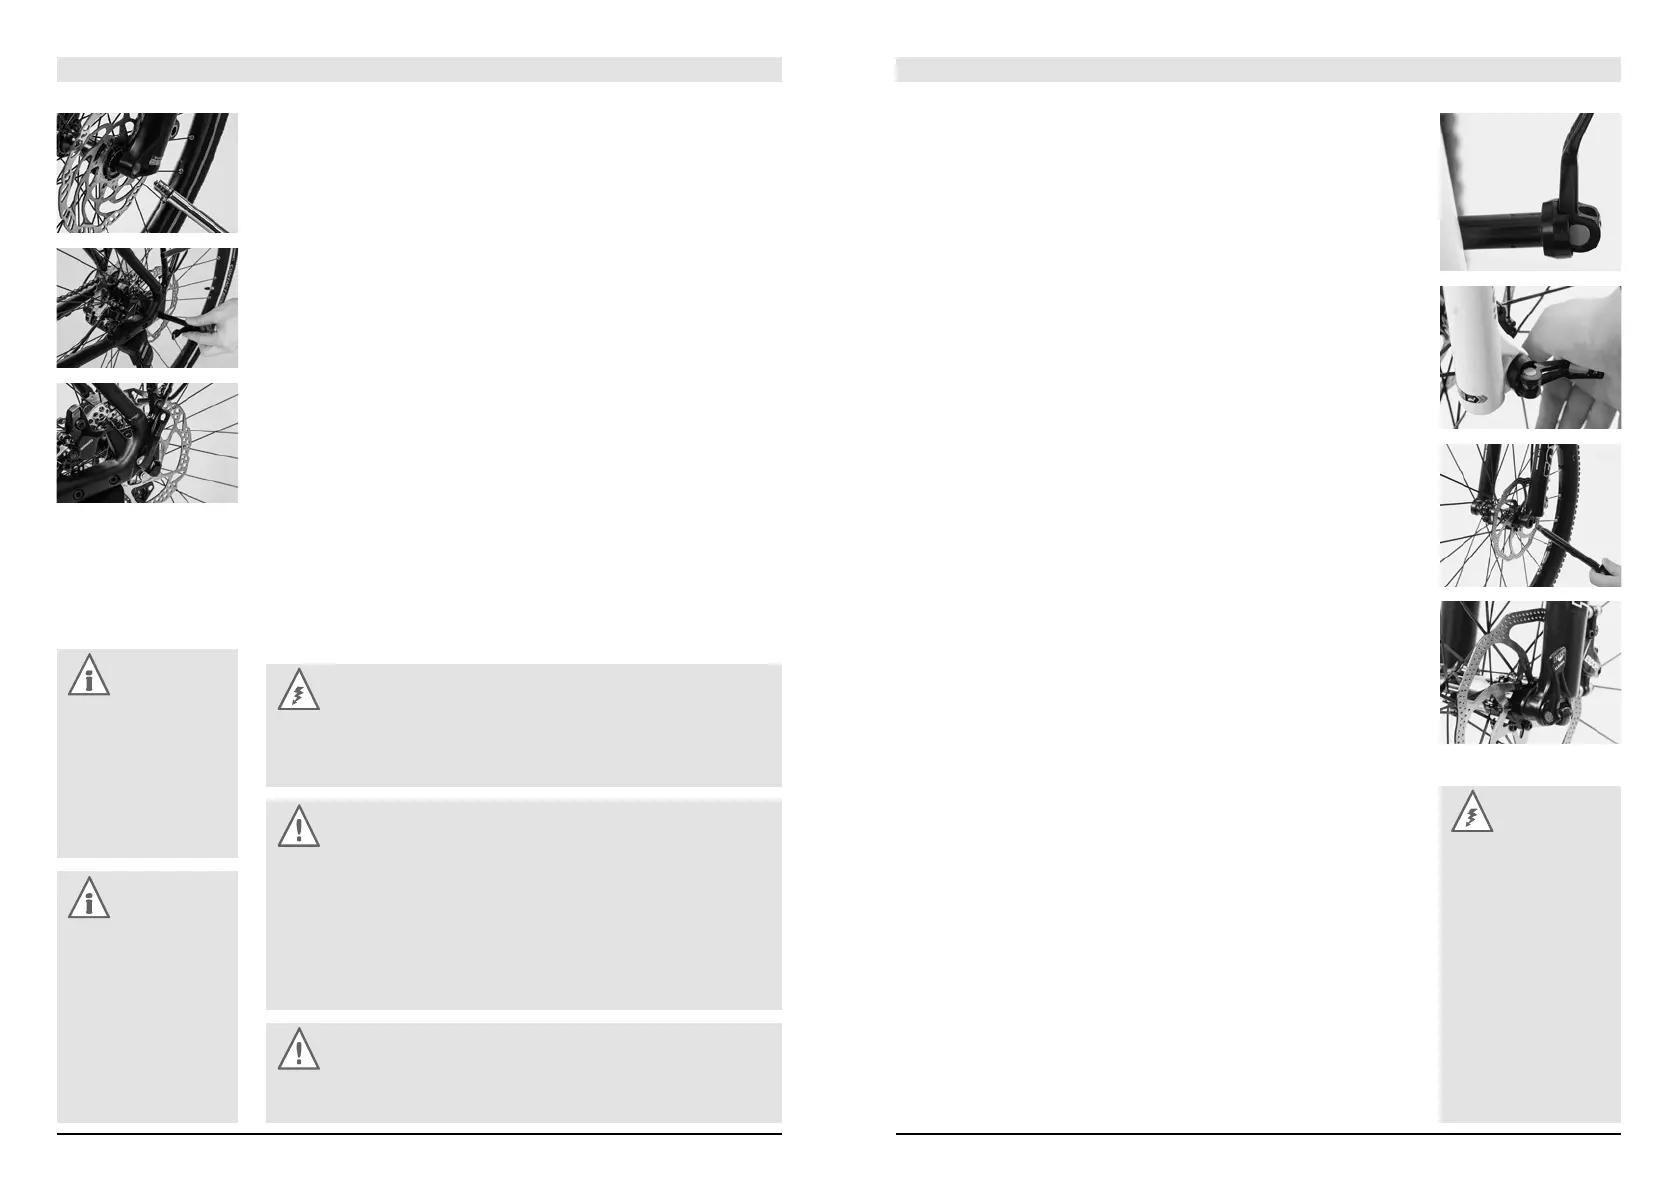
Useful Information for Mounting Wheels with Thru Axles
There is a wide range of thru-axle systems available now. Some systems are
tightened with quick-releases. Other systems require special tools for assembly
or disassembly.
Check the fixing after the first one to two hours of use and subsequently every
20 hours of use.
To dismount the wheel, open the quick-release of the axle at the fork. Once
it is open the thru axle can be loosened and the axle can be fully removed from
the hub.
If you are in doubt or if you have any questions, contact your STEVENS dealer.
Danger:
Improperly mounted wheels may throw you off your bicycle or result in
serious accidents! Ask your STEVENS dealer to show you how to handle
the thru axle type you have.
Caution:
To mount the axle only use the tools recommended by the manufacturer.
Make it a rule to use a torque wrench. Tighten carefully by approaching
the prescribed maximum torque value in small steps (0.5 Nm increments)
and check in between the proper fit of the component. Do not exceed the
maximum torque value indicated by the manufacturer! You find them on
the components themselves and/or in the chapter “Recommended Torque
Settings”. A too tight fixing of the axle can damage the axle or the fork leg.
Caution:
Check the thru axle fixing after one to two hours of use and subsequently
every 20 hours of use.
Note:
Before removing the
wheel or doing any
maintenance work, be
sure to read the oper-
ating instructions of the
fork, thru axle and wheel
manufacturers first!
Note:
Before mounting or
replacing a fork/wheel
combination with thru
axle system, be sure
to read the operating
instructions of the
respective suspension
fork or wheel manufac-
turer first.
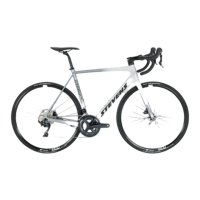
RockShox Maxle Thru-Axle-System
If your bike is equipped with a Maxle thru-axle-system, put the wheel into the
fork and mount the rotor in the brake calliper. Bring the wheel into the right posi-
tion between the drop-outs and slide the axle with the Maxle quick-release levers
open from the right side through the drop-out and the hub.
Make sure the quick-release lever is completely open and lies in the axle
recess. As soon as the axle thread engages with the thread of the left fork leg,
close the axle by turning it clockwise. During the first rotations you should be able
to rotate the thru axle easily.
Now turn the lever clockwise as tight as you can with your hand. Make sure the
quick-release lever does not slip out of the axle recess during tightening. Finish
by closing the Maxle thru axle quick-release lever like a usual quick-release lever.
Make sure the quick-release lever does not stand out to the front or to the side.
Fox E-Thru 15 mm
If your bike is equipped with a Fox E-Thru 15 mm thru-axle-system, put the
front wheel into the fork and mount the rotor in the brake calliper. Bring the front
wheel into the right position between the drop-outs and slide the axle with the
E-Thru quick-release lever open from the left side through the drop-out and the
hub. As soon as the axle thread engages with the thread of the right fork leg, close
it by turning it clockwise. During the first rotations you should be able to rotate
the thru axle easily. Tighten the axle a little and then release it by about a third of
a turn.
Close the E-Thru quick-release lever like a usual quick-release lever. From the
start of the closing movement up to about the first half of its travel the lever should
move very easily without clamping the wheel, whereas over the second half of its
travel the force you need to move it should increase considerably. Towards the end
of its travel the lever should be very hard to move.
In case you do not succeed in closing the lever fully, re-open it and turn the
axle a little anticlockwise. Try closing the quick-release lever once again. Use the
palm of your hand while your fingers pull on an immovable part, such as the fork
leg, but not on a spoke or the rotor.
In its end position the quick-release lever should be tight so that it can no
longer be turned. Make sure the quick-release lever does not stand out to the
front or to the side. The best closing position is in nearly upright position in front
of the lower leg.
Danger:
Check the tight fit of
whatever wheel fas-
tening system possible
after a few kilometres
(miles) or hours of use,
at the latest however
after 4 hours or 80
km (50 miles). A loose
wheel fastening can
throw the rider off his
bike with unforeseeable
consequences for life
and limb.