25
6-Operaon and Use
6.1-Operaon
Place the liing arm at the support point specied by the vehicle and adjust the rubber tray to the same height.
Check the posion of the rubber tray under the vehicle chassis before each single raising or when vehicle is lowered
to the ground and need to raise again.
6.2-Raising/Liing
◇ Press the power switch unl the vehicle reaches desired height. When the vehicle is raised, the safety lock auto-
macally engaged.
◇ During raising/liing, check whether the arm lock has been locked, it can be visually checked when it is raised
to a certain height (stop and check).
6.3-Stopping
Aer raising to desired height, press the lower lever and the li will automacally lower to a safe posion, the safe-
ty lock will be engaged and the li will be locked.
6.4-Lowering
The safety lock must be released before lowering.
◇ Press the power switch to raise the car by approximately 1.2″/30mm.
◇ Pull down to unlock the handle.
◇ Press the lower lever to start lowering process, the arm lock will be automacally released and allow the arm
rotang when the vehicle is completely lowered to the ground.
7-Safety
Please read this manual carefully as it contains important safety informaon that the operators need to know.
*WARNING*: The design and construcon of this li is only suitable for liing whole vehicle. All other uses are unau-
thorized, this CAN NOT be used to: wash vehicles, build liing plaorms, liing personnel, use as cargo lis and use
as cargo lis and use as liing paral of the vehicles.
7.1-Important Reminder: Personal and Equipment Safety
◇ During vehicle liing process, operators should be at a safe posion/area.
◇ Tum o the vehicle engine and manual brake on.
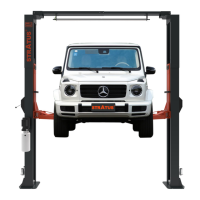
◇ Load vehicle correctly (FIG 26).
◇ The vehicle CAN NOT exceed the rated liing capacity and required size.
FIG 26 correct way to load vehicle