168
RT-SVX24Q-EN
WWAARRNNIINNGG
RRiisskk ooff EEnneerrggyy WWhheeeell CCoollllaappssiinngg!!
FFaaiilluurree ttoo ffoollllooww iinnssttrruuccttiioonnss bbeellooww ccoouulldd ccaauussee
tthhee eenneerrggyy wwhheeeell ttoo ccoollllaappssee uunnddeerr tthhee
tteecchhnniicciiaann’’ss wweeiigghhtt wwhhiicchh ccoouulldd rreessuulltt iinn sseevveerree
iinnjjuurryy..
BBeeffoorree llaayyiinngg aaccrroossss tthhee eenneerrggyy wwhheeeell,, aadddd eexxttrraa
ssuuppppoorrtt bbyy ppllaacciinngg aa rriiggiidd bbooaarrdd aaccrroossss tthhee ssppaann ooff
tthhee eenneerrggyy wwhheeeell ccaasssseettttee..
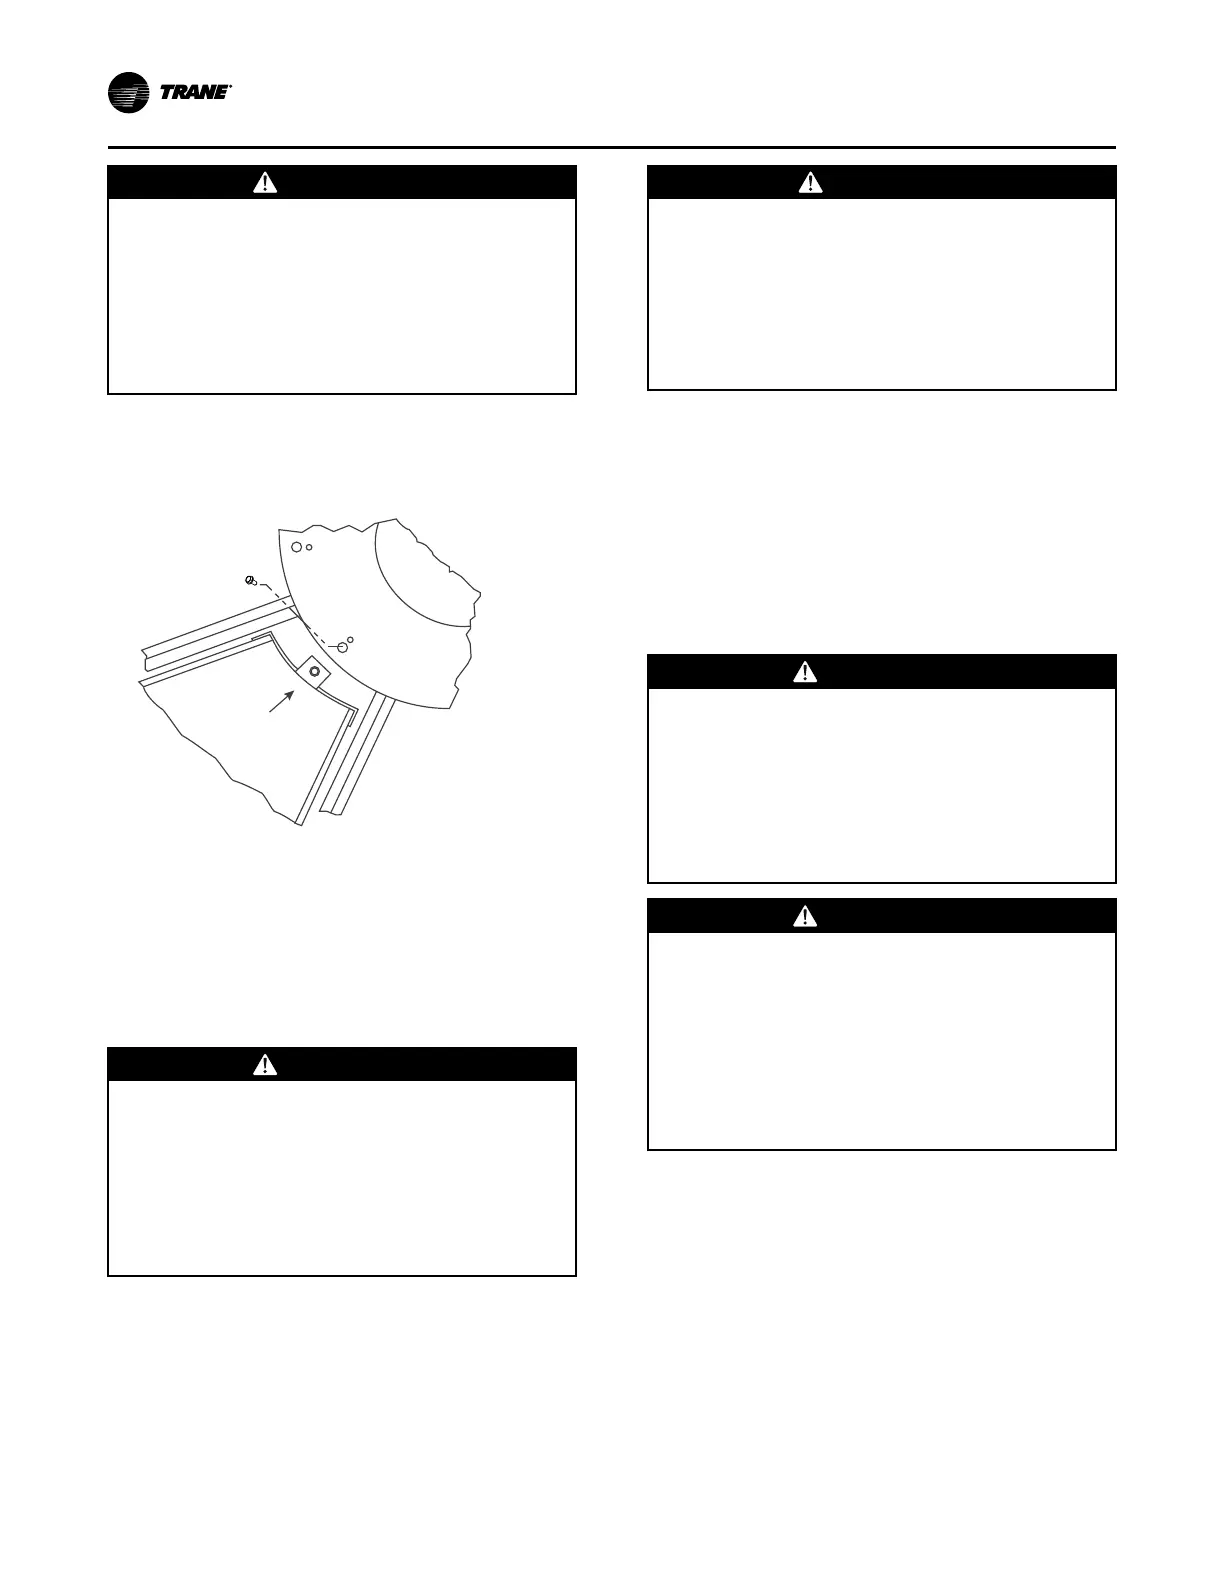
3. Support segment with one hand while removing 1/4
- 20 flat head retaining screw in the wheel hub with
5/32" Allen wrench, see Figure 128, p. 168.
Figure 128. Inner Segment Removal
4. Carefully slide the segment out from between the
hub plates, and remove from the wheel.
5. Reinsert the 1/4 - 20 screw in the removed segment
nose to avoid loss.
6. Rotate the wheel and continue this procedure to
remove all segments.
Segment Replacement
WWAARRNNIINNGG
HHaazzaarrddoouuss VVoollttaaggee!!
FFaaiilluurree ttoo ddiissccoonnnneecctt ppoowweerr bbeeffoorree sseerrvviicciinngg ccoouulldd
rreessuulltt iinn ddeeaatthh oorr sseerriioouuss iinnjjuurryy..
DDiissccoonnnneecctt aallll eelleeccttrriicc ppoowweerr,, iinncclluuddiinngg rreemmoottee
ddiissccoonnnneeccttss bbeeffoorree sseerrvviicciinngg.. FFoollllooww pprrooppeerr
lloocckkoouutt//ttaaggoouutt pprroocceedduurreess ttoo eennssuurree tthhee ppoowweerr
ccaann nnoott bbee iinnaaddvveerrtteennttllyy eenneerrggiizzeedd.. VVeerriiffyy tthhaatt nnoo
ppoowweerr iiss pprreesseenntt wwiitthh aa vvoollttmmeetteerr..
Inner Segment Replacement
1. Disconnect all electrical power.
2. Secure wheel from rotation.
CCAAUUTTIIOONN
SShhaarrpp EEddggeess!!
FFaaiilluurree ttoo ffoollllooww iinnssttrruuccttiioonnss bbeellooww ccoouulldd rreessuulltt iinn
mmiinnoorr ttoo mmooddeerraattee iinnjjuurryy..
TThhee sseerrvviiccee pprroocceedduurree ddeessccrriibbeedd iinn tthhiiss ddooccuummeenntt
iinnvvoollvveess wwoorrkkiinngg aarroouunndd sshhaarrpp eeddggeess.. TToo aavvooiidd
bbeeiinngg ccuutt,, tteecchhnniicciiaannss MMUUSSTT ppuutt oonn aallll nneecceessssaarryy
PPeerrssoonnaall PPrrootteeccttiivvee EEqquuiippmmeenntt ((PPPPEE)),, iinncclluuddiinngg
gglloovveess aanndd aarrmm gguuaarrddss..
3. Remove 1/4 - 20 flat head retaining screw from the
inner segment nose with 5/32" Allen wrench.
4. Rest the edge of the segment on the support flange
on one wheel spoke and slide it until the segment
nose is fitted firmly in the wheel hub and the
segment screw hole is aligned with the hub slot.
5. Reinsert 1/4 - 20 screw into the hub / inner segment
and tighten until the screw is firmly seated, see
Figure 128, p. 168.
Outer or Satellite Segment Replacement
WWAARRNNIINNGG
HHaazzaarrddoouuss VVoollttaaggee!!
FFaaiilluurree ttoo ddiissccoonnnneecctt ppoowweerr bbeeffoorree sseerrvviicciinngg ccoouulldd
rreessuulltt iinn ddeeaatthh oorr sseerriioouuss iinnjjuurryy..
DDiissccoonnnneecctt aallll eelleeccttrriicc ppoowweerr,, iinncclluuddiinngg rreemmoottee
ddiissccoonnnneeccttss bbeeffoorree sseerrvviicciinngg.. FFoollllooww pprrooppeerr
lloocckkoouutt//ttaaggoouutt pprroocceedduurreess ttoo eennssuurree tthhee ppoowweerr
ccaann nnoott bbee iinnaaddvveerrtteennttllyy eenneerrggiizzeedd.. VVeerriiffyy tthhaatt nnoo
ppoowweerr iiss pprreesseenntt wwiitthh aa vvoollttmmeetteerr..
WWAARRNNIINNGG
RRoottaattiinngg CCoommppoonneennttss!!
FFaaiilluurree ttoo ddiissccoonnnneecctt ppoowweerr bbeeffoorree sseerrvviicciinngg ccoouulldd
rreessuulltt iinn rroottaattiinngg ccoommppoonneennttss ccuuttttiinngg aanndd ssllaasshhiinngg
tteecchhnniicciiaann wwhhiicchh ccoouulldd rreessuulltt iinn ddeeaatthh oorr sseerriioouuss
iinnjjuurryy..
DDiissccoonnnneecctt aallll eelleeccttrriicc ppoowweerr,, iinncclluuddiinngg rreemmoottee
ddiissccoonnnneeccttss bbeeffoorree sseerrvviicciinngg.. FFoollllooww pprrooppeerr
lloocckkoouutt//ttaaggoouutt pprroocceedduurreess ttoo eennssuurree tthhee ppoowweerr
ccaann nnoott bbee iinnaaddvveerrtteennttllyy eenneerrggiizzeedd..
1. Disconnect all electrical power.
2. Secure wheel from rotation.
3. Rotate out the two segment retainer latches, one for
each side of the selected segment opening, such
that they are 90° from the wheel rim. See Figure
128, p. 168.
4. Set the segment in the gap between the segment
retainer latches, pressing it toward the center of the
wheel and inward against the spoke flanges. See
Figure 131, p. 170. If hand pressure does not fully
seat the segment, insert the flat tip of a screwdriver
between the wheel rim and the outer corners of the
segment and apply gentle force while guiding the
UUnniitt SSttaarrttuupp

 Loading...


