Do you have a question about the Uninet DTF 1000 and is the answer not in the manual?
This product is designed exclusively for professional use; manual review is mandatory.
Guidance on safe printer placement and power connection to prevent hazards.
Safe procedures for cleaning and maintaining the printer, avoiding electrical risks.
Precautions for safe operation, including magnetic fields and flammable materials.
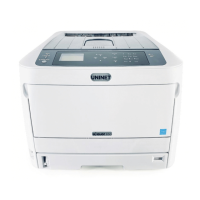
Overview of the DTF-Model-J printer and its identification details.
Mandatory safety guidelines for operators including age, reading the manual, and PPE.
Details on the warranty duration, coverage, and conditions for the printing system.
Manufacturer responsibility, liability limits, and conditions that void the warranty.
Specifies the legal jurisdiction for any disputes related to the product.
Guidelines to prevent common misuse scenarios and protect the printer from damage.
Advice on how to properly use and retain the operation and maintenance manual.
Crucial safety instructions to prevent injury and product/environment damage.
Company disclaims responsibility for injury or damage from misuse or non-compliance.
Details the recommended environmental conditions for proper printer placement.
Instructions for safely unpacking and handling the printer during initial setup.
Step-by-step guide for assembling and attaching the roll feeder to the printer.
Description of the buttons and switches on the right side of the printer.
Description of the buttons and switches on the left side of the printer.
Steps for installing and filling the CMYK ink tanks before printer operation.
Guide to downloading and installing the necessary Epson printer drivers and utilities.
Daily maintenance routines to ensure printer longevity and optimal performance.
Procedures for performing head cleaning and nozzle checks to maintain print quality.
Guide to downloading the WIC Reset Utility for waste pad error resolution.
Instructions on buying and applying reset keys for the waste pad counter.
Steps for installing the Epson R1800 printer driver for optional software use.
How to manually configure the serial port for the R1800 printer driver.
Guidelines for optimal storage, operation, and handling of inks and printer.
Minimum hardware and software specifications for running the printer.
Recommended hardware and software specifications for optimal printer performance.
Troubleshooting common print quality problems like blurriness and banding.
Resolving issues with printer power, flashing lights, and error indicators.
Summary of brand, model, colors, print area, and resolution.
Details on power, consumption, operating/storage temperatures, and humidity.
Printer physical dimensions, weight, and noise emission levels.
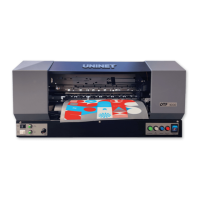
The UNINET™ DTF 1000 is a specialized inkjet printing system designed for professional use in heat transfer applications to various fabrics like cotton and polyester. This manual provides comprehensive instructions for its installation, operation, maintenance, and safety to ensure optimal performance and longevity.
The DTF 1000 printer utilizes inkjet technology to print high-quality photos and vector graphics onto specialized PET film. This process is a crucial step in Direct-to-Film (DTF) printing, where textile ink is first printed onto the film, followed by the application of DTF powder, and then cured. The system is designed to work with RIP (Raster Image Processor) software to achieve exceptional resolution and print speeds.
The printer includes a Roll Feeder for continuous media handling, allowing for efficient batch printing. It also incorporates a White Ink Management System (WIMS) to ensure proper agitation and circulation of white ink, preventing sediment buildup and clogs.
The printer requires placement in a dedicated, air-conditioned environment with a temperature range of 60°F to 80°F and relative humidity between 42% and 60%, non-condensing. It should be kept away from direct sunlight, dust, dirt, vibrations, and mechanical impacts.
The Roll Feeder assembly involves attaching side brackets, square rods, and round rods, then securing it to the printer. The printer's power supply and USB cables must be connected to the computer before powering on.
Before initial use, the CMYK ink tanks need to be filled. It's crucial to seal small breather holes during filling to prevent contamination. The white ink container at the top of the printer must also be filled.
A critical step involves priming the dampers to draw ink through the lines and into the print head. This process requires syringes with 14" gauge tips and involves carefully disengaging, filling, and re-engaging each damper. The print head carriage needs to be unlocked and moved manually for access.
The printer uses specialized PET film, with the matte side being the print side. Film is loaded from the roll feeder, fed under the printing platform rollers, and aligned using the green buttons that control the rollers.
The printer is powered on by flipping the blue switch to ON, followed by pressing the red button to power on the printing module.
The printer requires the "Epson Photo Stylus 1390" driver, which can be downloaded from the Epson website. During installation, it's important to uncheck the option to set it as the default printer and select "Others" for the area location. Updates from Epson should be declined to avoid compatibility issues.
For batch printing, the optional 8PRT software can be installed. This involves installing the R1800 driver (32-bit or 64-bit depending on the PC), configuring the port to "COM 1: Serial Port" manually, and then installing the 8PRT program. The 8PRT folder should be moved to the root of the C Drive. The software needs to be run as an administrator, and the "Epson 1390" printer selected and "Locking" box checked before connecting to sync with the printer. When printing from 8PRT, the feeding setting in AcroRIP must be changed from "Roll Feed" to "Sheet," and the port from "Epson Photo Stylus 1390" to "Epson R1800."
In an emergency, the main power to the entire unit can be turned off by flipping the large blue switch on the right-hand side of the front of the unit.
After printing and powdering, the film needs to be cured using a heating device. For a Heating Oven, the temperature should be set to 125° Celsius for 2 minutes. For a Heating Mat, it should be set to 108° Celsius for 2 ½ minutes. Images covering more surface area may require rotation and additional baking time.
The manual provides solutions for common printing issues such as blurry prints, bands or lines in images, split prints, and lights being off. For example, blurry prints can be resolved by ensuring the printer is on a level surface, and bands/lines by performing nozzle checks and head cleaning. If the ink and paper lights flash simultaneously, it indicates a waste pad error that requires checking the status monitor in the WIC program and resetting the waste pads.
When the white and blue buttons blink, it indicates full waste pads. The WIC Reset Program needs to be downloaded, installed, and used to read waste counters. If full, a reset key must be purchased and entered into the program to clear the error. The printer will then prompt to be powered off and back on.
| Colors | CMYK + White |
|---|---|
| Print Resolution | Up to 1440 dpi |
| Interface | USB, Ethernet |
| Operating System Compatibility | Windows |
| Weight | 150kg |
| Print Technology | DTF (Direct to Film) |
| Print Speed | Up to 15 sqm/hour (depending on print mode) |
| Power Requirements | 220V, 50/60Hz |