COOLING SYSTEM
BY Service Manual
7-19
Repair
Remove and Install Thermostat
Removal
1. Allow the engine to cool and drain the coolant
from the engine block. See Draining and Filling
Closed Cooling System on page 7-12.
2. Remove intake air pipe between intake air
cooler and intake manifold.
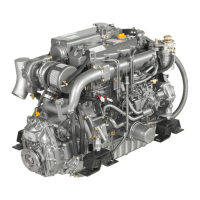
Figure 7-20
3. Release clips on coolant lines
(Figure 7-20, (1, 3)). See Disconnect and
Connect Quick-Connect Fittings on page 7-13.
4. Disconnect hose (Figure 7-20, (3)) from
coolant pump.
5. Remove four bolts (Figure 7-20, (2)).
Note: The thermostat and housing are
serviced as a single assembly.
6. Remove the thermostat and housing assembly
and pull off from coolant pipe (Figure 7-20, (1)).
7. Test thermostat as required. See Testing
Thermostat on page 7-9.
Installation
1. Clean the thermostat housing and mounting
surface of the coolant pump.
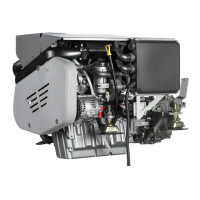
Figure 7-21
2. Ensure the O-ring-type seal (Figure 7-21, (1))
is in place in the thermostat housing.
3. Install thermostat assembly and tighten bolts.
4. Ensure O-rings are in good shape and in place
in quick connectors.
5. Install coolant pipes and secure with clips. See
Disconnect and Connect Quick-Connect
Fittings on page 7-13.
6. Fill the system with coolant. See Draining and
Filling Closed Cooling System on page 7-12.
7. Start the engine and check for coolant leaks.
Check the level of the coolant and add as
necessary.
A CAUTION
COOLANT HAZARD!
• Wear eye protection and rubber gloves
when you handle Long Life engine
coolant. If contact with the eyes or
skin should occur, flush eyes and
wash immediately with clean water.
• Failure to comply may result in minor
or moderate injury.
0000005enMarine
0003693
(
1
)
(
3
)
(
2
)
(
2
)