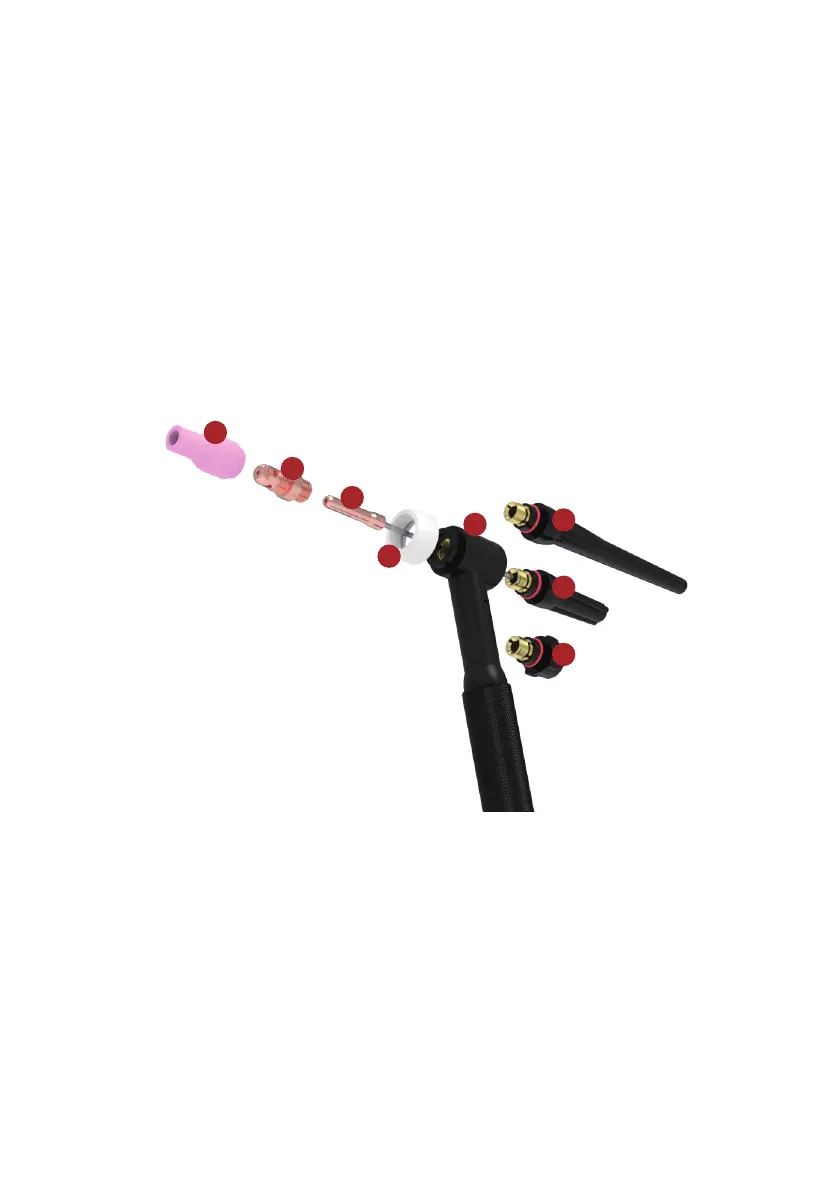
Here’s step-by-step guidance for assembling the TIG torch:
Match Collet and Collet Body:
Collet (4): Holds the tungsten electrode in place within the Torch Head (6).
Thread Collet Body:
Ÿ Stubby Gas Lens (2): Functions as the Collet Body, providing enhanced gas coverage and flow.
Ÿ Screw the Stubby Gas Lens (2) into the Torch Head (6).
Ceramic Nozzle Selection:
Pyrex Glass Cup (1): Thread this nozzle onto the Stubby Gas Lens (2) for gas shielding and better visibility during welding.
Insert Collet and Electrode:
Insert the Collet (4) into the Stubby Gas Lens (2), then insert the tungsten electrode.
Secure Electrode:
Back Cap (7): Tighten to lock the tungsten electrode in place, ensuring that 1/8" to 1/4" of the tungsten protrudes from the Pyrex
Glass Cup (1).
Additional Components:
Ÿ Temperature Resistant O-ring (3): Seals the gas flow in high-temperature areas, typically around the gas lens or torch head.
Ÿ Insulator Torch Body (5): Provides insulation around the Torch Head (6) to prevent overheating.
1
2
3
4
5
6
6
6
Cermic
Gas Nozzle
Collets
Body
Collet
Insulator
Torch Body
Torch
Head
Back
Cap
Here’s step-by-step guidance for assembling the TIG torch:
Install the Collet Body:
Thread the Collet Body (2) into the Torch Head (5) securely.
Insert the Collet:
Place the Collet (3) inside the Collet Body. This holds the tungsten electrode.
Insert the Tungsten Electrode: Insert the tungsten electrode through the Collet (3), leaving 1/8" to 1/4" of the electrode extending
from the gas nozzle.
Tighten with Back Cap:
Screw the Back Cap (6) onto the rear of the Torch Head (5) to lock the tungsten electrode in place.
Insert Collet and Electrode:
Insert the Collet (4) into the Stubby Gas Lens (2), then insert the tungsten electrode.
Attach Insulator and Gas Nozzle:
Place the Insulator Torch Body (4) over the Torch Head (5) to protect the assembly from heat. Thread the Ceramic Gas Nozzle (1)
onto the Collet Body for proper shielding gas coverage during welding.
- 40 -
 Loading...