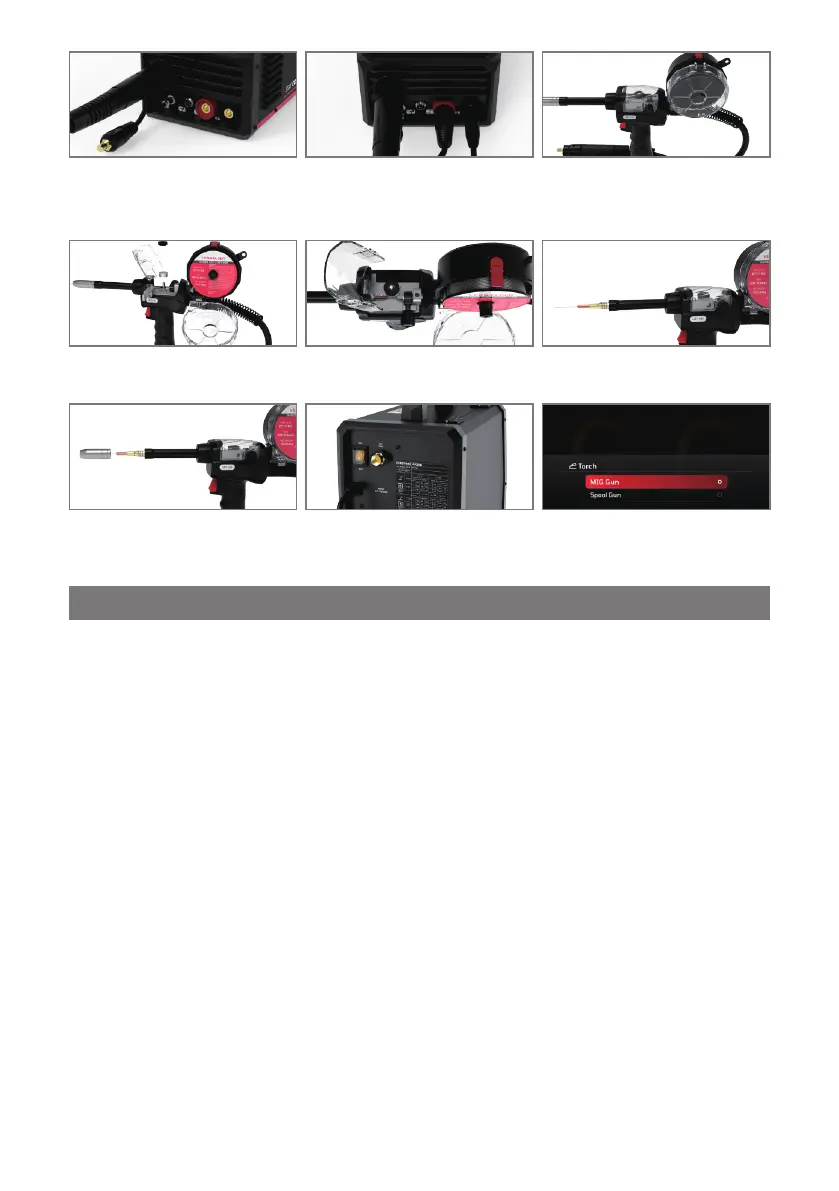
Ÿ Insert the optional YesWelder LBT150
spool gun into the Euro MIG connection
socket on the front panel and secure it.
Connect and tighten the control cable to
the receptacle.
Ÿ Based on the Spool Gun Connection sec-
tion, install the wire drive polarity lead
and work clamp as needed for the spe-
cific setup.
Ÿ Press the Cover Release clip on the
spool gun to open the wire housing
cover.
Ÿ Place the wire on the spool holder. Re-
move the tensioner before placing the
spool and reinstall it afterward.
Ÿ Adjust the spool holder's tension to en-
able a smooth and stable wire feeding.
Ÿ Remove the gas nozzle and contact tip
from the welding torch.
Ÿ Install a correct-sized contact tip, screw
the contact tip into the tip holder of the
torch, and tighten it up.
Ÿ Turn on the power source on and select
MIG/MAG or Flux process on the Home
Menu page.
Ÿ Navigate to the “Torch” menu and choo-
se the “Spool Gun” option.
3.12.1 Overview of Adjustable Advanced Parameters
3.12 Advanced Parameters
The welding machine offers various advanced settings that can be flexibly adjusted to optimize welding parameters. These
adjustments help operators tailor the welding process to different tasks and material requirements, improving both the quality and
efficiency of welding operations.
Advanced parameters can be accessed by pressing the Value Adjustment Knob or navigating to the Advanced settings on the
parameter page. The advanced parameters are closely tied to the selected Torch Trigger Operation Selection, which include 2T, 4T,
Spot, and S4T modes:
2T Mode:
1. Press the torch trigger to ignite the arc, and the machine will feed wire at the selected welding speed.
2. Release the trigger to stop wire feeding and extinguish the arc.
4T Mode:
1. Press the torch trigger to ignite the arc, and the machine will start at the selected welding wire feeding speed.
2. Release the trigger to maintain the wire feeding speed for continuous welding.
3. Press the trigger again to reduce the wire feeding speed to the crater (or pilot arc) wire feeding speed.
4. Release the trigger to stop the arc and complete the weld.
Spot Mode:
The spot welding time can be adjusted between 0.1 and 10 seconds. This is the duration for which the arc remains active before
automatically shutting off.
1. Press the torch trigger to ignite the arc, and the wire feeding speed will rise to the preset value.
2. Once the spot time has elapsed, the wire feeding speed decreases, and the arc is extinguished.
S4T Mode:
1. Press the torch trigger to ignite the arc, and the wire feeding speed will reach the initial (start) wire feeding speed.
2. Release the trigger to ramp up the wire feeding speed to the selected welding speed.
3. Press the trigger again to reduce the wire feeding speed to the crater (pilot arc) wire feeding speed.
4. Release the trigger to stop the arc and end the welding cycle.
Note:
Ÿ When “Spot” option is selected, the machine will automatically open the Spot Time Adjustment page, allowing to set the desired
spot welding time.
Ÿ When “S4T” option is selected, the machine will directly navigate to the Advanced Settings page for further adjustments.
- 31 -
 Loading...