64171, Rev. 10/May 2019
3M™ GMI™ PS200 PORTABLE GAS MONITOR
CALIBRATION
9-3
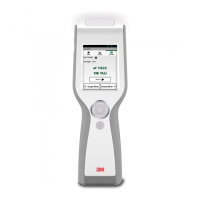
5. Once gas is applied, press and hold the R button to start the calibration. The 60 second count-
down will commence (refer to
Figure 9-4: APPLY GAS Screen). After 60 seconds, the monitor will
be calibrated to the predefined values.
Figure 9-4: APPLY GAS Screen
6. The timer will count up to 9 seconds, during which time the monitor will adjust the gain to the
sensors accordingly. No manual input is required.
Figure 9-5: APPLY GAS Screen
7. Once calibration is successfully completed, the user has the option of saving the results (see
Figure 9-6: CAL COMPLETE/SAVE RESULTS Screen).
Figure 9-6: CAL COMPLETE/SAVE RESULTS Screen
8. Using the L button, highlight one of the 3 the available options:
NOTE: The test gas must match the predefined cylinder values stored in the monitor.
 Loading...