button.
Relay
Warning: This Relay button is not associated with traditional VIGIL Server relay functions. Contact
3xLOGIC Support for more info.
CAM
To add a camera to the virtual switch, select the virtual switch monitor number and then press the virtual
switch input number followed by the CAM button.
Virtual Switch Keypad Hotkeys
The Virtual Switch can also be controlled via standard keyboard hotkeys. Each keypad function, along with the correpsonding hot-
keys are listed in the table below.
Function Hotkey Function Hotkey
MON . Numerals
Same as
number
Prev - In N/A
Next + Near N/A
Preset / Open N/A
Relay * Far N/A
CAM Enter Close N/A
1x1 Layout F5 2x2 Layout F6
3x3 Layout F7 4x4 Layout F8
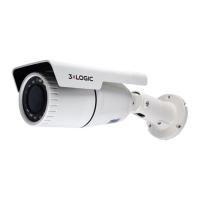
8.2 Virtual Switch Screen
The virtual switch screen is displayed on secondary monitors with the main monitor reserved for controlling the system without inter-
rupting view of the virtual switch display. Cameras may be added and removed using the keyboard number pad and controlled on-
screen using the mouse, or the virtual switch keypad.
-64-
©2014 3xLOGIC Inc. | VIGIL Client - User Guide