Installation
The MICRO 4000 NET system has been tested, calibrated, and run at the factory in a
closed-loop configuration. After installation, most systems may be started up and operated
without further adjustment. Refer to the connection and wiring diagrams on page
137 for cable
installation information.
OEMs: If shi
pping clamps and spreaders are removed, make sure that they are re-installed
prior to forwarding to the final destination. Verify that all mechanical and electronic
components are secured for shipment.
1. Linear Actuator and Guide
Install the web guide and linear actuator into the
machine. Refer to the guide and actuator
application drawings on page 137 for installation information. Once the web guide is installed,
it must be tra
mmed to the rest of the machine.
Note: Ma
ke sure the actuator is in the servo-center position before tramming the web guide.
This may not be possible until after step 5, below.
Important: Special attention must be given to the actuator mounting. Any mechanical
compliance or backlash in the actuator mounting will seriously affect guiding accuracy.
Deflections of a few thousandths of an inch will reduce the performance of the system. Also,
an anti-rotation bracket is required for most applications. The actuator must be allowed to
gimbal slightly on the ball rod ends to accommodate minor actuator mounting misalignment.
2. Sensor (Edge Detector or Digital Line Guide)
Install the sensor (edge detector or digital line guide). Refer to the guide and sensor
appli
cation drawings on page 137 for installation information. Use of the AccuWeb edge
detecto
r mounting bracket simplifies installation and adjustment.
The sensor cable should be long enough so that the sen
sor may be repositioned if the web
width or web path changes. The standard cable length is 12 feet. Longer cables are available
upon request.
Note: The
cables supplied with the system have been chosen for specific shielding and
capacitance properties. DO NOT splice or replace these cables with any other style or
configuration of cable. This can cause serious degradation or complete loss of system
performance. DO NOT SPLICE CABLES. Longer cables are available upon request.
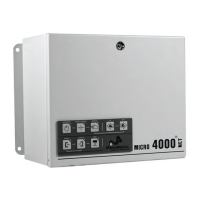
3. Control Enclosure
Install the control enclosure on a rigid mount such as a wall or secure framework. Do not
install the
control enclosure on the side of a dryer or in other high temperature areas. Also, do
not install the control enclosure on a moving winder structure.
4. Electrical Power
Note: Ele
ctrical power must be provided from a customer-supplied disconnect. Connections
must comply with NEC 590 and other local codes.
a) Verify that the power source is off and locked out.
b) Install the electrical power cord through the right-most cord grip.
MICRO 4000
NET Web Guide Control System
7
Artisan Technology Group - Quality Instrumentation ... Guaranteed | (888) 88-SOURCE | www.artisantg.com