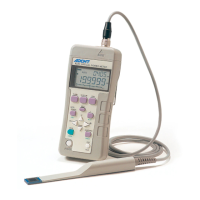
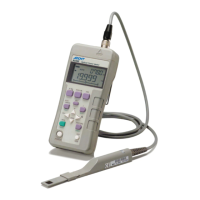
8230 Optical Power Meter Operation Manual
1.9 Precautions when Using This Instrument
1-11
1.9 Precautions when Using This Instrument
• Avoid giving strong impacts to the instrument and sensor. The sensor contains delicate components
such as photodiodes and other optical parts and is particular care of the incident surface.
• This instrument does not emit any laser light, however, an intense light may be reflected if the laser
light is directed onto the incident surface of the sensor.
Do not look at the incident surface, because any reflected laser light may seriously damage your eye-
sight. This instrument and sensor is rated to measure laser classification I to III B.
If necessary, refer to IEC60825-1 and FDA21CFR1040.10 regarding the hazards and precautionary
measures associated with each laser classification.
Follow all safety precautionary markings and statements in the manual provided in the laser product.
• Refer to ANSI Z136.1 for the safe use of lasers and laser systems.
Measurements shall be conducted at all times by personnel who have been trained in the operation of
lasers and laser systems.
• Never input a light beam that is smaller in diameter than the beam spot size or light that exceeds the
maximum intensity of incident light. Measurements results may be inaccurate or sensor may be dam-
aged by excessive energy.
• Do not radiate or focus strong laser light on the sensor body to prevent the risk of fire.
Especially unattended condition, keep the flammable material away from the sensor.
• Do not radiate or focus strong laser light on a protective cap and protective sheet to prevent risk of fire.
1.10 Checking Operations
After checking the standard accessories, check the operation according to the following procedure.
1. Refer to Section 1.8, "Power Supply" in this manual and connect the AC adaptor or insert the batteries.
2. Connect the sensor to the INPUT connector of the 8230.
3. Press the [POWER] switch and turn on the power.
4. All parts of the LCD display are lit.
5. The product name such as 8230 is displayed in the measurement value display area and the connected
sensor type is displayed in the wavelength display area. ("82311" is displayed when 311B is connected.)
The under bar is displayed when no sensor is connected.
6. The option number of the optical power meter (Example: +70 for OPT8230+70) is displayed in the mea-
surement value display area. Nothing is displayed if an option is not specified.
7. The software revision is displayed.
8. The error message "Err 2" is displayed when no sensor is connected.
9. Input the light to the sensor and check the response.