76
TriScroll 600 Dry Scroll Vacuum Pump
D R A F T 4 / 7 / 1 1
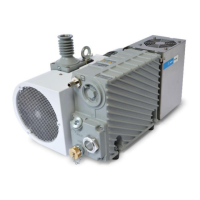
12. Repeat steps 1 through 3 to reassemble the
orbiting plate assembly and locking nut on
the inboard assembly.
13. Using the locking nut wrench, tighten the
locking nut until the distance from the face
of the locking nut to the crankshaft end
equals the distance noted in step 6 on
page 74, plus .008 inch.
14. Secure the locking nut by installing the four
M4x12 locking screws.
15. Use the locking nut wrench to maintain the
locking nut position while tightening the
locking screws.
16. Ensure that all four locking screws are
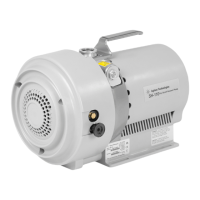
tightened to at least 40 in-lb.
17. Insert the tip seal in the scroll tip grooves on
the orbiting plate.
18. Cut to length at the end of each groove.
Final Assembly (continued)
CAUTION Make sure that the locking
nut does not rotate relative
to the crankshaft.
 Loading...