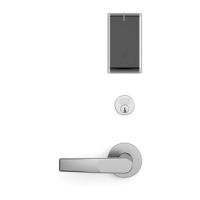
Fig. 5A
Peel back
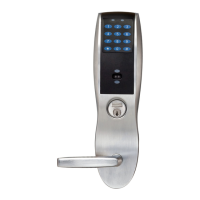
B. Weather Conduit
(supplied with Weatherization Kit 52-6084)
Install weather conduit on NON FIRE-RATED exterior doors* only.
1. Carefully insert weather conduit into ribbon cable hole on
inside of door (Fig. 4B).
2. Place O-ring around weather conduit on the outside and
up against door (Fig. 4C).
Mortise Installation Instructions for
KP8900 Series (Continued)
*Install conduit if exterior door is directly exposed to the weather,
if it's a hollow metal (open core) type door. It's not required on
solid core doors. If rain water enters open web at top of door,
the conduit prevents water from inside of door entering onto
controller or keypad.
O-Ring
Step #4 – Install Weatherseal Gasket (Exterior Doors*)
1. Carefully remove adhesive backing from the gasket (Fig. 5A).
2. Apply gasket to escutcheon:
• Starting in one place, press the adhesive side
of the gasket firmly against the escutcheon.
• Work around the escutcheon, pressing the sticky side
of the gasket firmly against the escutcheon edge.
• The gasket should be aligned so that all edges
of the escutcheon are covered.
3. Attach escutcheon to the door.
Note: The 43 cylinder may be used with or without a gasket.
*For exterior doors and supplied with Weatherization Kit
(p/n 52-6084). Additional supplied shroud (not shown) is
required if outside keypad escutcheon is directly exposed
to weather.
8
Copyright © 2014. 2021, Sargent Manufacturing Company, an ASSA ABLOY Group company. All rights reserved.
Reproductions in whole or in part without express written permission of Sargent Manufacturing Company is prohibited.
02/28/21
17 A7137D • 800-810-WIRE (9473) • www.sargentlock.com
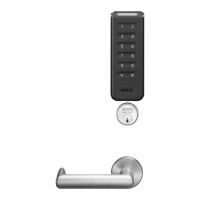
Installation Instructions
Mortise Exit Device
KP8977 / KP8978
Fig. 4B
 Loading...