SECTION 2
INSTALLING THE PRINTER
6
SECTION 2 – Installing the Printer
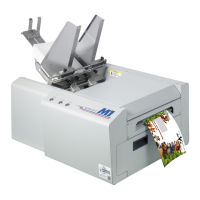
Contents of Packaging
Ink Tanks – Cyan, Magenta, Yellow, Black, Black
Media Side Guides: Registration (Fixed) and Adjustable –
mounting screws attached to Printer
Rear Media Support Guide
– thumbscrew attached to Printer
Media Support Wedges: Narrow and Wide
– mounting hardware attached to Rear Media Support Guide
Envelope Attachment Spacers (pkg. of 2)
Before using the Printer the following must be done:
Choose a location for the Printer
Unpack and assemble the Printer
Remove the Service Station Transport Tab and Shipping Tape
Plug in the Printer and connect it to the computer
Install the Printer Driver
Install the Ink Tanks
Install the Printhead
Set up the feed on the Printer
Choose a Location
The Printer must be placed on a sturdy level worktable or cabinet at least 9" from any walls. Use the
Bubble Gauge mounted on the Print Engine (or a small level) to make sure the Printer is level. Protect
the Printer from excessive heat, dust, and moisture. Avoid placing it in direct sunlight.
Unpacking and Setup
Remove the Printer and its parts from the carton. Remove all packing tape. The screws that attach the
various parts of the guides to the Printer are under the tape in their respective positions.