Syn248 Installation and Configuration Guide Back to Contents
Installation 19
Deskset Installation
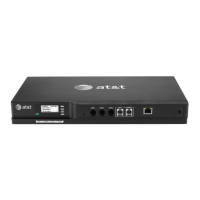
Figure 9 identifies the features on the bottom and side of the Deskset. You can install
the Deskset on a desktop or mount it on a wall.
Figure 9. Deskset Connections (SB35025 Model Shown)
1. Network Port There are two LEDs next to each network port.
The green LED is on when the Deskset is connected to
the network and has AC power.
The yellow LED flashes when there is network activity.
2. PC Port Intended for connecting an end-user PC to share the same
LAN connection as the Deskset.
3. Reset Button Restarts the Deskset when pressed momentarily.
Restores factory defaults when pressed and held for more
than five seconds with the LAN cable disconnected.
4. Power Jack For connecting the AC adapter to the Deskset. The Deskset
also supports Power over Ethernet.
5. Corded Headset
Jack
For connecting a corded headset. Actual jack location may be
different than shown.
6. AUX I/O Port SB35025 Deskset only — For connecting a Music on Hold
source and/or a single-zone overhead paging system.
7. Handset Jack For connecting the corded handset to the Deskset base using
the supplied handset cord.
8. Wall-Mount Slots See “To install the Deskset on a wall:” on page 22.
 Loading...