601–0445 /05 Loki 31
The following guidelines can help you determine the best physical location for the projector.
• Only install the projector on a sturdy flat surface, or in an approved rigging frame.
• Do not install the projector in a thoroughfare or other area where it is at risk of being pushed or jostled.
• Allow sufficient free space around the projector for ventilation and exhaust, as described in section
“Installation conditions”, page 28.
• Use the throw ratio of the installed lens as a guideline for the projector’s physical distance from the screen.
• Wherever possible, the projector lens surface should be positioned so that it is perfectly perpendicular to
the center of the screen.
Use the projector offset (lens shift), rather than physical angling, to correct any off-center positioning.
• Minimize the source cable length as much as possible.
In general HDBaseT and 3G-SDI are long-haul interfaces and suitable for bespoke installations using
relatively long cables.
DP, HDMI and DVI are short-haul interfaces using pre-assembled cables with limited cable lengths.
• Limit the use of power cable extensions wherever possible. Where physical limitations necessitate their
use, make sure that the extension cord has adequate surge protection and meets all electrical
requirements of the connection.
• Keep the projector away from equipment that emits electromagnetic energy for example, motors,
transformers and elevators.
3.5 Mounting the projector, general considerations
Mounting safety
When mounting a projector in a rig, always use an interface plate (between the projector and the mount) that
has provision for a safety wire or another safety mechanism, to ensure that the projector does not fall down
should the interface plate come loose from the mount.
Always screw the interface plate securely to the projector body while the projector is on the ground (i.e. cannot
fall down). Then attach proper safety wire between the interface plate and the rig before mounting the
projector in the rig
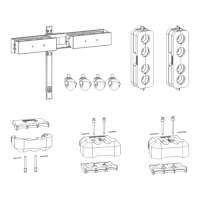
Using 3rd party mounting equipment
The projector has features for mounting into various system environments using 3rd party mounts.
Four mounting inserts are located on the bottom of projector. The ceiling mount inserts have a pull-strength of
more than 4x the weight of the projector.
The feet can also be removed if appropriate for the mounting accessories. Do NOT use the threaded holes for
the feet for other attachment devices.
WARNING:
The projector feet tread holes must NOT be used as a anchor point for ceiling mount. They are only
intended to be use with the feet, on a flat surface.
Where possible, the projector lens must be positioned exactly perpendicular to the center of the
screen. Use the projector offset (lens shift), rather than physical angling, to correct any off-center
positioning.
CAUTION: The position and physical securing of the projector must be sufficient to prevent it from
accidental or involuntary movement. Proper securing of the projector is the responsibility of the
installer and user.
CAUTION: Always use a Rigging Frame when the projector shall be mounted in other ways than on
the feet, on a flat surface.
Installation and use of the Rigging Frame are described in document R5906768 F90 Multifunctional
Frame — Installation Manual.
The threaded hole in the lower back end of the projector is NOT suitable for lifting or other heavy
operations. Only for adjustment purposes.
Physical installation
 Loading...