601–0445 /05 Loki32
Mounting on a flat surface
1. Position the projector at the desired location.
2. Power up the projector.
3. Go to Main Menu / Test Patterns and select an internal hatch pattern to display on the screen.
4. Adjust the projector legs until the projected hatch pattern is a level and perfect rectangle.
Adjustable feet
Twisting the adjustable feet in either direction, left or right, allows you to fine-adjust the projector position for
precise vertical mechanical alignment.
Image 3-4
Mounting to a ceiling
1. Install the projector in to an approved rigging frame.
2. Install the rigging frame to the desired location.
3. Power up the projector.
4. Go to Main Menu / Installation / Orientation and select the correct orientation for your setup.
See “Orientation”, page 81 for more information.
5. Go to Main Menu / Test Patterns and select an internal hatch pattern to display on the screen.
6. Adjust the position (height and angle) of the rigging frame until the projected hatch pattern is a level and
perfect rectangle.
If applied in a motion rig, care must be taken to stay within the environmental specifications for
vibration and shock. It may also be necessary to use additional, custom means to stabilize the
projection lens to make sure that the projected image remains in position and properly focused.
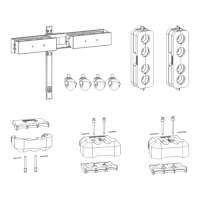
3.6 Projector safe attachment points
About
The projector has four anchoring points (ref 1, image 4-5) that can be used with the rigging frame and
projector installation. There are an additional 9 fastening points (ref 2 and 3, image 4-5) that can used for
attaching light weight accessories and other miscellaneous equipment. See table below for more information.
Physical installation
 Loading...