Perfusor® compact, 2.1 gb 4- 1
4
4-Unit Elements
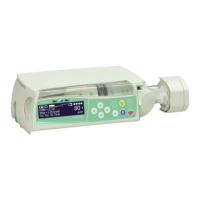
Perfusor® compact
4.1 Fundamental Repair Information
Battery Pack and Batteries
Designation Ord. No.
Battery pack . . . . . . . . . . . . . . . . . . . . . . . . . . . . . . . . . 3450 1690
Note
Always disconnect unit from mains power.
Prior to repair:
1. Switch off the Perfusor® compact.
2. Disconnect the unit from the mains power.
3. Remove batteries to avoid short circuits or consequential
damage.
Note
The battery may only be removed when the device is switched off
as otherwise alarm 022 is displayed upon startup. Press the ON-/
OFF-button to delete the alarm 022 until the alarm symbol is no
longer displayed. If the alarm 105 is triggered afterwards switch
the unit off.
Before startup:
4. If batteries are used switch the device first on without line
connection. If the battery pack is used, then the device is to
be switched on with line connection.
Note
Defective batteries must be disposed of according to the
regulations, e.g. return to B. Braun (see "Return of Spare Parts and
Test Equipment" ➨ p. 0 - 9).
Fitting Plastic Screws
To avoid damaging the thread:
Turn counter-clockwise (until the thread is found), then turn
clockwise to fasten (max. 0.5 Nm).
4 - 18
2.1