Service Program
3
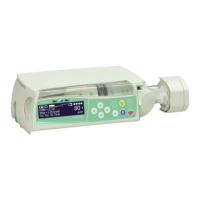
3- 16 Perfusor® compact, 3.1 gb
3.1
Syringes 50 ml Free Type / Syringe Type Number
1. Press keys 7 C {number of the 50 ml free type} F – syringe is
accepted (if an alarm is triggered, then the syringe selection
setting is not correct!) Check whether the free type was
marked on the unit (please see syringe table).
2. Reset syringe types after the test is finished!
Syringe selection
Reset syringe selection according to the condition as the unit was
delivered.
Unit Calibration
General
1. Connect unit to PC and start the Service Program (see
“Working with the Service Program” ➨ p. 3 - 4).
Calibration
1. Start communication via menu item
File
➨
Connect
(F1).
2. After activities on the drive:
Transfer data via menu item
EEPROM
➨
Read
(F3) from the
unit to PC.
3. After replacement of the E-Module:
Call default data from the PC via menu item
EEPROM
➨
Default
(F2). The existing values are deleted.
4. Check or input the serial number with menu item
Calibration
➨
Serial number
. Default data cannot be transferred to the
device if the serial number was not input.
5. Calibrate length via menu item
Calibration
➨
Length
calibration
(F5).
a) Insert zero point gauge in OPS slot.
b) Push drive manually to gauge and lock.
c) Start calibration.
6. Pressure calibration:
a) Open drive lock before starting pressure calibration.
b) Calibrate pressure via menu item
Calibration
➨
Pressure
calibration
(F6). Insert calibration gauge (6.6-80N) in
Ops slot when prompted.