13
ENGLISH
ir33 +030220441 - rel. 2.0 - 01.05.2006
The operating parameters can be modifi ed using the front keypad, and are divided into two families:
frequent use parameters (type “F”) and confi guration parameters (type “C”). Access to the confi guration
parameters is protected by a password that prevents unwanted modifi cations or access by unauthorised
persons.
How to access type “F” parameters (frequent use):
press PRG for more than 5 seconds (if an alarm is active, the buzzer is muted fi rst of all), the display
shows the code of the fi rst modifi able type “F” parameter.
How to access type “C” parameters (confi guration):
1. Press prg and SET together for more than 5 seconds; the display will show the number “00”,
representing the password prompt;
2. press SorT until displaying the number “22” (the code of the password allows access to the
parameters);
3. confi rm by pressing SET; the display will show the code of the fi rst modifi able type “C” parameter.
4.1 Modifying the parameters
After having displayed the parameter, either type “C” or type “F”, proceed as follows:
1. press SorT suntil reaching the parameter to be modifi ed. When scrolling, an icon appears on
the display representing the category the parameter belongs to. Alternatively, press prg to display a
menu that is used to quickly access the family of parameters to be modifi ed;
2. scroll the menu with the SandT buttons; the display shows the codes of the various categories
of parameters (see the “Summary of operating parameters”), accompanied by the display of the
corresponding icon (if present);
3. when having reached the desired category, press SET to move directly to the fi rst parameter in
the category (if there are no visible parameters in the selected category, pressing SET will have no
effect);
4. at this stage, continue to scroll the parameters, or return to the categories menu by pressing prg;
5. press SET to display the value associated with the parameter;
6. increase or decrease the value using the SorT button respectively;
7. press SET to temporarily save the new value and return to the display of the parameter code. Repeat
the operations from point 1 or point 2;
8. if the parameter has sub-parameters, press SET to display the fi rst sub-parameter;
9. press SorT to display all the sub-parameters;
10. press SET to display the associated value;
11. increase or decrease the value using the SorT button respectively;
12. press SET to temporarily save the new value and return to the display of the sub-parameter code;
13. press prg to return to the display of the parent parameter.
4.2 Storing the new values assigned to the parameters
To defi nitively store the new values of the modifi ed parameters, press prg for more than 5 seconds,
thus exiting the parameter setting procedure. All the modifi cations made to the parameters, temporarily
stored in the RAM, can be cancelled and “normal operation” resumed by not pressing any button for
60 seconds, thus allowing the parameter setting session to expire due to timeout. Important: if the
programming session ends by timeout, the clock parameters will not be reset, as these parameters are
saved immediately when entered.
If the instrument is switched off before pressing prg, all the modifi cations made to the parameters and
temporarily saved will be lost.
4.3 Classifi cation of the parameters
The parameters, as well as being divided by TYPE, are also grouped into logical CATEGORIES identifi ed
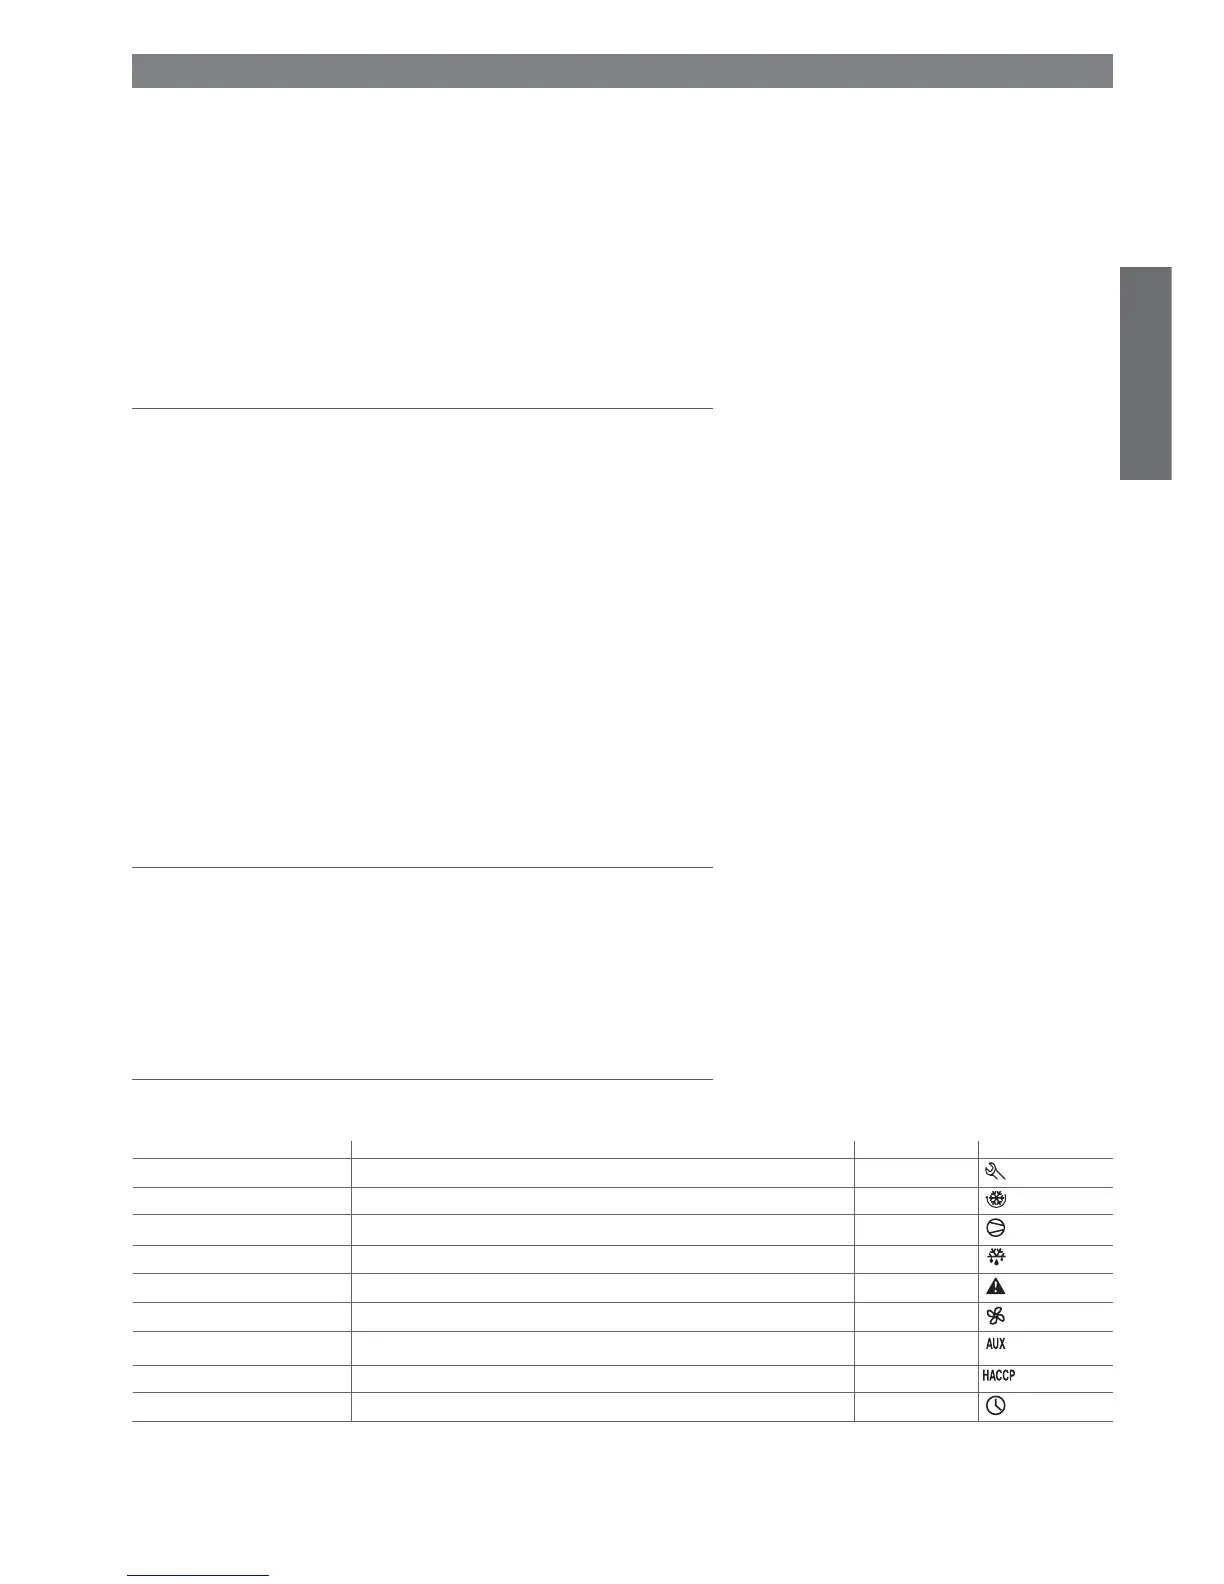
by the initial letters or symbols. The following table lists the categories and the corresponding letters.
Parameters Category Text Icon
/ Temperature probe management parameters Pro
r Temperature control parameters CtL
c Compressor safety time and activation parameters CMP
d Defrost management parameters dEF
A Alarm management parameters ALM
F Fan management parameters Fan
H confi guration General confi guration parameters (addresses, enabling, etc.…) CnF
H haccp HACCP parameters HcP
rtc RTC parameters rtc
Tab. 4.a
4. PROGRAMMING THE INSTRUMENTS