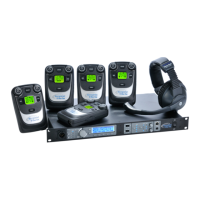
75 Tempest®2400 2-Channel Wireless Intercom System
No audio passing when not using an external hard wired intercom system and Tempest BaseStaons are
sharing intercom channels.
• Conrm that no wired intercoms are connected to the system.
• Conrm a 3-pin XLR cable connecon for each channel to be shared, between each of the BaseStaons.
• Set the BaseStaon 2-Wire Intercom Type Select Switch to the Clear-Com posion.
• Select 2-Wire for the relevant channels. Set only one of the Tempest BaseStaons to Master Mode.
No audio passing when using an external hard wired intercom system and Tempest BaseStaons are
sharing intercom channels.
• Conrm a 3-pin XLR cable connecon for each channel to be shared, between each of the BaseStaons.
• Set the BaseStaon 2-Wire Intercom Type Select Switch to the appropriate posion.
• Select 2-Wire for the relevant channels.
• For each channel to be shared, connect the wired intercom to one of the BaseStaons.
Audio can only be passed from one BaseStaon to another in the “Clear-Com mode”
unless actually connected to to another type of wired intercom system. Connecng
any wired intercom to any BaseStaon will automacally disable Master Mode and
disconnect all shared channels that do not have a wired intercom connected.
When connecng any shared BaseStaons to any wired intercom system, only
channels connected to the wired system can be shared.

 Loading...